Tuesday, January 30, 2024

Modern Potholder Group Quilt

Back in October 2023, I first heard the term "potholder quilt" when I saw someone on Instagram who was making such a quilt. Are you familiar with a potholder quilt? 

I definitely was not, so I did what all curious quilters do - I searched on Google.

This 2019 potholder quilt blog tutorial by Wendy Caton Reed, The Constant Quilter (also on Instagram here), provided good information. I learned that basically you make quilt-as-you-go blocks that are bound and then hand-sewn together, in the manner of English paper piecing. 

It got me to thinking... Have I ever seen a modern quilt made this way? 

Definitely not.

What might a potholder quilt made by a group of modern makers look like? 

Since I've always enjoyed being invited to participate in a group quilt, and I like planning the details to make a group quilt, I decided to organize and make a Modern Potholder Group Quilt.

1) First, I selected a color palette of Painter's Palette solids by Paintbrush Studios. A shop called KC Maker Studio, in Kansas City (where Paintbrush Studios is headquartered) stocks all the colors.  
Top to bottom colors are: Pewter, Banana, Sulphur, Aruba, Bright Aqua, and Agave

2) I made samples of two blocks in two sizes. One block is improv-pieced.

Then, both blocks are layered and hand-quilted with white thread, either size 8 perle cotton, embroidery floss, or Sashiko thread.

I've asked makers to not bind their blocks. That's because my plan is to choose binding colors that will enhance the overall design. 
Bound blocks made by me

3) After working out what the blocks would be, I wrote instructions, and set an April deadline.

4) In late December 2023 I emailed instructions to 15 modern-makers, selected because they piece improvisationally, and big stitch hand quilt. 

I've already received a set of blocks from Betty.
Made by Betty

And another set of blocks made by JoElla.
Made by JoElla

I anticipate being given more blocks from long-distance quilters who will attend QuiltCon. 

A lot more work is ahead - though it's "work" I love! When I have all the blocks, I'll:
  1. create an arrangement
  2. sew binding to each block
  3. hand-stitch to join blocks
  4. and enter our finished group quilt in QuiltCon 2025, in Phoenix, Arizona.
A project like this needed long-term planning, and I'm up for what lies ahead. Watch this space for updates! Linda

Friday, January 26, 2024

15th Blog-iversary!

It was 15 years ago today, January 26, 2009 that I wrote my first blog post.

And today is Australia Day! Even though it's been a decade since I last visited Australia, the country (particularly Sydney) will always have a special place in my heart. Pavlova, a lovely meringue dessert, will forever make me think of Australia. 

In the past 15 years I've published 1,277 blog posts; this post is number 1,278. That's an average of 85 blog posts a year, or 1½ blog posts a week. 
14,583 comments have been published and - if I were to guess - I've responded to 99.9% of them. Even if a commentor has been "noreply" or "anonymous" or "unknown," I respond to each ON that blog post. 

A few other statistics fascinate me.

Like how many times my blog has been viewed - 2,567,917 times! Wow! Who are all these people?! Are they quilters?

Apparently my most-viewed blog posts are about peg-loom weaving, which I explored during the pandemic. 

If I was truly celebrating properly, I'd host a giveaway, which I frequently did (as did other bloggers) for many years. However, knowing that I have as many international blog-readers as US blog-readers, the high cost of international shipping has me reluctant to give away something that could very well be less expensive (like fabric) than shipping costs. Call me cheap; call me frugal, but it just doesn't seem right.

If you're reading this, thank you! I appreciate blog-readers, and even more, I adore blog-commenters.I'm grateful that you sometimes hang out with me here, and let me know what you think.

I'm even more thankful that many of you have become friends through your comments and our emails back and forth. I can't imagine how different my life would be without you being part of it. 

Happy blog-iverary! Fifteen years, and more to come!

Hugs, Linda

Thursday, January 25, 2024

Prudence and More

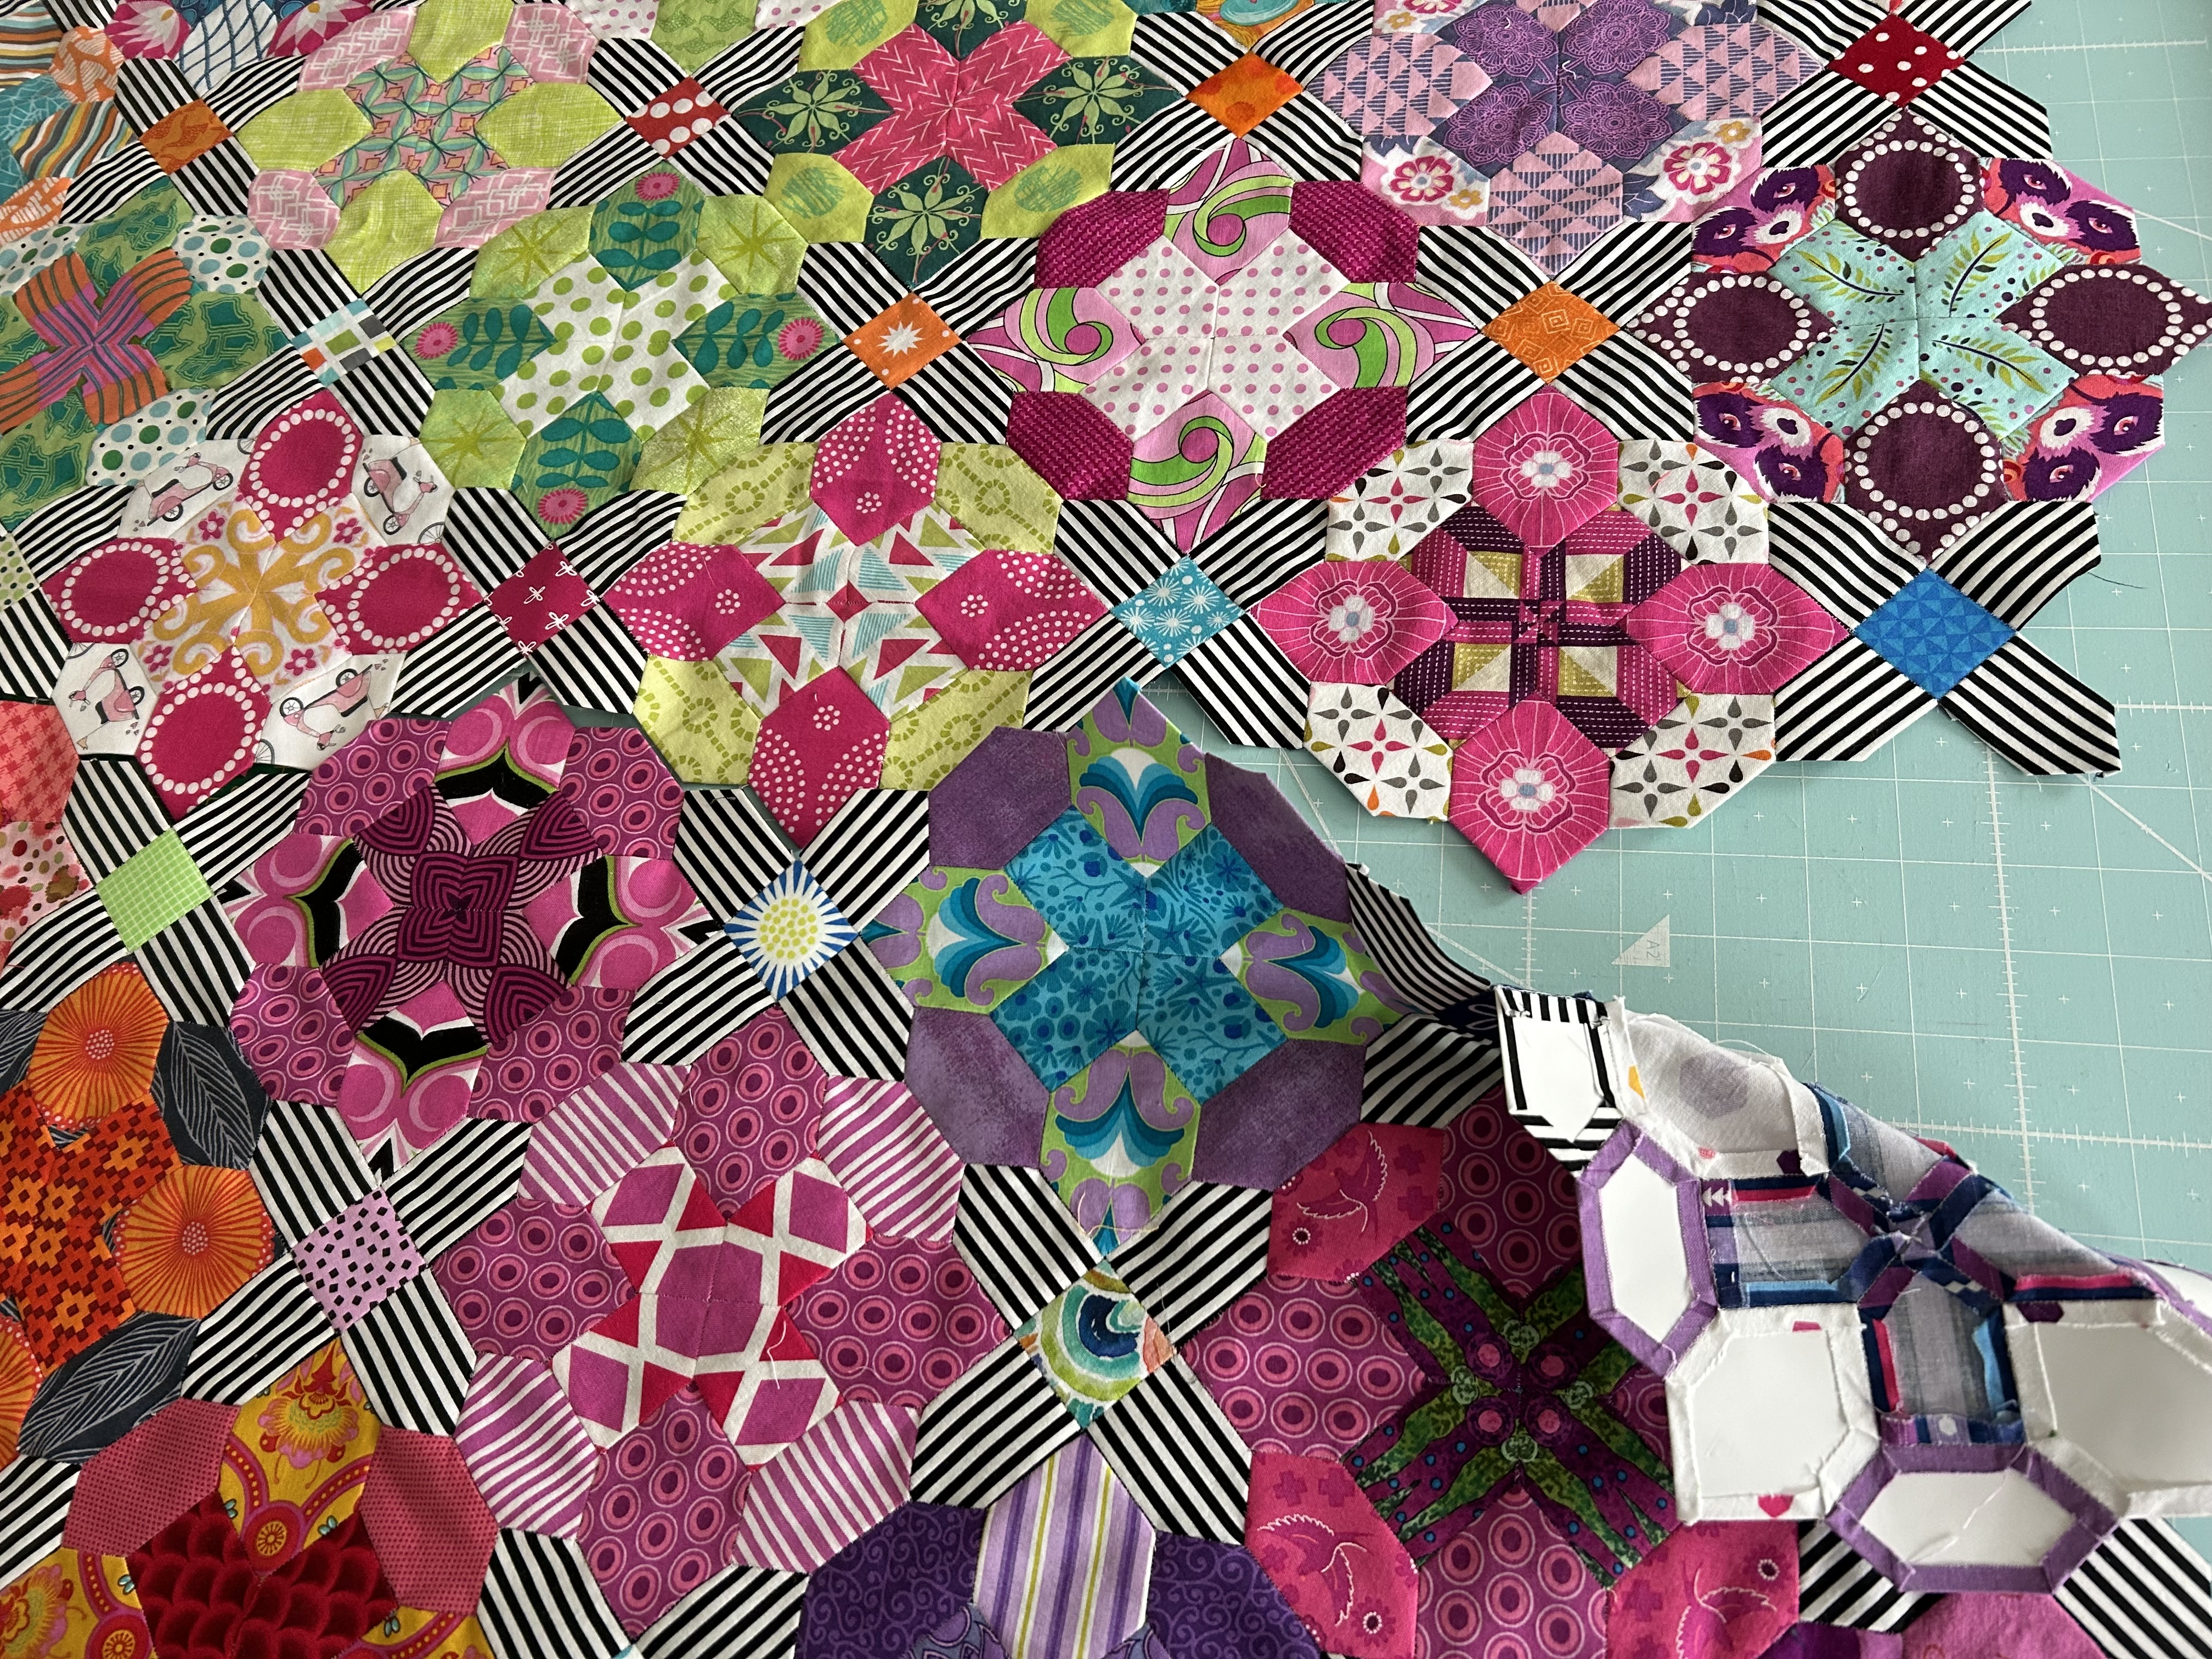
A milestone happened Tuesday. While stitching-away during Big Cypress Quilters' business meeting, I finished the Prudence quilt center, my long-term (since June 2019) English paper piecing project. It measures 51" X 51".

Rather than EPP more blocks to fill in scallops around the perimeter (to make the quilt borderless), I've decided to border it. I've been auditioning what I might use. Black seems to best contrast with the quilt center, though I'm not much of a black fabric-lover. I'd prefer to use a different color, but black sure makes it pop!

Another idea I came up with is to piece two fabrics to make a combo border of black and a wider black and white stripe, to contrast with the narrower stripe in the cross blocks. Thoughts? When I've settled on what I want to do, I'll hand-appliqué the EPP edges to borders.
 

Last Saturday's virtual "Map Making" workshop with Timna Tarr @timnatarr was great! I'd been thinking that sometime I wanted to try making a map quilt, and this workshop was the perfect opportunity. 

For privacy sake, I'm intentionally not sharing the map I used, but my locale was inspiration. Wanting to make a quilt larger than the 8" X 8" design suggested by Timna, I learned a new-to-me way to enlarge a design. 

I took a picture of the map, and uploaded the photo to a website called www.blockposter.com where it was resized. Then, almost immediately I downloaded the upsized-photo, and printed it - 9 pages! I taped it together, and selected and outlined the section I wanted to use in my quilt. In fabric, I interpreted it entirely with prints.

After fusing large sections of fabric to a backing, I made quarter-inch bias tape "roads" that I glued into place. The unsewn quilt top is layered on batting and a backing that's a 2005 Lorilee print. This seemed like a good representation of us Florida senior girls.
😀 

Using either 50-weight Aurifil or 100-weight Invisifil by Wonderfil, I free motion quilted. Neighborhoods have angular quilting, to sorta represent houses; ponds are spiral quilted; and green spaces are "topography-quilted." Some roads are indicated with quarter-inch bias tape, made with a Clover bias tape-maker, and then edge-stitched into place.

I faced the 19½" H" X 24½" W" piece, and Wonder-clipped, ready for hand-stitching to the back. 

Book Recommendations
Do Not Disturb
 by Frieda McFadden is a psychological thriller that begins with a murder. Quinn has done the unthinkable, but only in self-defense. She has marks on her neck to prove it. But she knows that no one will believe that her handsome, charismatic, charming, successful husband could have done that to her. She runs.

However, a winter snowstorm impedes her progress. That, and a broken tail light force her to look for an out-of-the-way place to stop. She finds the Baxter Motel and learns she's one of only two occupants. The other is an elderly woman, once a fortune teller. Quinn discovers the dark past of the motel, and the significance of the "do not disturb" sign on the door of the room next to hers. As much as she wants to leave, the weather, and other sinister forces conspire to prevent it. 

Linda's score: 4.1/5.0

Typically I don't sequentially read books by the same author, however, I was on a waitlist for The CoWorker, also written by Frieda McFadden and didn't want to let it pass me by. 

Natalie is the top-sales agent at Vixed, a nutritional supplement company. Dawn Schiff is a new employee who's filling the accountant position vacated by a retiree. 
Natalie is out-going, confident and beautiful. Dawn is rigid, fastidious, friendless, and awkward (think Sheldon Cooper of The Big Bang Theory). 

When Dawn doesn't show up for work, no one except Natalie notices. It's not like Dawn to not be in her cubicle at 8:45 am sharp, but Natalie seems to be the only person who has attempted to befriend Dawn. She takes it upon herself to find Dawn and goes to her house. Natalie sees that it neat. Orderly. And jam-packed with bookshelves full of books and turtle figures - Dawn is obsessed with turtles. And there's lots of blood. 

As detectives investigate Dawn's disappearance, and later find a body, Natalie receives anonymous phone calls that have her more involved than she wants to be. 

Ms. McFadden is the perfect example of an author who's a master at creating a  last-moment, unexpected twist. I liked this one too!
Linda's score: 4.2/5.0

29 Seconds
 by T. M. Logan is a "what if?" sort of book. What if you didn't like someone? What if that someone was making your life miserable? What if you were given 72 hours to decide whether or not to make that person disappear - forever? If there was no going back, could you make that 29 second phone call?

Sarah is a contract professor in a prestigious department of a London university. Her husband has left her for a younger woman, but she's trying to maintain normalcy - working and taking care of her two children. 

While running late to pick up her children from school, Sarah takes a shortcut, and witnesses what appears to be a kidnapping. She intervenes by driving into the abductor. Later, Sarah herself is abducted only to learn that her abductor is the father of the girl Sarah saved. He wants to repay her but she has only 72 hour in which to make her decision.

This is a good one... and didn't see the end coming! Linda's score: 4.3/5.0

Whew! Three psychological thrillers in a row is a bit much for me. Time to switch genres. 

Friday, January 19, 2024

Movin' Slowly

I don't know if it's from the colder temperatures here in Central Florida (37F Wednesday morning), or the fact that we haven't yet turned on our furnace so I'm wearing more clothes than usual, but I haven't had a lot of urge to do. Yet I'm plodding away on a couple things. 

One side of the improv quilt now has those "tentacles" pieced into it. I can't say it was either easy nor fun to put them all together. That's also why I haven't made more progress.

It's been a much easier to sit in my favorite aqua chair, and listen to a book or watch Suits while I EPP toward a finish on my Prudence quilt. Such progress there! Most papers have been removed.

It will take only one more trip across the quilt center to join the last two sections. Then it's a quilt center!

Next comes choosing fabric for a background, and then hand appliquéing each side of the EPP quilt center to that background. The pattern says the quilt will finish at 65" X 65", but that depends on the width of the border I choose to add.

In Other News
An Instagrammer tagged me after finishing her 2023 temperature quilt top. Claire @claire.hall.9634340 lives in the UK, and said she saw my temperature quilt on my blog here, and using Wrights Quarter Circle Block Template she made her quilt similar to mine. Those cooler colors look great, don't they? 
Needing a few more filler blocks to complete the quilt top, Claire even made color key blocks (on the far right) as I did with mine. Thanks, Claire, for letting me share this picture of your beautiful quilt top! 

If you're inclined to make your own temperature quilt, and you're a member of the Modern Quilt Guild, you can watch a webinar about it - The Highs and Lows of Temperature Quilts. It's presented with lots of pictures in a panel format by Jo Avery, Karen Foster, and me. 

Book Recommendations
Hemlock by Kiersten Modglin is about Maggie who has just bought her dream home at 40 Hemlock Drive, in her old hometown. Though the house doesn't look like much - it needs lots of TLC - she's happy about a new beginning since losing her job and breaking-up with long-time boyfriend, Nick.

Just as Maggie is trying to unlock the front door, a man steps onto her porch to offer help. She's shocked to see Tucker again after 13 years, and even more surprised to learn he lives next door. She's also maintaining a distant relationship with her lifelong friend, Clayton, even though he's broken her heart. 

Mysterious occurrences happen in Maggie's house - lights flickering, doors open - and she begins to wonder about the history of the house. She doesn't want to be alone, and she doesn't believe in ghosts. 

Though I liked the story, and some of it was unexpected, the plot moved at a slow pace until the last third of the book. By then I had figured out who-done-it. Still, the storyline is different than I've encountered before.

Linda's score: 3.9/4.0

Saturday, January 13, 2024

Working on WIPs

The past week found me picking up a few WIPs.

First was piecing more Diamond in the Sky 3½" X 3½" foundation paper pieced blocks. This was one of the free FPP blocks in Cassandra Beaver's 2023 Quilt Concert series.

I printed a stack of this design onto freezer paper, and now I've got about 40 blocks pieced. Each one has a scrappy center with a solid or solid-looking background.

As you can see in the bottom row, I tried putting a few blocks together using 1½" X 1½" patches from my leaders-enders basket. 

Ick. Not happy with how they look. Much too busy! I'll try alternating a Diamond in the Sky block with a single 3½" X 3½" patch - a print? a solid? I'll keep experimenting. 

I've gotten hooked on Suits on Netflix. As I watch I've been EPPing my Prudence Quilt. This is the pattern, templates, and papers that were an Instagram giveaway win in June 2019 - yep, almost five years ago! - from Lilabelle Lane Creations. I used stashed fabrics to make medallions, fussy-cutting many of them.

These seven rows are joined...

...and papers have been removed, except for those around the perimeter. Progress! 

I have four more rows to join to the seven, and the quilt center will be done. 

Lastly, I've been working on my latest improv quilt, one that was started in a December 6 "Fearless Curved Piecing" workshop with Cindy Grisdella. She invited us to experiment as we wished, so rather than make square blocks in a symmetrical layout, I cut and pieced curves into rectangles. Sort of. As I ran out of fabric colors, the design morphed.

Except for the littlest bits, I've used up all the colors except Painter's Palette Oyster, and Kona Crush, the latter of which was gifted to me by Candi @candipursuits. As you can see, I'm trying to work out how to use the last pieces of Crush to pull color into the outside perimeter. 

A friend suggested that I maintain the piecing in the center, and join various hues and values of Oyster into a low volume background. With that in mind, I've been "making fabric" with offcuts and scraps.

I'll try to cut and piece the dashed "tentacles" into an improv border - a technical piecing challenge that I hope I can work out! I'm even dreaming about how to do it!

I have to say that these past couple weeks have been pleasant with no challenges or specific must-do projects to work on. Choosing to play with whatever I wish - with an eye on WIPs - I expect to see a few of these finished in 2024. 

Book Recommendations
The Girl in the Picture by Melissa Wiesner is the story of Tegan, a young woman who's alone. She and her brother have shared a tough life, but now she's left him behind to go on a long-planned-for trip to find the perfect small town where the two of them can put down roots and belong to a community. 

But Tegan's journey hits a rough patch when she encounters problems with her vehicle, and deals with a lecherous truck driver. When she's in a diner reassessing her situation, she meets a man who's unable to pay his restaurant tab. She steps in to help, and then finds herself on the road again, with Jack. He's obviously well-off, but very close-mouthed. Tegan tries to learn more about him, but his gruffness is off-putting. Nor does she want to share anything about herself. 

Their trip begins out of desperation, but the more they get to know one another, the more they find in common, and that their feelings are changing. The problem is that they come from disparate backgrounds, and each of them have personal situations they need to face

This story is sweet enough, but I think I could have written it. Think "Hallmark movie," and you've got the picture. Linda's score: 3.8/5.0

Taking place in 1813 along the rocky Southwest coast of England, A Castaway in Cornwall by Julie Klassen follows the life of Laura Callaway. Because ships frequently wreck in the area, she often walks the seashore looking for treasures the tide brings in. 

One night, a ship is dashed to pieces in front of a crowd. They watch, helpless, as nearly everyone drowns. Laura rushes to help a man on the beach who has been given up for dead. With the help of her neighbor, and a new doctor in the area, she brings the man back to health. He tells Laura he's Alexander Lucas, however when word goes around that two escaped French prisoners were on board the ship, and are missing, Laura is drawn into Alexander's confidences. He's Captain Alexander Carnell and wants to escape before he brings unwanted attention to Laura and her family. Laura comes to recognize that she too wants to get away, though for different reasons. 

I like historical fiction that's based on a particular locale. Such is the case with A Castaway in Cornwall. The epigraph of each chapter is a bit of historical information - a newspaper quote or fact - relevant to the story. Ms. Klassen gives Laura and Alexander faith too, so Scripture and prayers are woven into the story. 

As I listened to names of villages and sites, I paused the book to look them up on Google Maps. I learned so much, and appreciate what that part of England is like. The church at St. Enoduc in Trebethwith was especially interesting - a church that through decades was literally buried in sand (has now been restored). The author's note includes information about her Cornwall research during the pandemic, and what parts are real (Tom Parson was a real wrecker). I thoroughly enjoyed learning about French prisoners in Britain, shipwrecks, the geography of Cornwall, and a little about the channel island of Jersey, a British Crown Dependency. This was a good one!

Linda's score: 4.3/5.0

Linda

Wednesday, January 10, 2024

Confetti Pouch Exterior Tutorial

Recently I watched a sped-up Instagram reel showing (no verbal explaination) an unusual way to make the exterior of a pouch.

I'm not claiming this concept as my own, but after making several pouches, I've learned a few things that I'm sharing here. Let's make a Confetti Pouch Exterior!

I suggest reading through the entire tutorial, as I've suggested two different methods for putting together the sandwich, and for quilting it. You can choose which is best for you.

Supplies Needed for a Confetti Zipper Pouch
  • Fabric snippets - all the tiny offcuts from block-trimming, squaring-up, and such, that otherwise is dropped into a bag of bits to later use for stuffing a pet bed
    • I specifically sorted through scraps to select snippets that made pretty color combos, making sure that black and white stripes, and/or black and white prints were among the snippets
    • I suggest choosing your zipper tape print or color first. Then choose fabric snippets to color-coordinate with the zipper
    • I do not recommend using thread snippets - they sneak out of the tiny holes of the netting
  • 10½" X 13½" foundation fabric such as muslin, or an old sheet
  • 11" X 14" white netting or mesh or tulle
    • Per a comment received on this post, do not use tulle because it can rip
    • netting and mesh are inexpensive at JoAnn's
    • Consider using a netting color other than white. It may better suit your fabric snippets
    • bridal veil is also an option, though slightly more expensive
  • 11" X 14" fusible interfacing - I like Pellon SF101, but fusible fleece works too
  • lining fabric - Cut 2 pieces 6½" X 10"
  • zipper tabs - Cut 2 pieces 2" X 2" 
  • 12" zipper - I used black and white striped zipper tape purchased from Sew Hungry Hippie, though many other fun options are available!
  • Thread - choose your favorite thread for quilting. It can be 50-weight or 40-weight; and whatever color matches the netting or compliments fabric snippets
  • Sewing machine with a walking foot
Inexpensive netting from JoAnn's
With a 50%n off coupon, I paid .99-cents for a 22"-wide, ½ yard piece! (Oct. 2023) 

Optional - Misty Fuse - A 10½" X 13½" piece can be used to fuse confetti fabric in place before quilting.
Lay 10½" X 13½" Misty Fuse on top of 10½" X 13½" foundation fabric

IMPORTANT NOTE: If you are not using Misty Fuse to secure fabric snippets, it's critical to have a large flat sewing machine bed to support your piece as you quilt. It will not work to use only the free arm of a sewing machine. 

The most fun part!

1. Lay the 10½" X 13½" foundation fabric on a flat surface near your sewing machine.
  • If you don't have a flat surface near your machine, consider placing the foundation on a large acrylic ruler, or a small rotary cutting mat
  • Misty Fuse Users: Do NOT use a ruler or rotary cutting mat! Instead, place your foundation on an ironing board. Lay Misty Fuse on top of the foundation fabric.
2. Sprinkle fabric snippets on the foundation, distributing them liberally and evenly across the 10½" X 13½" foundation fabric until you're satisfied with the arrangement
  • Being particular, I use sewing machine tweezers to move pieces around, and turn them right-side up
  • Misty Fuse Users: When you're satisfied with the arrangement, place an appliqué pressing sheet, or a piece of parchment paper over the confetti fabric. Press and fuse confetti pieces to the foundation
Fuse Misty Fuse: lay an appliqué pressing sheet or parchment paper on top, before pressing
.
3. Carefully position 11" X 14" netting over the snippet foundation. While keeping the netting smooth,  straight pin the perimeter of the foundation. No need to pin if you're a Misty Fuse User.

4. Draw a 10½" at the center of the 13½" side of the confetti sandwich (6¾" from each end)
  • I marked with a Clover white Chaco Liner on the line shown in black


5. Gently move the sandwich to your sewing machine bed 

6. Set your sewing machine stitch length to 3.0 or higher (3.10 to 3.15 on my Bernina 770QE). Or set your machine for a Serpentine stitch (Photo further down, shown in pink.)
  • Use a walking foot  to quilt through the marked line. Then, with the side of the walking foot as a guide, continue quilting at ½" intervals until 13½" is quilted

As I quilt, I use my sewing machine tweezers to make sure each snippet is flat and in a good position. 

  • Turn the confetti quilt sandwich and mark a line at the center of the 10½" side 
  • Quilt at ½" intervals until 10½" is covered

Quilting will look like this. 

Or, if you've used a Serpetine stitch, quilting will look like this.

6. When quilting is complete, fuse 11" X 14" SF101 interfacing or fusible fleece to the back of the quilted confetti sandwich. 

7. Trim the piece to 10" X 13"

8. Cut the quilted piece in half on the 13" side (6½" from each end), to make two pieces 6½" X 10". 

Now you're ready to turn your Confetti Pouch Exterior into a finished pouch.

Sunday, January 7, 2024

Small Things

Time spent in the sewing room this week has been leisurely and therapeutic. It's been worthwhile to take time and assess the six... seven... eight WIPs lying about, and ask myself, "Which one do you want to play with?" and "Which one should be my first 2024 finish?" 

Looking at the 19 yards of fabric twine I made in December, I wondered how much I would use to make a small bowl. Since I've never made a rope bowl, this was new territory for me. Happily, it was an easy thing to sew. Just zig-zag stitch. I used gray thread.


It took eight yards of twine (twisted from 2" fabric strips) to make, so from the 19 yards I twined in December, I have leftover for another project.

Last September, after watching a sped-up Instagram reel about using scrap bag snippets to make a pouch, I made this. I call it a Confetti Zipper Pouch. 

You sprinkle tiny fabric scraps - confetti - onto a background, cover it with inexpensive bridal veil...

quilt it...

and sew it into a pouch. 

This week I made a couple more with boxy bottoms.


In this up-close picture, you can see that after straight-line quilting the piece on the right, the next one (on the left) I quilted with a serpentine stitch. I like them both. 

I think the secret to making these look good is using bits of black and white prints alongside the black and white striped zipper tape yardage from Sew Hungry Hippie.

LinkWithin

Related Posts Widget for Blogs by LinkWithin