Wednesday, March 28, 2018

March Wrap-Up

When we travel to/from Kansas City, which is about 18 hours each way, I always take along handwork. In between helping navigate around traffic slowdowns in Atlanta, Chattanooga, and Nashville, handwork is what occupies my hands and makes me feel productive.

It turns out that for our March trip to KC I didn't plan very well. I thought I'd grabbed plenty of English paper-pieced medallions (for my LindaNova/TulaNova quilt) for many happy hours of hand stitching. But in fact, I'd picked up enough fabric and papers for only three medallions - stitched during the first day of riding in the car. The rest of the clipped-together bundles of fabrics were missing papers... I had left at home.

😤😩 I was so upset with myself, and horrified at the thought of having nothing to do all the way home!

So while in KC, I bought a pattern, crochet hook, and yarn to make a teddy bear. But still, it didn't go as planned. I should have read the instructions in advance, as the bear needed to be stuffed as I went along. I didn't have stuffing. So, I crocheted the head until stuffing was called for. Then I crocheted an arm, until stuffing was called for. The I crocheted the foot... you get the picture. Since returning home I've bought stuffing, but the bear hasn't made much progress. 

The first thing I worked on last weekend was a mini quilt - my entry in Curated Quilts Triangle Mini Challenge. The quilt must be square; no larger than 16" X 16"; and use some of these colors in solids or prints. I emailed to ask if a neutral could be added, and received a "yes."

Though I'm not a "pink person," pink/rose was the only color with three values that I could work with given my continued interest in the effect of transparency. I tried to make two large triangles look like they overlap.
Triangle Mini Challenge, 15" X 15"
I quilted on my Bernina Aurora 440QE, as I prefer the walking foot on it to the walking foot on my Janome 1600P. 

The picture of my mini has been uploaded to the Curated Quilts website to meet their April 1 deadline. By April 30 I should learn if the quilt has been accepted into the magazine. 

Having now made four quilts this year, I was behind on label-making. My favorite way to make a label is to design it on my computer (on a Macbook, I use Pages software) - in this case I designed four labels for one 8-1/2" X 11" page of paper - print on paper to proofread and the check for errors, and then print on Printed Treasures. I've found that the texture of Printed Treasures is difficult to hand-sew through, so I border each label with fabric. 

Yes, I like to put a lot of information on my labels, and add a picture where it's appropriate. These were hand-sewn to the back of each quilt during the monthly business meeting of Big Cypress Quilters.

If you voted for my "Tiffany Lights" fabric bundle in PBStudios' Mad for Solids challenge, thank you! Though my bundle won in the first round - and I appreciate everyones' votes -  I'm pretty sure it didn't win in the second round which ended Monday evening. Mine competed against a lovely color combination of blues and greens called "Heirloom Opal" put together by ShelleyBrooksQuilts.

In any case, every quilter who competed has been invited to use her bundle of Painter's Palette Solids to make a quilt. Since I'm still swooning over all the many ways that wedges can be used to make a quilt - according to Christina Camelli's (AFewScraps) book "Wedge Quilt Workshop" - I wanted to play more. 

I used a Mini Quick Curve ruler to insert unexpected arcs of color into some of the wedges. Those flower-head pins have A, B, C, D, E, written in Sharpie on the heads, so I can keep track of the sizes of each wedge. It's still a work in progress and I'm not exactly sure where it's going, but I know I love the riot of color. 

Updating you on our boy Hogan... he continues to do well at 14 years and 5 months old. He's still crazy for green beans and eats about four pounds-worth a week!

I had to take this picture of him while we were in Kansas City... sleeping in the bed belonging to Milson, a nine-pound teacup poodle. Hogan thought he fit!

Here at home, we've had absolutely glorious weather, so it's been nice for him to feel like he's outdoors, laying in front of the front screen door.

It's Holy Week, and I'm singing! I joined the choir at the church we've been attending, Amazing Grace Lutheran. Though I've always been an alto, because all eight women in the choir (13 singers in total) are altos, several of us have been assigned soprano. That's quite a stretch - literally - for me. In one song, the highest note is F# in the octave above middle C! Eek. However, it's all about praising the Lord, right? We'll sing at services on Maundy Thursday, Good Friday, and Easter.

Have a blessed Easter. Hosanna! He is Risen! Linda

Thursday, March 22, 2018

Blue and Green Turtles

First, thank you to all of you who entered my book giveaway: "Modern Plus Sign Quilts." I enjoyed reading your comments - and compliments! When I chose winning comment #38, using random number generator, I discovered that the commenter had not left a way for me to reach her. Generating a second number, #28, I contacted a very happy Mandy. She lives in Iowa, and we discovered some mutual cities of residence. Small world. She's thrilled to receive the book, and is already planning a quilt for her daughter! 

Second, I'd like to say thank you for your support during round 1 of the Mad for Solids competitive voting. My Painter's Palette fabric bundle - Tiffany Lights - won! (Read more about it here.)

Thank you for voting on the InspiredbyFabric blog, Instagram, and Facebook!

Tiffany Lights will again compete in round 9 on March 26 beginning at 6 pm through 6 pm March 27 (one vote per person/per medium). I don't yet know which fabric bundle is opposite mine, though I'd love your support. The Mad for Solids winner will design a quilt made from the fabrics in her bundle.

When we reach the final round on April 1, your votes on InspiredbyFabric blogInstagram, and Facebook enter you in several giveaways of fat quarter bundles, so don't miss that! 

All this excitement happened while I was away from home! Dan, Hogan, and I traveled by car - 18 hours each way - to Kansas City to spend spring break with our daughter and her family. Not only were the kids out of school, but our granddaughter was home from Colorado State. I saw my dad three times, and both my siblings and their spouses, so it was a nice visiting time. I also celebrated a birthday with them. The only negative: not nice weather - gray and gloomy. Oh, how I prefer the (mostly) sunshine, and temperatures in Florida!

Anticipating our trip, I decided to "whip up" a couple gifties for the boys. These turtles are made according to the large size of this Shell Shelter pattern by Java House Quilts.

In this picture I had all the parts and pieces made, only needing to join them all together. The head and eyes were stuffed with cotton fiberfill.

I chose the colors, blue and green, because our daughter assigned these colors to her boys when they were little. Being 13 months apart in age, color-coding each boy helped others who thought they were twins!

Instead of sewing buttons for eyes, I used 1 mm sequins. 


What makes each turtle special is the zippered storage area in the belly.

Adhering to my self-imposed plan to sew only from my stash, where the pattern called for "decorator weight fabric," I cut up Dan's old blue jeans and used the legs to piece the bellies of both turtles. The orange interior wouldn't have been my first choice, but that orange print was the appropriate decorator-weight lining fabric.

Both boys loved their turtles! Aesa immediately stuffed his with his favorite toys, including a stuffed shark! Hmmm. A little irony? Aesa named his turtle Shelly.

Tay named his turtle George, and was very impressed that Bapa's jeans were used for George's belly.


A few more turtle-making days are in my sewing future. After all, I have four grandsons! 😊 Linda

Sunday, March 18, 2018

Birthday and Tiffany Lights

I'm a little embarrassed to make a big deal about my own birthday. I wouldn't normally do this, but I have two reasons to celebrate today.

Reason Number 1
I'm proud to be 65 years old. Wrinkles, gray hairs, and all. This past week I reached five years as a breast cancer survivor. No one can belittle the significance of that! And claiming Medicare benefits is a bonus.

Reason Number 2
I'm a contestant in Painter's Palette Solids: Mad for Solids "Sweet Sixteen" that launches today! 

Sixteen of us were invited to curate a bundle of eight Painter's Palette Solids.

Colors for my fabric bundle were inspired by this photo, taken at the Charles Hosmer Morse Museum in Winter Park, Florida. (My Australian friend Di, and I visited a year ago.) It's where a huge collection of Louis Comfort Tiffany stained glass and art is displayed.

Based on these colors, my fabric bundle is called "Tiffany Lights."
(Credit: The Charles Hosmer Morse Museum, Winter Park, Florida; Pair of color wheels; c. 190410 Fountain, reception hall, Laurelton Hall Lead, brass, glass (U-102:1, 2)
The interlocking stained glass color wheels were actually hidden at the base of a fountain. They turned, diffusing colors through a pool located on the grounds of Mr. Tiffany's home, Laurelton Hall.

Tiffany Lights

Of the 168 solid colors in the Painter's Palette Solids collection these are the eight I chose for Tiffany Lights. (Top to bottom) Dewberry, Aquarius, Beryl, Maize, Poppy Red, Daredevil, Island, and Paradise.
Tiffany Lights
If you like this combo, I'd love your vote for Tiffany Lights. Remember: It's my birthday! 😁

Your vote for my bundle on InstagramFacebook, and Inspired by Fabric (one vote per medium per day, please) will advance me toward the final. 


Voting runs Sunday, March 18 through Monday, April 1

Another Reason to Vote (besides it being my birthday!)

To win fabric! 
Painter's Palette Solids/Paintbrush Studios will randomly select four winners from the championship game voting to receive fat quarter bundles of the winning palette. Help your favorite palette advance all the way to the championship game!

First bracket voting begins at 6 p.m. today
and continues for the next 24 hours

Vote Here - One vote per medium per day 


Thank you for your birthday present! 💝 Linda

Thursday, March 15, 2018

Charming Postage Plus

Hi there! If you're visiting my blog today because of Cheryl (MeadowMistDesigns) and Paige's (QuiltedBlooms) blog hop, then thank you for stopping by! And to my long-time blog-reader/followers, thank you too! I'm always grateful for your comments.

Today's post is all about this new book, and the quilt I made after being invited to participate in the authors' blog hop.
Photo courtesy of C+T Publishing
Modern Plus Sign Quilts is written by Cheryl Brickey (MeadowMistDesigns) and Paige Alexander (QuiltedBlooms). Though I haven't met either of them in person, I feel that I know them both. Paige has become a special friend since we have followed each other's blogs for more than a year. All it takes is commenting a time or two, and suddenly you're swapping emails and chatting like old pals. Isn't that the best part of blogging? Commenting on blog posts, and receiving conversational replies?

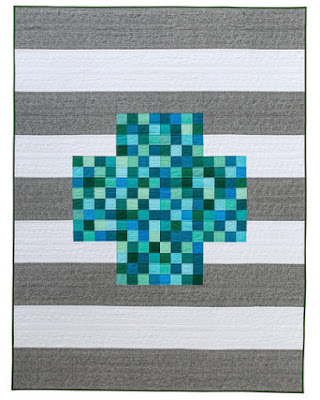
The quilt I chose to make from their book is "Postage Plus." The plus part can be made with jelly roll strips.
Postage Plus photo courtesy of C + T Publications
Postage Plus photo courtesy of C+T Publications
Below is my quilt, photographed here in The Villages, Florida with the help of my good friend, Becky. We had fun taking pictures of several quilts.
Charming Postage Plus, 54" X 72"
I named my quilt "Charming Postage Plus" because I used 192 different 2-1/2" (unfinished) prints to make the plus part. It's probably no surprise to anyone who knows me that I pulled all these cut squares pieces from a bin of 2-1/2" X 2-1/2" prints that I've been accumulating for several years. 

When piecing the plus part, I used a Strip Stick to help press open each seam. The curve of the stick hyperextends the seam allowance so there's no chance of accidentally pressing a tuck.

I used my favorite homemade basting spray to make the quilt sandwich which is assembled with Quilter's Dream 100 percent poly batting. While I love the poly batting (it's so soft!), I learned that homemade spray doesn't adhere well to polyester. Still, I'll keep making and using the spray when I'm sandwiching with cotton batting.

I happily did most of the quilting during the Olympics, watching nearly all the curling competitions. Curling is such a fascinating sport. We were more than thrilled when the US men's team won gold!

Quilting was done on my Bernina Aurora QE440 with Sulky "invisible" nylon thread on top, and Aurifil 50-weight in the bobbin. I first used a walking foot to straight-line quilt the plus area on the diagonal. Then, continuing to use the walking foot, I established several sections in the background areas. Curves were also quilted with a walking foot. The rest of the sections were fill in with free motion quilting.


I enjoyed quilting this combo of swirls and bubbles.


Finishing the quilt meant using my favorite binding technique: No Tails Binding: Mitered Corners by Machine. This method lets me to change binding colors at the corners. The top and bottom are bound with Kona Turquoise, and the sides are bound with Painter's Palette Aluminum.

To bind a quilt like this, you'll find my blog tutorial here. Or, if you're a member of the Modern Quilt Guild, you can watch my 2016 webinar here.

It's always satisfying to relax with hand-sew binding.

Background solids are:
dark aqua: Kona Turquoise; medium aqua: Painter's Palette Aquarius; light aqua: Painter's Palette Azure
light gray: Painter's Palette Aluminum; white: Kona White


Since my 2018 goal is to sew only with fabrics from my stash, the backing is pieced too. Couldn't resist using a few more 2-1/2" squares to piece a little green plus.

Lots of quilters have been busily sewing quilts from Cheryl and Paige's book. I'd encourage you to visit these blogs to see what everyone else has been making. It's apparent that the book gives you lots of possibilities! 

Thursday, March 15th
Linda @ Flourishing Palms YOU ARE HERE!
Bernie @ Needle and Foot
Michelle @ From Bolt to Beauty

Friday, March 16th
Izzy @ Dizzy Quilts
Christa @ Christa Quilts

Monday, March 19th
Jessica @ Quilty Habit

Tuesday, March 20th
Katherine @ Sew Me Something Good

Wednesday, March 21st
Anja @ Anja Quilts

Thursday, March 22nd
Joanne @ Quilts by Joanne

Friday, March 23rd
Paige @ Quilted Blooms

This giveaway is closed.
GIVEAWAY
Comment to be entered in my giveaway!
For those of you who've read through this whole post, thank you! I am personally giving away a digital copy of Modern Plus Sign Quilts.

Why a digital book? Because it's the best way to make it available to everyone, no matter where you live in the world. Yep. Anyone can enter.

Just be sure I have a way to email you if your comment is chosen. Don't miss being a winner because you're a "no-reply commenter"!

This giveaway will remain open until Saturday afternoon, March 17.
That's 'cause Sunday the 18th is my 65th birthday. I plan to be celebrating! Yay for Medicare! 😁

If you already know you can't live without this book, go to these links to purchase your copy:

Linda

Friday, March 9, 2018

Playing With Wedges

Since receiving Christina Cameli's (afewscraps) new book "Wedge Quilt Workshop," I've been itching to play with wedges. My interest in sewing wedges was piqued after watching Christina's MQG Webinar (Wedge Quilts Go Modern, July 2012 - accessible only to MQG members) about using 9-degree and 10-degree wedge rulers. So when her book came out, I was the first in line to get it! 


Cutting out and sewing was easy. I used my Marilyn Doheny 9-degree wedge ruler, purchased in 1989! Christina's book has lots more ideas and options than the two-color, 12 inch-long wedges I made.

It was figuring out what to do with those wedges that challenged me. Many different iterations appeared on my design wall. I first made wedges using a combination of white and Painter's Palette Carrot. Then I made some wedges with white and Kona Punch. As the design progressed, I began alternating those colors which may be difficult to see in my pictures.

Besides playing with the design, I auditioned other colors with the wedges. Besides this poppy red, green and gold made appearances. No good.

Then I tried in Kona Breakers. It seemed right. 

I switched the design again to make circles, and cut a piece of bias using Kona Breakers. I liked the bias accent. 

This is how I applied the bias to the inside of all the wedge circles, while simultaneously appliquéing to the circle center fabric which is Kona Silver. 


The design evolved. I really liked the idea of the Breakers color "pouring" through the whole design. However, Breakers as the center color seemed a little heavy.

So I moved it to the bottom. It's as heavy there, but I'm considering adding another small partial circle on the middle or upper right. And of course, my quilting will impact the overall design. I'm thinking to use turquoise-colored thread to quilt some accent circles. 

In case you're interested to know how I applied the outside edge of the circle wedges to the background, here are a couple pictures. I cut 1-1/2"-wide bias strip of white fabric, and used a quarter-inch seam to sew it to the outside wedge circle. 

I folded and pressed the bias to the back.

Then, using an appliqué foot and straight stitch, I sewed the wedge to the background. On the back of the quilt, I trimmed away the excess backing, and any parts of wedges that were covered. 

Because I don't have any big hunks of yardage from which to make a quilt back for this 54" X 70" wedge quilt top, I'm piecing a back using this free quilt pattern called "Bookmarks". Nothing uses up stash fabric more than making two quilts as one! 

Also, with all that wedge-piecing, I sewed more leaders and enders from my basket of 1-1/2" (unfinished) squares. Though the pile number says 83, I actually have 88 16-patch blocks. I have a quilt design plan for those too!
Linda

LinkWithin

Related Posts Widget for Blogs by LinkWithin