Wednesday, December 31, 2014

2014 is a Wrap

Instead of showing (again) everything I made, I decided to write a 2014 wrap-up, mostly for the blog book I have printed each year from these posts.

2014 saw me making, and blogging about:
  • 12 quilts (Click on "2014 Quilts" tab to see them all.)
  • 12 bee/gift blocks
  • 7 skirts
  • 6 placemats
  • 4 shorts for little boys
  • 4 tote/bags
  • 3 pillows
  • 3 thread catchers
  • 3 pin cushions
  • 3 tops for myself
  • 2 sewing machine covers
  • 1 re-covered office chair
  • 1 shorts for myself
  • 1 little boy's pj's
  • 1 toy dog
Given that I also taught quilting classes, attend frequent quilting meet-ups, line dance at least three times a week, and attend Bible study and a stitchery group, I'm satisfied with what I accomplished.

Throughout 2014, I remembered my word-of-the-year, "perspective" that I managed to sew into a quilt back.

did keep a good perspective on life as I spent time with family, remained active, and continued quilting. I didn't allow continuing health concerns to drag me down. In the past 12 months I had five catheterization procedures on the femoral arteries in both legs - three on the left leg alone. An anticipated sixth procedure, a re-catheterization of my 60 percent blocked right femoral artery, hasn't yet happened and will be checked again in March, 2015. In any case, the future looks bright related to breast cancer and PAD. I do continue to feel blessed.

Reflecting on 2014 has made me consider what 2015 has in store, and what word I'll choose to take into it. I'm most aware that I am simply grateful for the life I've been given, and the blessings I receive. How can I not be?! So my 2015 word is "thankful" and stems from this Bible verse:

...give thanks in all circumstances, for this is God's will for you in Christ Jesus. - Thessalonians 5:18

So whatever 2015 brings, I will strive to be thankful. Whether it's an outpouring of blessings, or an unexpected event, I will be thankful. Linda

“When you rise in the morning, give thanks for the light, for your life, for your strength. Give thanks for your food and for the joy of living. If you see no reason to give thanks, the fault lies in yourself.” ~ Tecumseh

Down to the Wire

Whew! Two weeks to make two start-to-finish quilts is almost more than this old gal can handle! But I reached my goal to finish Urban Abacus, a design by Sew Kind of Wonderful by year end, upping my quilt tally by one.

This quilt design is one of three Sew Kind of Wonderful designs, using the Quick Curve Ruler, that I will teach in the Beyond First Time Quiltmaking series in March and May. If you're local, and interested, click the "Schedule" tab above.

Assorted fabrics from my stash were chosen in a limited color pallet (orange and aqua are two favorites) and include pieces of a favorite collection: Terra Australis by Emma Jean Jansen. Background fabric is Kona white; vertical bars and binding are grey Crosshatch by Carolyn Friedlander.

For free motion quilting, I took my cues from the pattern cover quilt. Jenny quilts on a longarm, so it was a fun challenge for me to get a look similar to hers. To make the hundreds of spaced lines, I used two different lengths of Fine Line Rulers. I used the eight inch ruler to quilt the bars.

And I used the short, six inch ruler to quilt the "beads." Here's a short video.

 Quilting is fairly dense; I spent about 15 hours at my Pfaff, quilting this 51" X 66" quilt.

From the back...


Urban Abacus brings my 2014 total to 12 quilts made this year. See all 12 quilts by clicking the "2014 Quilts" tab above.

I'm not about to set any quilt goals for next year. I've learned that unplanned events happen - sometimes a health concern - that can make goal-setting a disappointing failure. Instead, I choose to look on the positive side, and review what was accomplished the previous year. That's what I'll be doing in my next blog post. Linda

Monday, December 29, 2014

Austin's Star Wars Quilt

60" X 71"
This is a modified version of the free Riley Blake Designs pattern, School Pride. I wanted a simple pattern to let the fabric shine - literally! It's Star Wars glow-in-the-dark fabric.
back
It was so much fun to make and quilt this quilt - pressure-free! No worries that a judge would be checking to see if the quilt is on the square, or has well-balanced quilting, or even stitch length, or buried thread tails - yes, I simply clipped those tails!

Because the prints are pretty busy, this quilt is nearly impossible to show quilting designs. I used several designs, including stippling (with invisible thread), geometric lines (seen in the blue on the left), and I quilted Austin's name in the red spot area.

The red area at the bottom is quilted with a curved jaggy design. Ribbon candy quilting shows up best in the narrow white strips.

From Friday when I cut out the fabric, to the following Tuesday evening, just before Christmas, when I finish hand sewing binding, this was a quick-project/quick-finish. I'm aiming for one more finish before the year end! It's quilt, quilt, quilt around here! Linda

Saturday, December 27, 2014

Gaining on 2014

The weeks leading up to Christmas found me with a little extra time on my hands. With no company expected, nor travel in our plans, and with fewer regular activities to fill my time, I've made good progress on several UFOs. 

First, I free motion quilted Flower Ball. This is a Geta Grama design that's English paper-pieced with papers that replicate the curvature of a ball.

I started this quilt in January, and thought it would take me years to hand stitch. Less than 11 months, in between many other projects including two show quilts, isn't bad.
Flower Ball, 40-1/2" X 40-1/2"
The last time Flower Ball was seen on this blog was in September, as a quilt top. It could have been quilted and finished sooner.

Batting is Orient by Quilter's Dream. I'd never used this type before, and while I like it, a denser batting would have been more appropriate for this wall hanging. Orient would be great for a summer-weight quilt, a stroller throw, or light baby quilt.

Before I began quilting, I used my lucite board and dry erase markers to play around with designs.  

For quilting, mostly I used YLI polyester thread - I love the sheen - to quilt flow-y like feathers in the flower petals. Flower centers are spiral-quilted and surrounded by pebbles.

In the white paths between each flower are more pebbles with the occasional small spiral tossed in. 

The background quilting is an all over orange peel pattern, and is less dense than the quilting in the Flower Ball.

I always like to admire the resulting quilting texture which is usually more apparent from the back.


Flower Ball now hangs above the guest room bed, and I love it there, especially with the aqua ceiling.


With the Flower Ball finish, I moved on to honor a request from four year-old grandson, Austin. I pulled out Star Wars glow-in-the-dark fabrics I had for several months, and with a few other pieces from my stash, put together this top. Batting is Cream Rose that I've had around for a long time. The pattern is a freebie, called "School Pride," from Riley Blake Fabrics. I modified it to not only add the wide strip with Austin's name, but to make the quilt larger than the 46" X 53" pattern. This came out 60" X 71".

Because I can reconfigure my sewing room with sawhorses and hollow core door table tops, I did so for a two-day pin-basting marathon, beginning with the Star Wars top. 

Then, I re-pinbasted this Kaffe quilt (so-called because it's Kaffe Fasset fabrics). The reason I needed to re-baste is explained here. There's a completely different backing on this second basting go-'round.

And then, after pin-basting a third quilt top, "Urban Abacus," (50" X 67") my pin tin was completely empty!

I have my sites on two quilt finishes before the end of the year, so I'm totally in the FMQ groove. Back soon for an update. Linda

Wednesday, December 24, 2014

Merry Christmas!

Our Christmas will be warm, mild and quiet, as we attend a Christmas eve worship service, and then share Christmas day as a twosome - a first for us to be alone.

Hopefully, on FaceTime we'll get to share some of Christmas day with our two children and their families. Here are a few pictures we've recently received.
LJ, 11 months and walking!
Daughter Jill, and 16 year-old Celina
The photo below requires a little background. Our son has always liked a wood-burning fireplace. We had one for all his growing up years, so now as a home-owner himself, a fireplace is what he misses. So, being the ingenuitive engineer he is, he created his own!

The flames and logs - a little difficult to see in this picture - are made of construction paper glued to a cardboard box. Lights give it the glow of warmth. What I like best is how the stockings are hung over the fireplace, warming my heart as much as the clever fireplace. I made all of them.

I've been told the plan is to add on to the fireplace each year, so perhaps next Christmas we'll see a brick front, or a mantel. I can't wait.

And I have to add this photo of our UPS man... like none I've ever seen up north! This is how the men and women in brown travel around The Villages, delivering parcels. He was a good sport to let me take his photo after dropping a box of fabric at my front door. Looks like a fun way to work, doesn't it?


As we celebrate that God sent his Son to show us how to live, and prepare for everlasting life, my sincerest hope is that you and your family share God's gift of love during this holy Christmas. Bless you. Linda

Wednesday, December 17, 2014

Welcome Sew Mama Sew Visitors

I'd like to extend a special welcome to anyone who might be visiting my blog today from Sew Mama Sew, and is looking for my binding tutorial. This binding method - around here it's also called "No Tails Binding" - is my hands-down favorite method, because it's easier... and so different than the way most quilters sew binding to their quilts. I encourage everyone to give it a try. And, if you happen to be in my area, I'm offering a workshop on it, Sunday, March 8, 2015. Click the "Schedule" tab above for more information.

Here's the link to Sew Mama Sew's "17 Best Binding Tutorials." Good information here!

Have you been sewing for Christmas? I have made only a few things, and find that since we aren't decorating - no tree because no one's coming to visit, nor are we going to visit anyone (after all, we moved south to get out of winter weather!) - I've been playing catch-up on an untold number of projects. Here are a few finishes.

This patchwork Scottie dog is for grandson LJ. It was easy to make with 2-1/2" unfinished squares, as I keep a big stack of precut squares ready for a variety of scrappy projects. I made sure a few novelty prints were included, so he can identify them as he gets older.

The other side.

Then, I set up my sewing machines like this, so it was nice and easy to swivel between the serger and the sewing machine to make some clothes.

For Austin, I made these flannel Angry Birds jammies. To make it a set, I bought a long-sleeved thermal shirt. It's fun and easy to sew short (or long) pants with this Kid Shorts Pattern from Dana Made It. It's a purchased download that comes in sizes 12 months to 10 years - a good investment. I have some more fun novelty prints to sew into shorts.

Then, I made myself a top. This is a newer pattern by Jennifer Paganelli of SisBoom, called "Tortola." Another purchased download. Have you noticed how much I like to shop from home?

The top is cut on the bias so it takes a lot of fabric. Made with voile, I like how it's really flowy. The pattern calls for two yards, even for a small, but next time 1-2/3 yard should be enough. I sure like how it turned out though I can't wear it yet because the weather is a little cool for a tank top. But, I plan to make a bunch of them.

And, I made "Iris" shorts from a purchased download Colette pattern. These appeal to me because of the no-button waistband, the side invisible zipper (love my new Bernina invisible zipper foot!), and front inset pockets that are not in the side seam.

I'm pretty sure this pattern will make a repeat appearance.

Since this spurt of clothes-sewing, I've returned to free motion quilting in an effort to get caught up with projects before January. I recently learned that First Time Quiltmaking, scheduled to begin January 5, is full with 20 students. So we - the Lifelong Learning College and me - added another class... and already 14 students have registered! Looks like 2015 is shaping up to be busy! Linda

Thursday, December 11, 2014

Happy News!

On Wednesday I learned that two quilts I entered into QuiltCon, the big national quilt show for The Modern Quilt Guild that's next February 19-22 in Austin, Texas, were juried into the show! I'm tickled pink! Even more so since learning that of the 1,357 quilts entered, only 26 percent - or 352 quilts - were accepted! Wowsa!

So, to receive a couple emails like this has been pretty exciting!

"Shapes," that you'll see further down, is my entry in the Panasonic Bias Tape Appliqué Challenge, and I incorrectly assumed that all challenge entries were accepted. In fact, they were not, so I'm even more proud about these acceptances!

Our "Ad Libbing" was completed in August - a joint effort between me and Lora (Dragonfly Quiltworks) who lives 90 minutes away. We each made blocks, inspired by the "Missing U" quilt in the book Sunday Morning Quilts, as part of the June program and workshop Lora and I presented to Quilting Guild of The Villages.
Ad Libbing - 71" X 71"
Then when we went together to Sebring for a modern quilt retreat, Lora made our blocks into a quilt top. I took it home and quilted it, then returned it to her for binding, a sleeve and label. 

The name "Ad Libbing" refers to how this quilt came about - quite unintentionally, passing it back and forth, figuring it out as we went along. We were tickled when this quilt took first place in the large quilt category of 52 quilt entries, at QuiltFest Jacksonville in September.

Now we're excited to see how "Ad Libbing" will do at QuiltCon. Both of us will be there to find out!

The second quilt accepted was "Shapes."

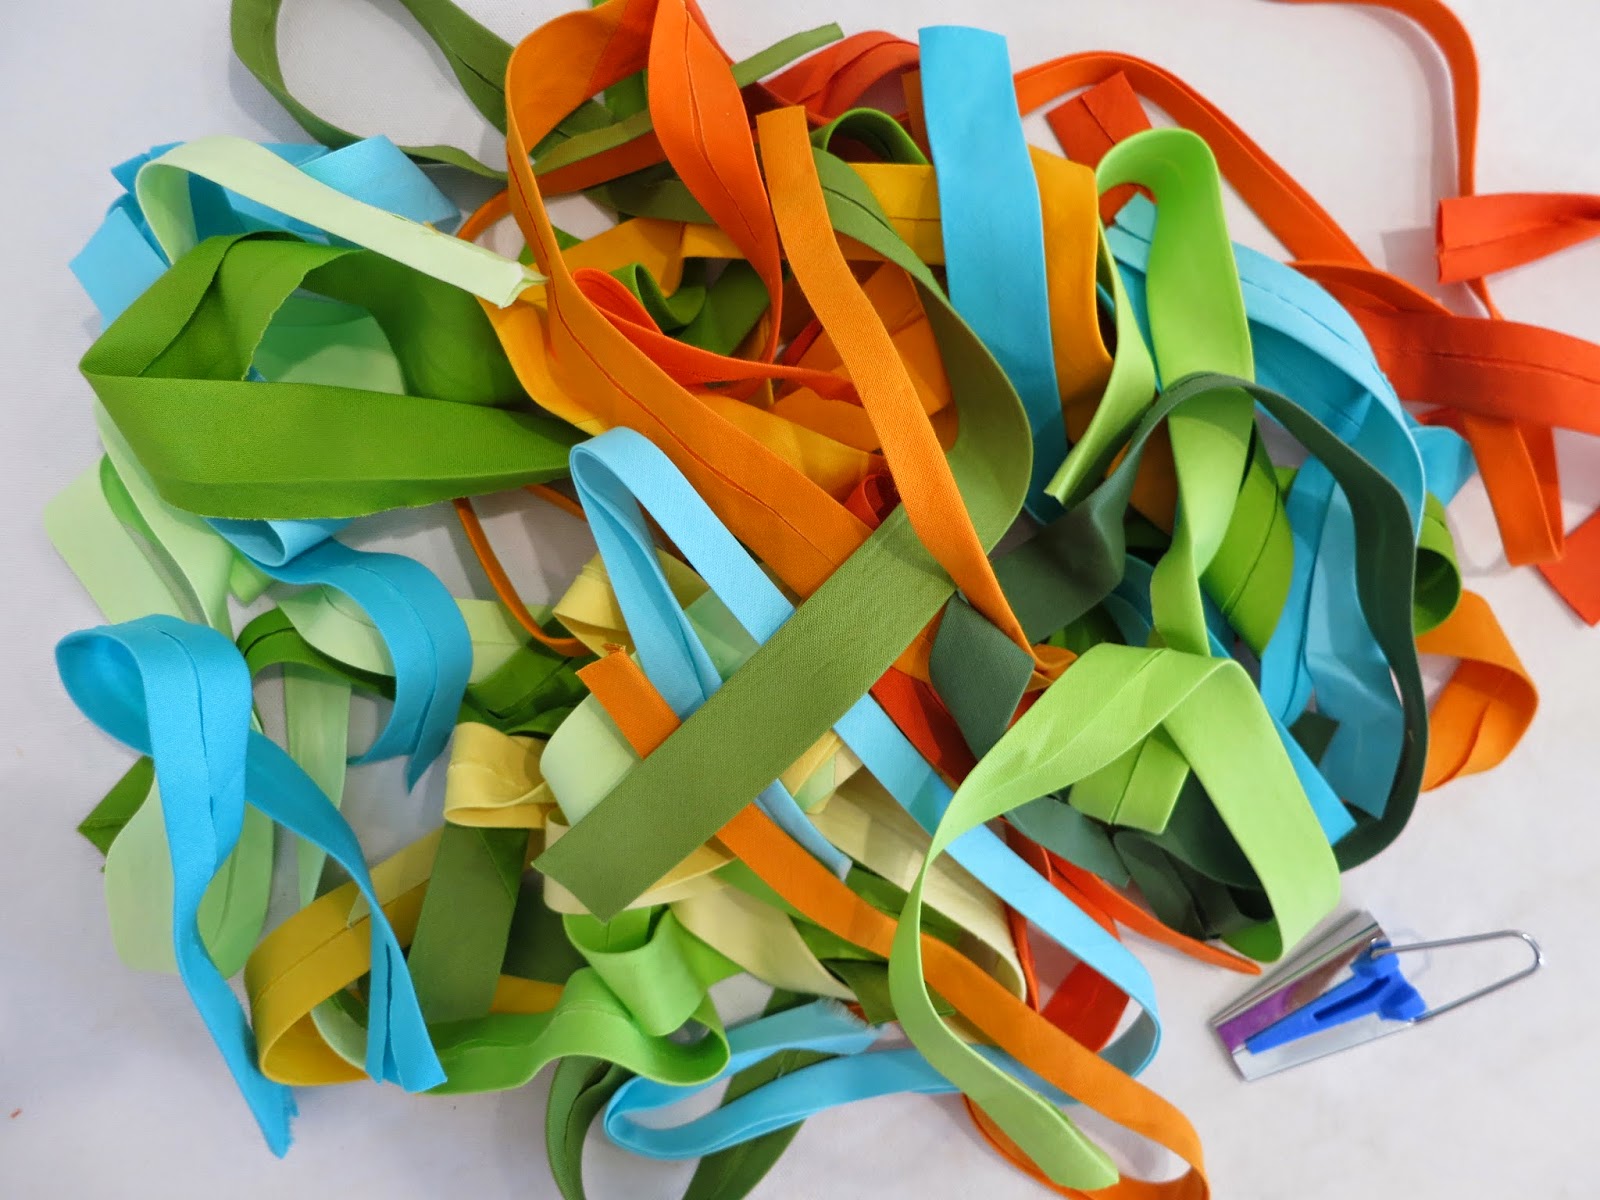
My efforts began with this pile of bias tape made with a small Clover bias tape maker. The MQG made a very nice, helpful video about how to cut fabric on the diagonal, and use the bias tape maker to press and fold bias tape.

After I'd made a pile of tape in different solids, I folded and circled and pinned it to white Kaufman Kona, agonizing over how to layout the design. Thankfully, my friend Debbie even came over to offer helpful advice! For the background, I used two widths of Kona, hiding the joining seam behind the long, wide zig-zag of bias text print fabric.

Sandwiching involved two layers of batting: the bottom batt was Quilter's Dream polyester; the upper batt was Quilter's Dream wool. It was timely that I was Quilter's Dream featured "batt girl" in June, and was the recipient of a complimentary box of Quilter's Dream battings! You can see that the puffiness of double batting warrants dense pin-basting.


I can't say this quilt finished smoothly, as many of you know about the grease marks that appeared on the white background fabric as I was quilting with my Pfaff walking foot.

I discovered that the foot, which had been recently serviced with my machine, had an excessive amount of grease inside the open base. Suffice it to say I suffered through much heartbreak figuring out a resolution to the marks, which did not come out of the fabric after attempts at cleaning with various spot remover products.

Now, strategically placed bias tape appliquéd hexagons hide the worst of the marks. Happily, I think they enhance the overall design, and add to the significance of the quilt name - "Shapes."

Shapes is quilted with 50-weight Aurifil threads - white, ivory, yellow, hot pink. I changed colors where I wanted to emphasize quilting designs that flowed into bias tape colors. And yes, I also strategically sewed pieces of solid hot pink fabric in the binding.
Shapes - 67" x 67"
Some of the quilting designs here are similar to those in "Ad Libbing," but I did my best to change them up a little. 


Shapes has been hanging on my design wall for several weeks now, waiting to find out if it was accepted into the show before sewing a sleeve to the back. Both quilts must be ready to ship to Austin for arrival between January 5-23. There's nothing more to do but wait... excitedly... with fingers crossed. Linda

Monday, December 8, 2014

Making Pin Cushions

Needing a pin cushion for a Central Florida MQG swap in December, my online searches turned up several options, and I had to try them out to see which one I wanted to give.

The first design is a free Riley Blake pattern - Little Birdie Pincushions found here. (Link updated 5/13/17.)

What's that adage? A bird in the hand is worth two in the bush? What does that mean?!

Then, deciding the birds were too small, I found this pattern for a Pin Cushion Caddy. It's a design by Anna Maria Horner found in her book "Seams to Me: 24 New Reasons to Sew." I don't own the book, but I found the free pattern here. Apparently there are some measurement issues with book instructions, so I printed Anna Maria's own corrections here. Then, I found this tutorial for accurately calculating all the pieces, and I used it too! Just call me Sherlock.

Using all three helps, this is how it went.


It's not an easy pin cushion to sew. When I got to this point, I thought I was preparing a couple racks of lamb. 


I ended up chucking this one. Even after attempting several times to resew the seam that joins the outside to the inner tube, I couldn't avoid the tucks. What a failure!

The final pin cushion, a hexagon pin cushion caddy, came from this tutorial.

Since my bloggy friend, Vreni, had made this one, she advised me to reduce it by 25 percent, and that's what I did. It's entirely hand-sewn, so it took quite a while to make, but I'm proud of it. It has some of my favorite fabrics in it - Anna Maria Horner, Mimosa, and my special Terra Australis. 

What I'm not so proud of are these two pictures! I pride myself in taking good photos, and obviously I goofed! I'd say the camera was on the wrong setting. But, since the pin cushion now belongs to someone else, this is the best I can offer. You can see all 18 swapped pin cushions on our Central Florida MQG blog, here.

Better pictures next post. Promise. Linda

LinkWithin

Related Posts Widget for Blogs by LinkWithin