
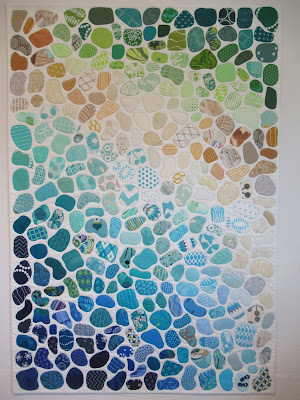
My 34½" X 50" Seaglass quilt is finished.
Already, I want to make another one!

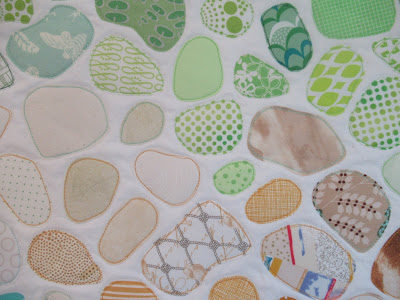 '
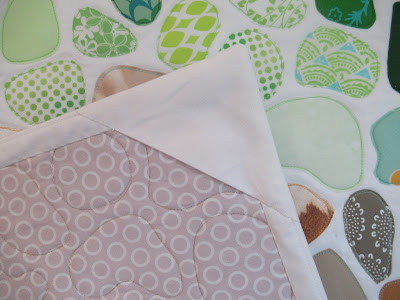
'It's sandwiched with Quilter's Dream Cotton Request. Quilting was easy... just free motion quilt around each shape. This video plays back at double-speed, so you can imagine how much slower I actually FMQ.
Though it isn't necessary to change colors for every print, I used this opportunity to empty a few thread spools! Such a good feeling.
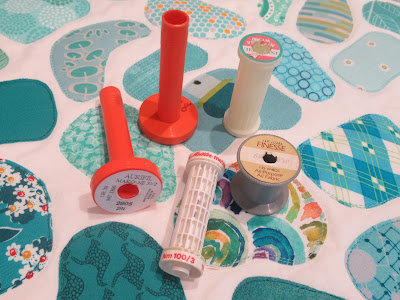
In the bobbin I used Wonderfil 100-weight Invisifil thread. One of the empty spools (above) was Invisifil.

When Seaglass was quilted, I cut fabrics to make a faced finish. My favorite facing tutorial is on the Bernina, We All Sew site. It calls for 2"-wide strips folded in half, and four 5" squares folded into triangles for each of the corners.
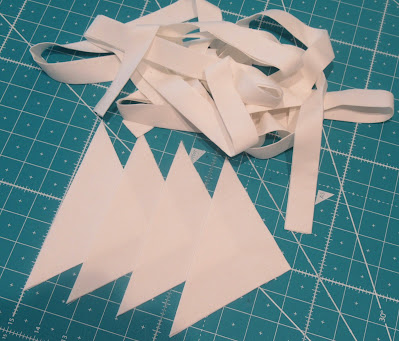
Though I always hand-sew down facing, for this quilt I left the four corners unsewn. That's so a dowel rod or curtain rod can be tucked under two triangles, and used to hang the quilt.
I have someone in mind to gift this to; it will be perfect for her. In the meantime, I'm plotting my next Seaglass quilt, thinking to use some orange, or maybe pink, or maybe even purple in the accent area. So many possibilities!
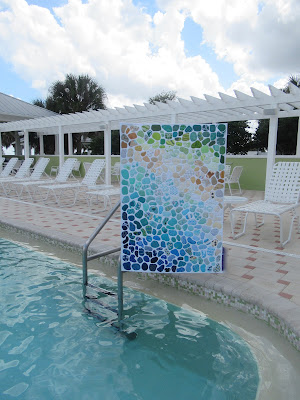
This is the closest I've been to water since being in the Atlantic Ocean last June. Thanks Flo, for being a great quilt-holder!
If you're interested in making a Seaglass quilt, like me, you'll have to register and pay for the www.ExhaustedOctopus Seaglass course. Darn it. Instructions are not sold as a pattern. Linda

love this quilt and it captures the beauty of sea glass.
ReplyDeleteWe pick it here on the north shore of the sound.
great video too~
This turned out beautifully! I've long admired Allie's quilt design.
ReplyDeleteOh my, I LOVE this quilt!
ReplyDeleteThis looks wonderful and I enjoyed the video. Quilting it actually looks relaxing (other than stops/starts). But the results- lovely.
ReplyDeleteThat's really pretty, and thanks for showing the video.
ReplyDeleteA perfect quilt for a Florida home with a pool and lanai. A great way to feature scraps of favorite fabrics. This reminds me of the oriental stepping stones quilts though most of those that I've seen have a more controlled placement and fewer shapes overall. You had a gorgeous array of scrappy pieces for this!
ReplyDeleteWhat a beautiful quilt. Looks like a lot of work, though.
ReplyDeleteThat's such a pretty quilt! And what a perfect name!
ReplyDeleteWow. Really beautiful.
ReplyDeleteThanks Deb! I'm giving this quilt to a Bible study leader who has put her heart and soul into researching Revelation for us each Friday. (Revelation 15:2) She's not expecting it, and that's the best kind of gift to give. Linda
DeleteLove the quilt and loved seeing how you FMQ around each shape. I couldn't tell if you pull up the threads to the front and knotted them, or just cut them. Also I think when I FMQ I go way too fast, that's why it never looks as nice as yours. My speed it about the speed on your video !!
ReplyDeleteBeautiful. Lucky friend to be gifted such a great quilt. Perfect pool side photos too. Can't believe you live in Florida and haven't been in the water for months. I take it you're not a swimmer?
ReplyDeleteWonderfully made, Linda! I purchased the class a little over a year ago and have made small ones that I mounted on canvas frames or sewn onto card stock as cards. I have pieces cut to make a bigger version. Did you fuse your fabric pieces as the instructions say or glue?
ReplyDeleteHi KB! Your Google profile is set to "no reply-commenter" so I am unable to respond to you directly. I hope you read this! It's nice to know other ways of experimenting with technique." Fun isn't it? Yes, I used the fusible, as instructed. I didn't have any problems with this method, so will certainly be using it again.
DeleteGorgeous quilt! Whoever you are sending it too will be lucky!
ReplyDeleteStunning!! Apologies for brief one word comment, hand problems limit my time.
ReplyDeleteLinda, a stunning quilt! I like it very much and the colors are just fabulous.
ReplyDeleteEdith
Yes, this is stunning! I love the colour graduation and am sure the recipient will feel very special.
ReplyDeleteSimply stunning, Linda! What a wonderful gift your Seaglass quilt will be.
ReplyDeleteI love Seaglass Linda! I will send you a photo of a piece of wall art I took on my trip away.
ReplyDeleteYour seaglass quilt is beautiful! I especially appreciate the link to your favorite facing technique. I have a technique I've been using but it is just "OK" so I will try this one. Thanks!
ReplyDeleteDon't the edges of your seaglass blocks unravel with time in spite of the fusing?
ReplyDeleteHello Uninformed! Because you are a "no reply commenter," I am unable to respond to you by email. So, I hope you revisit this post to see my answer to your question.
DeleteHonestly, I don't expect the appliquéd edges to come up, though I can't say for certain. I have made two Seaglass quilts and given both of them away. In both cases, the new owners have hung them on a wall, so I'm sure that fraying won't be a problem. Still, even if the quilt is being used and washed, I would expect only a few loose threads. Between the fusible holding the edges in place, and two rounds of quilting stitches around each piece of "glass," I'm sure the appliqué is secure. It's no different than anyone who chooses to edge stitch fusible appliqué - flowers, leaves, vines - to a background fabric. I'm hoping to make a third Seaglass quilt, for myself, and will keep an eye to see if fraying is a problem. Thanks for commenting!
So on the “glass pieces “ you just use fusing and they are single layers? What fusing do you use? Then you double stitch them on the quilt correct?
ReplyDeleteHi Anonymous! Yes, each shape is a single layer of fabric that is fused to a background with Heat 'n Bond Lite. You can see in the video that I free motion quilted around it once.
DeleteI love your beach glass quilt and getting ready to make a queen sized one. I want to use it as a quilt so will hand appliqué each one. I wonder what size did you use for all of the pieces?
ReplyDeleteCatherine from Canada
Thank you very much, Catherine! I'm very happy with this quilt, though I no longer own it. Hand appliquéing this sounds like a lot more work than the quilt-liqué method I used. I hope you enjoy doing that. As for size, I didn't measure anything. I just eyeballed a variety of different sizes. No templates. If you wish, you can count how many pieces of seaglass are along the widths and length of my quilt, and divide that by my finished measurements. Maybe that will give you an idea. I'd just suggest you start cutting with scissors and do what feels right to you.
Delete