
1) aren't familiar with the concept of squaring-up blocks, squaring up a quilt center, and how to add measured borders that square-up the whole quilt.
2) are accustomed to making binding that leaves less binding showing on the front of the quilt, and more binding showing on the back.
While I don't mean to sound like an authority on binding, I do know that in a judged quilt show, it's binding that quickly separates the "men from the boys."
Quilt bindings are critically examined for these components:
- Corners that are sewn closed, either by hand or machine.
- Binding that's straight.
- Binding that shows equally on the front and back.
- Binding that is fully stuffed.
Here's the way many quilters sew binding to a quilt.
The quilt is trimmed to remove backing and batting, so it's all even with the quilt top. Then, placing the raw edge of the binding even with the trimmed quilt, the binding is machine-sewn to the quilt with a quarter-inch seam,

When the binding is wrapped to the back of the quilt, pulling it against the edge of the quilt, less binding shows on the front than the back. Technically, this is incorrect.

Of course, it only matters if you care! Like if your quilt is going to be examined closely, or judged. For demonstration purposes only, I pulled this binding all the way to the back and hand-stitched it down. This is what I don't want.
And, to further make my point, if I hand sew this binding to the back correctly, aligning the binding fold with the machine-stitching line - so the front and back binding widths are the same - this leaves part of the binding unstuffed, as you can see along the edge. Again, this is what I don't want.
So you may ask: "How do I sew binding to a quilt so the front and back bindings are even, and the binding is stuffed?"
The answer is: "Do not trim the backing and batting even with the quilt top."
This means if you're hiring a longarm quilter, be sure to ask that she doesn't trim your quilt!
Here's the way I sew binding to a quilt.
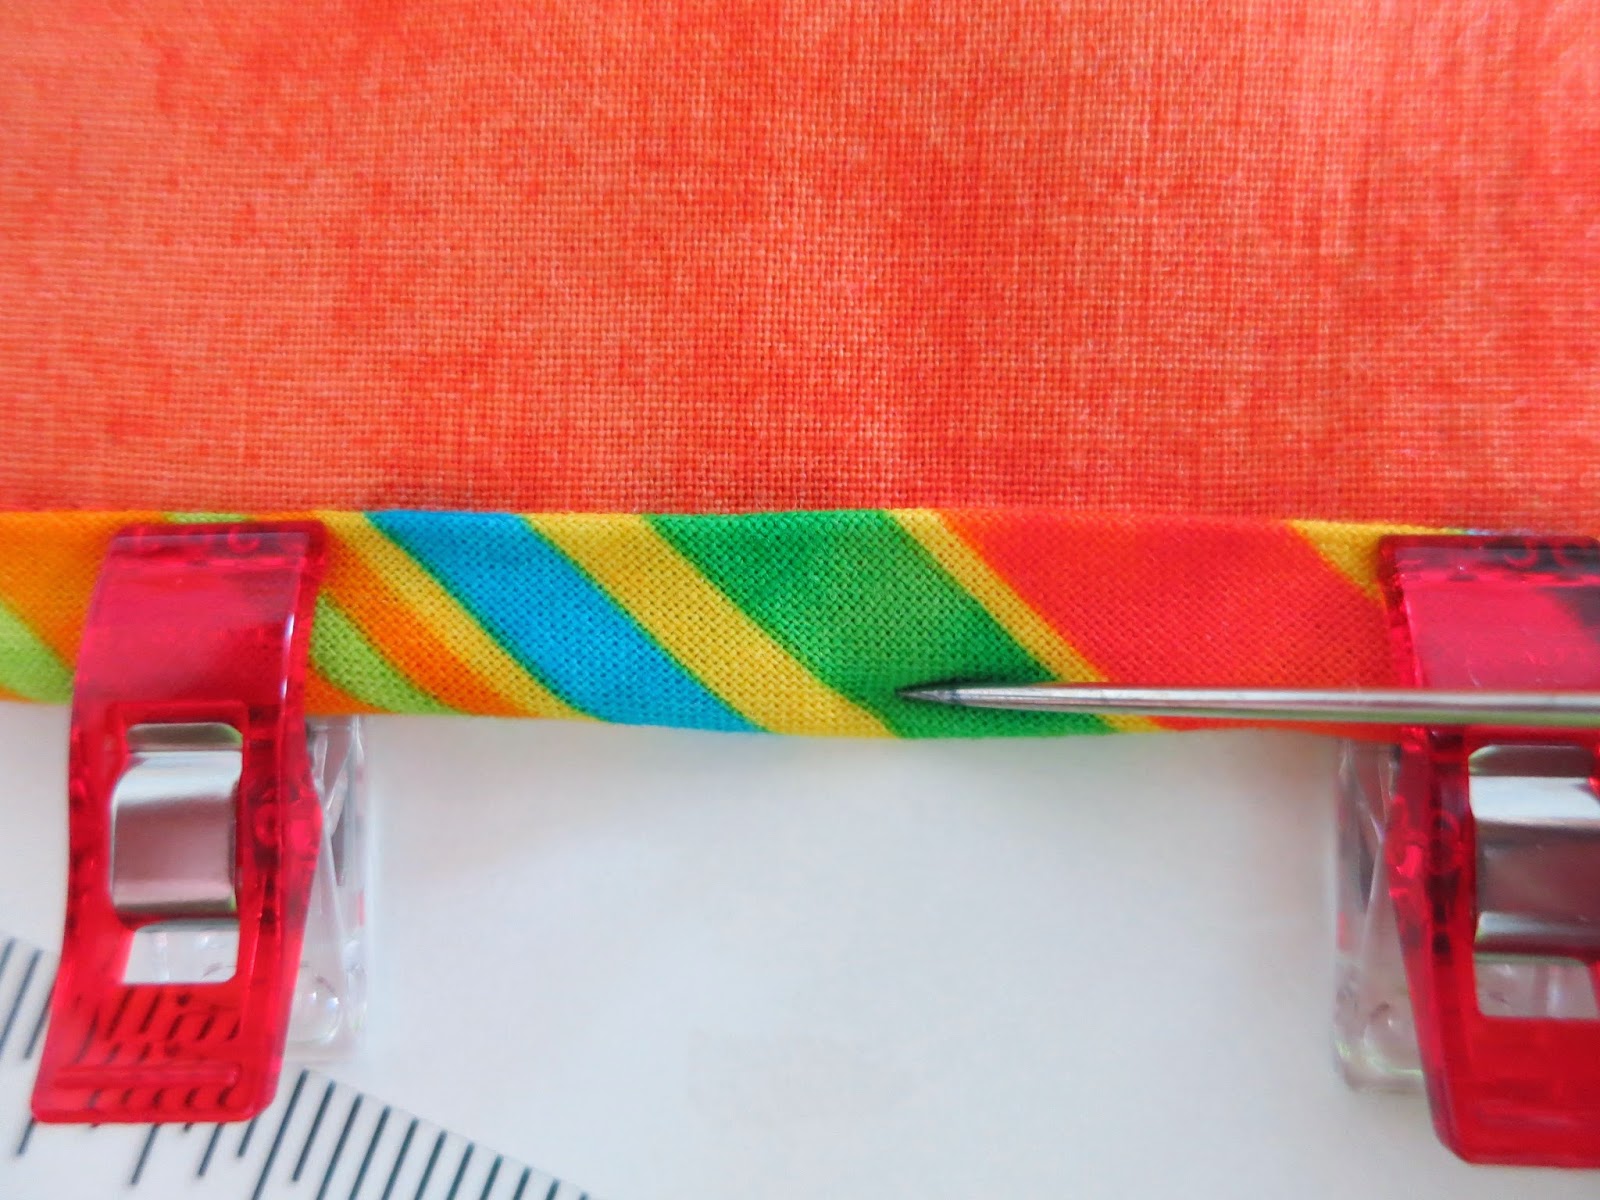
2) Align the raw edge of the binding with the line you've drawn. Sew 1/4" from the drawn line.

 |
| For 2-1/4"-wide binding, trim 3/8" from machine stitching line |
The result is binding that's:
1) fully stuffed with backing and batting that wasn't trimmed away; and
2) the same finished width on the front as on the back!
 |
| Aim for binding that's the same width on the front and back. |

I could share more about what I've learned while teaching, but admittedly this stuff is difficult to explain in photos. Hopefully though, I've given you some food for thought, and perhaps helped you improve your own binding. After all, binding is the best part of making a quilt because it means you're done! Linda

This is a brilliant post! I have just the same issues that you mention & it's so helpful to have direction on how to address these problems. I've bookmarked this to refer to when I bind my next quilt. Thanks for the clear & detailed information.
ReplyDeleteGreat tip! I just went back to read your no tails binding technique too- I am going to try that!
ReplyDeleteThis is a very cool tip.... Thank you! I'm going to check out your no tails binding next.
ReplyDeleteGood info, Linda. I noticed "Binding filled with batting" was always a standard on a judges checklist, which is how I became aware of the goal. And stitching miters closed on the corners- a little thing that can make a difference. Though I must admit, most of my corners are stitchless!
ReplyDeleteexcellent tutorial, thank you. I'll definitely give the drawn straight like a try next time I'm binding a quilt!
ReplyDeleteI love learning new techniques to make my quilting experience more fulfilling. Thank you for sharing this very useful information. I look forward to attaching the binding on my next quilt and giving it a more professional appearance!
ReplyDeleteI'll have to try this sometime, Linda. I love putting on binding but, in all honesty, none of my grandchildren or others I give quilts to care whether it's even on the front or the back. I can see if I ever wanted to enter a judged competition that I'd get failing marks for my binding. Ack! Does Quilt Con judge on such things too? Thanks for the excellent explanation!
ReplyDeleteThis is great advice. I've been making my binding 2", which shows evenly on both sides when I trim along the quilt top edge. But now I know what to do if I want to have a wider binding. Thanks!
ReplyDeleteI now wait to trim the quilt until the binding is seen down as I had one to many saggy situations. I suppose having the binding on both side even only works if you are hand binding. Which you'd do for a show quilt. When machine binding I need it uneven on purpose
ReplyDeleteThis tutorial is excellent Linda. It's mostly what I do but haven't done the drawn line before. I really like this idea and will do on my next quilt. ( coming up soon ) What would you do when there is no plain border and the blocks of the quilt are the finish and you have 1/4" seams on the edge? Would love your thoughts on this. :-D
ReplyDeleteSue, I appreciate your question because, like you, I seldom put a border on my quilts. That means along the edge of the quilt top, you've likely got pieced blocks that need a quarter-inch seam. This is where your piecing skills will be tested! You'll either: A) draw a straight line that's a quarter-inch from every block; or B) find that your piecing isn't precise and have to make an "executive decision" to sew binding that may nip (cover over) the tips of block shapes like triangles, or reduce the size of squares or rectangles. This isn't easy to verbalize - pictures would sure help - but hopefully you get a rough idea of what I'm talking about.
DeleteI totally understand Linda and have had to make a few 'Executive Decisions"in my time!
ReplyDeleteThanks again, I think we all learn a few tips from each other, even after 20 + years of quilting. I know I do. Thanks again Linda for the tute. :-)
So well explained, Linda. I love a well stuffed binding. Flappy, unfilled bindings are my biggest bugbear with our ladies :-) for competition quilts I'm trying to do sewn corners now, but I must admit it isn't easy so I just fold the corners on my charity quilts.
ReplyDeleteAn excellent explanation of sewing on bindings and it makes perfect sense. I must check out your no tails corners. Would love to have those sewn closed with the machine instead of doing them by hand. Thanks for the great pics.
ReplyDeleteSuch a great tutorial and wonderful photos to help us understand. I always leave room for well stuffed binding too but I have never even seen the No Tails Binding technique you use! So I will add that to my list of skill builders for 2015. So far I don't intend to enter a show but who knows...maybe sometime down the road and this technique sure makes for a classy finish!
ReplyDeleteThanks for the explanation! I will admit my bindings are far from show-worthy. One thing I have a problem with (besides the unequal bindings as shown above!) is sewing down the mitered corners. They always look good on the front but never perfect on the back. :( I do love to hand-sew binding though. It's one of my favorite parts of quilting.
ReplyDeleteThis is a great post, Linda! I am pretty much a self-taught quilter so I learned a lot of the things you mentioned in your last post, slowly. Doing things the "right way" does make a huge difference if you plan to exhibit your quilts or enter contests.
ReplyDelete3/8" and 1/2" there's so little in it isn't there, but so important! I've worked out most things by trial & error, and getting those back & front bindings equal has been tricky! Thanx for this excellent post! Linda
ReplyDeleteAlways learn some little trick from you Linda. I do pretty well with my binding and corners but didn't know the judging criteria . . . not that it matters too much to me. Thanks for sharing.
ReplyDeleteOhhhhh! This was so helpful! Thank you. I really prefer to sew the final binding edge on by machine. What are your thoughts on machine vs hand sewing the final seam? Good results?
ReplyDeleteI decided to try this way tonight, Linda, but, I guess I should have squared up my top before I pin-basted it, because it's not even, at all. Some rows are about 1/8 to 1/4" longer, or shorter. I suppose I will do that the next time, and look up your tutorial to try again. Thanks so much for this! I DO want to do mine correctly, or better than I have been. They're never even from front to back and I had no idea how to fix it. Now, thanks to you, I do!
ReplyDeleteThanks for this Linda! I'll definitely reference back on my next finish.
ReplyDeleteI’m confused about how you do the corners
ReplyDeleteHello Crafty Mamaw! I'd be happy to chat through your questions, but because you're a "no-reply commenter," I am unable to respond to you. So, if you read this, please see my full tutorial - No Tails Binding: Mitered Corners by Machine. That may help. If you have questions, please provide your email address and I will gladly answer you. Linda
DeleteI’m also confused how you do the corners with the extra edge on there. And I’m totally lost about the no tails binding. Please do a video.
DeleteHello Anonymous. I appreciate that you'd like me to do a video of this method, but I don't have the proper lighting or video camera set-up to make that happen. So, the best I can do is point you to my blog tutorial with pictures: https://flourishingpalms.blogspot.com/2009/06/binding-tutorial_12.html. Also, if you are a member of The Modern Quilt Guild, you can find my webinar there, where I demonstrate the process, as well as answer questions. I hope this is helpful!
DeleteCould I do this binding process with a flange added?
ReplyDeleteHi Anonymous! I think you could add flange to a binding made this way. Though I've never done it myself, if I was to try, I think I'd sew the flange to the binding first, then handle the two pieces as one binding to follow the rest of the steps. I'd love to know if you try it!
Delete