Friday, September 25, 2020

Dribs and Drabs

Dribs and drabs - this and that has been the way of the past week. I'm fluffing along. 

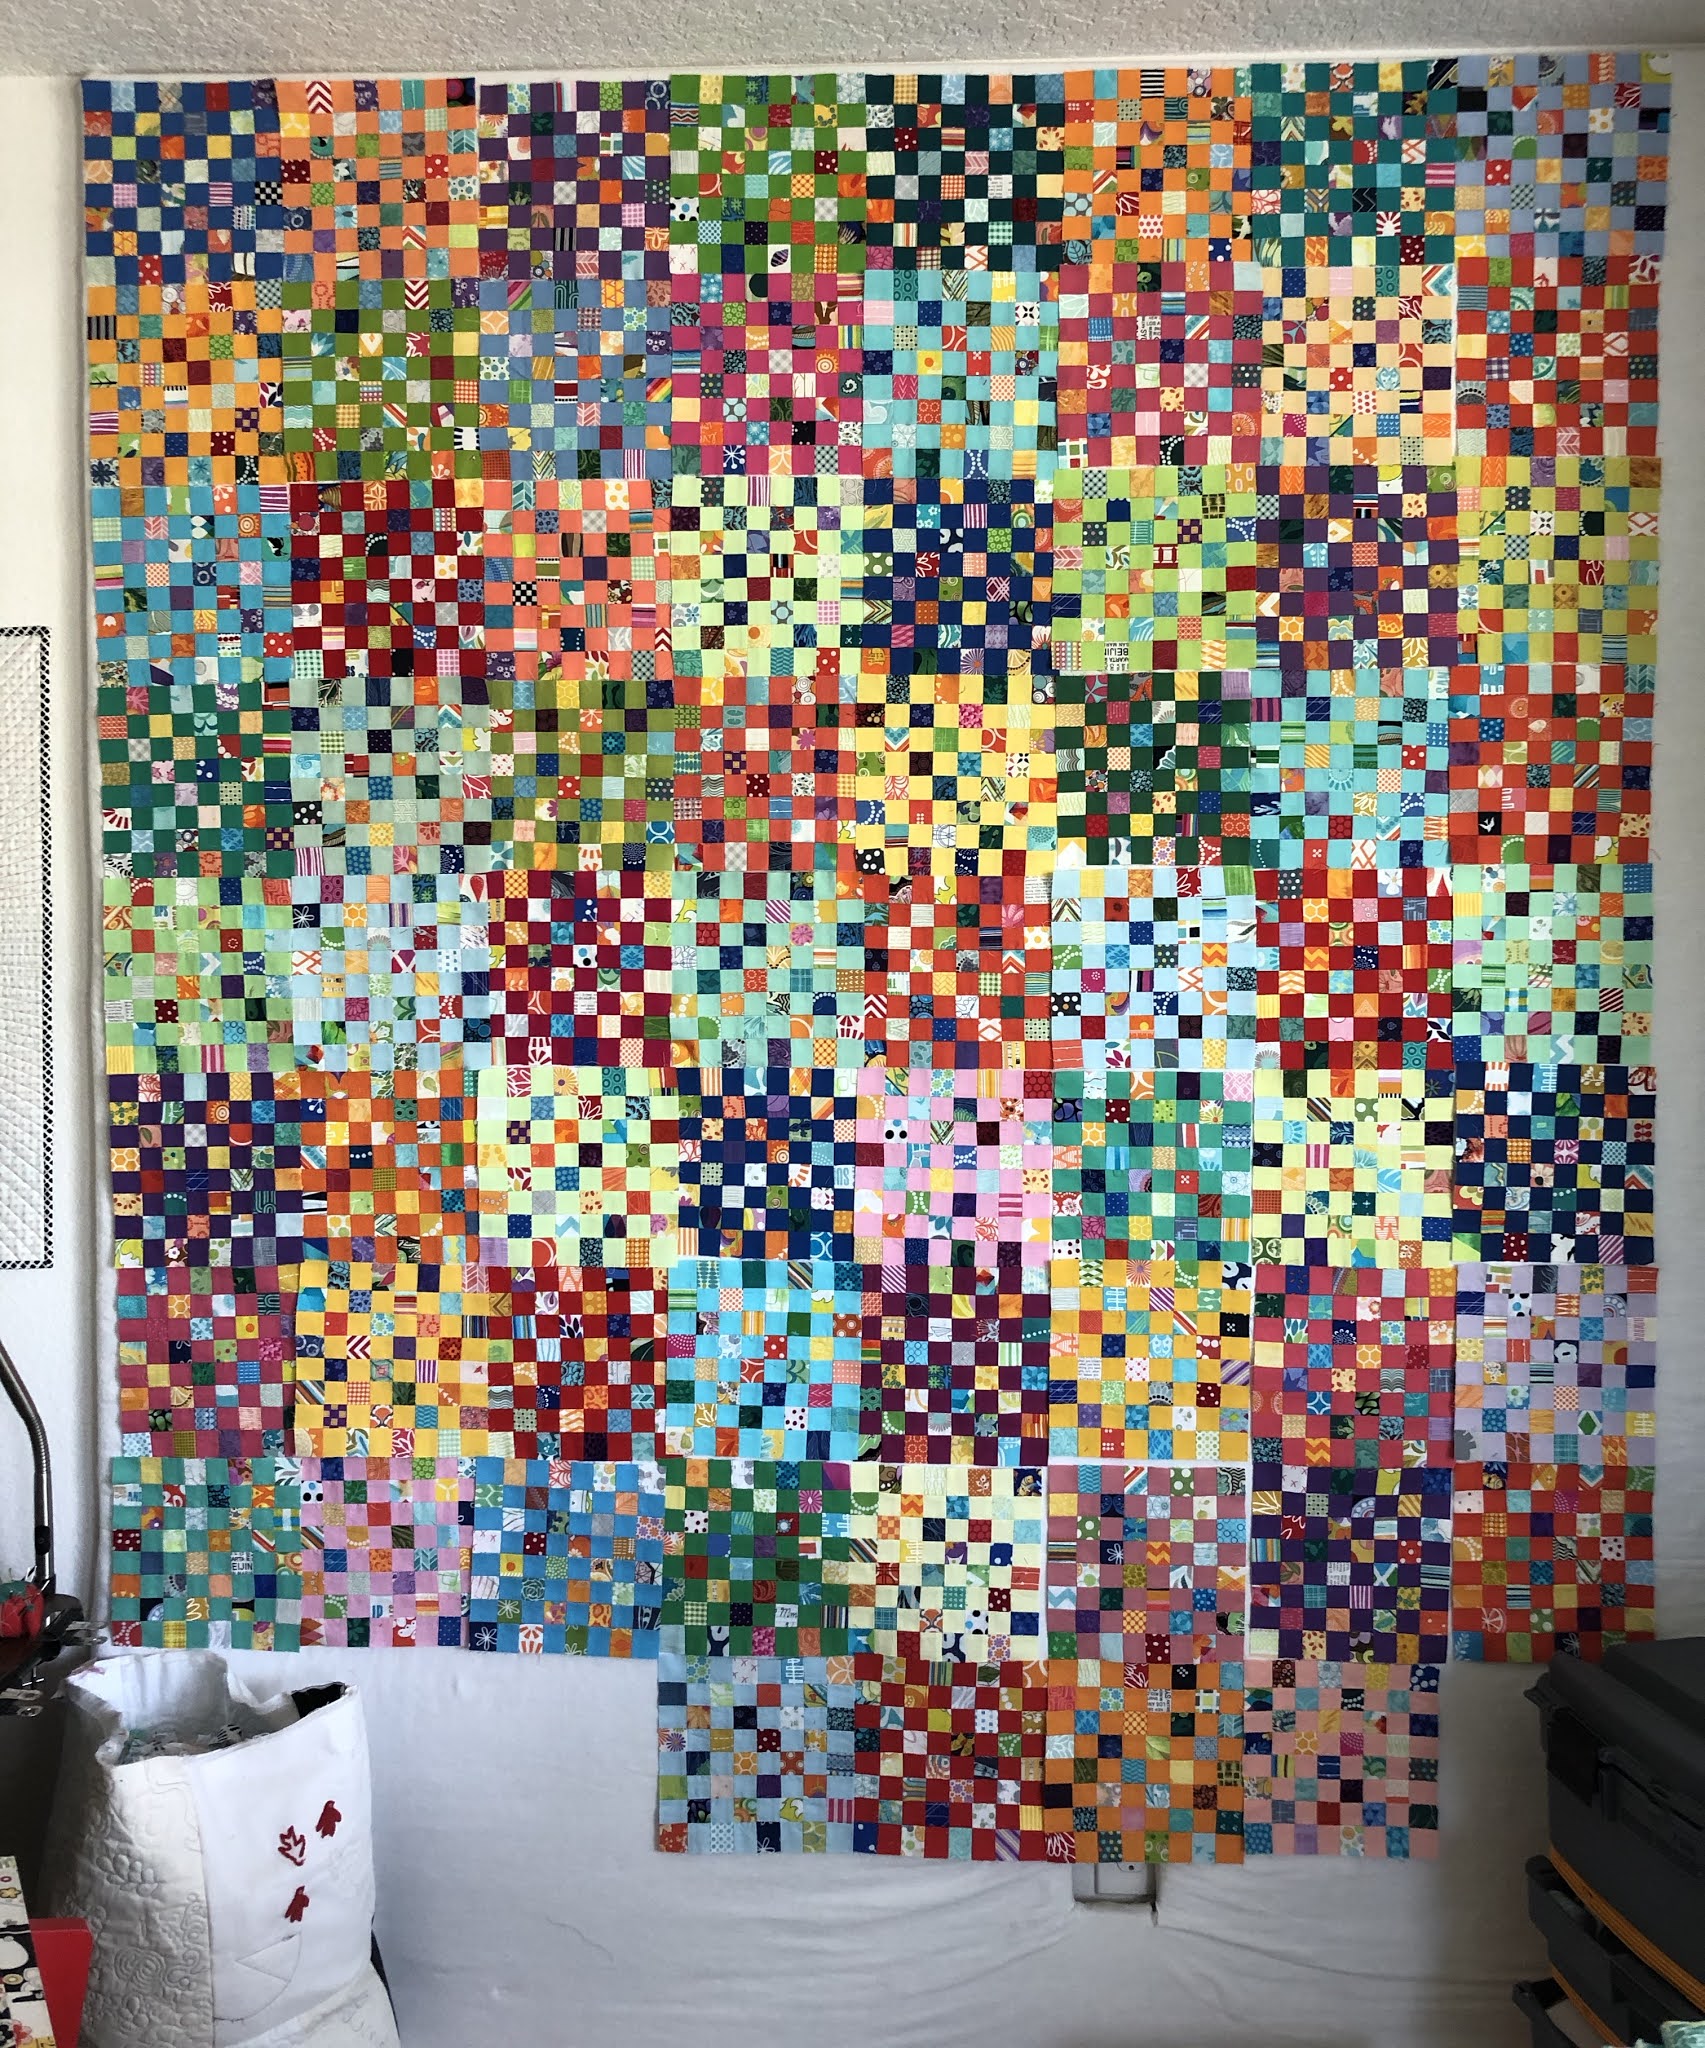
I put my hand-piecing project on the design wall to arrange more Starfish units, and gray background pieces, clipping them together with Wonder Clips. It's about 53" X 55" now.

I've also EPPed more Prudence medallions. The holes are where striped X units are needed. I have a long way to go on this quilt, but that's what I like about it.


Maria Shell's Improv Patchwork book arrived and I've spent hours looking through it.


Since I purchased the book directly from her, it included the best autograph I've ever seen! That's some great creativity, isn't it?

I sure liked her tips. One really jumped out at me, validating my propensity to fix mistakes. Maria says, "When you see a mistake, fix it." I find it impossible to do otherwise. 

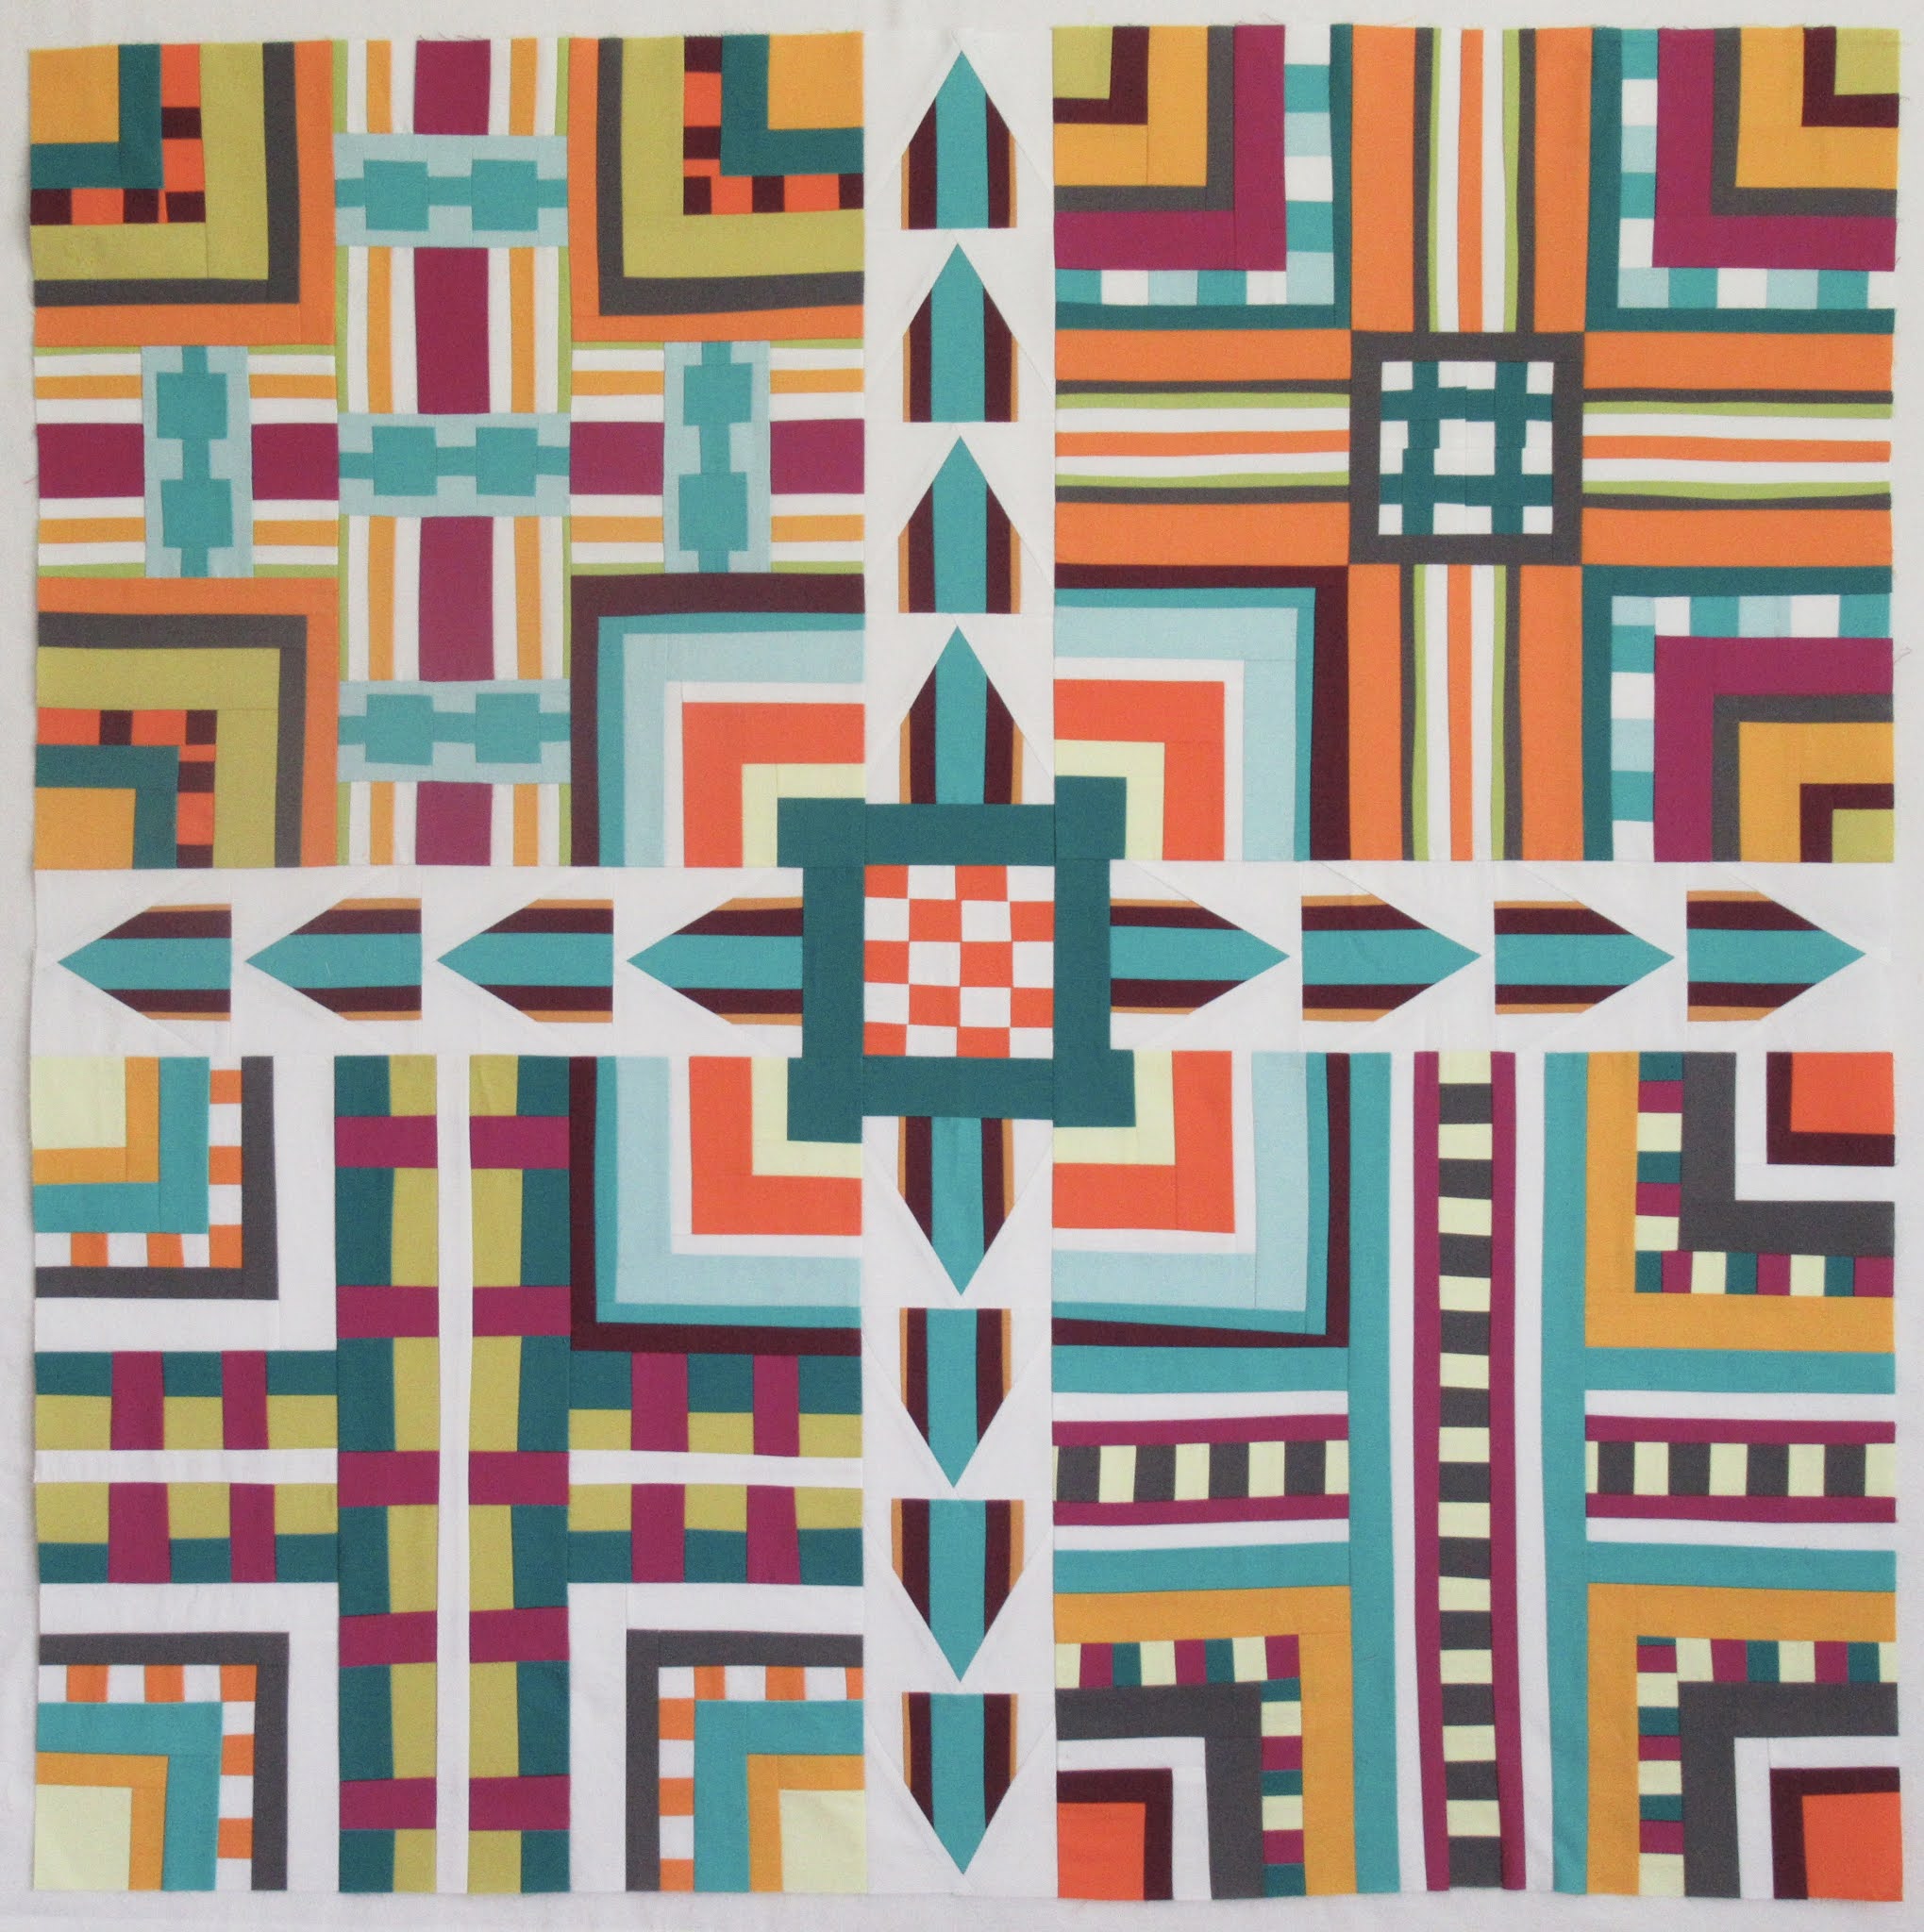
So maybe you'll get a chuckle from the error I made in my improv quilt. NO ONE NOTICED IT! Neither on my blog post, nor on Instagram! Can you spot it?

incorrect
correct
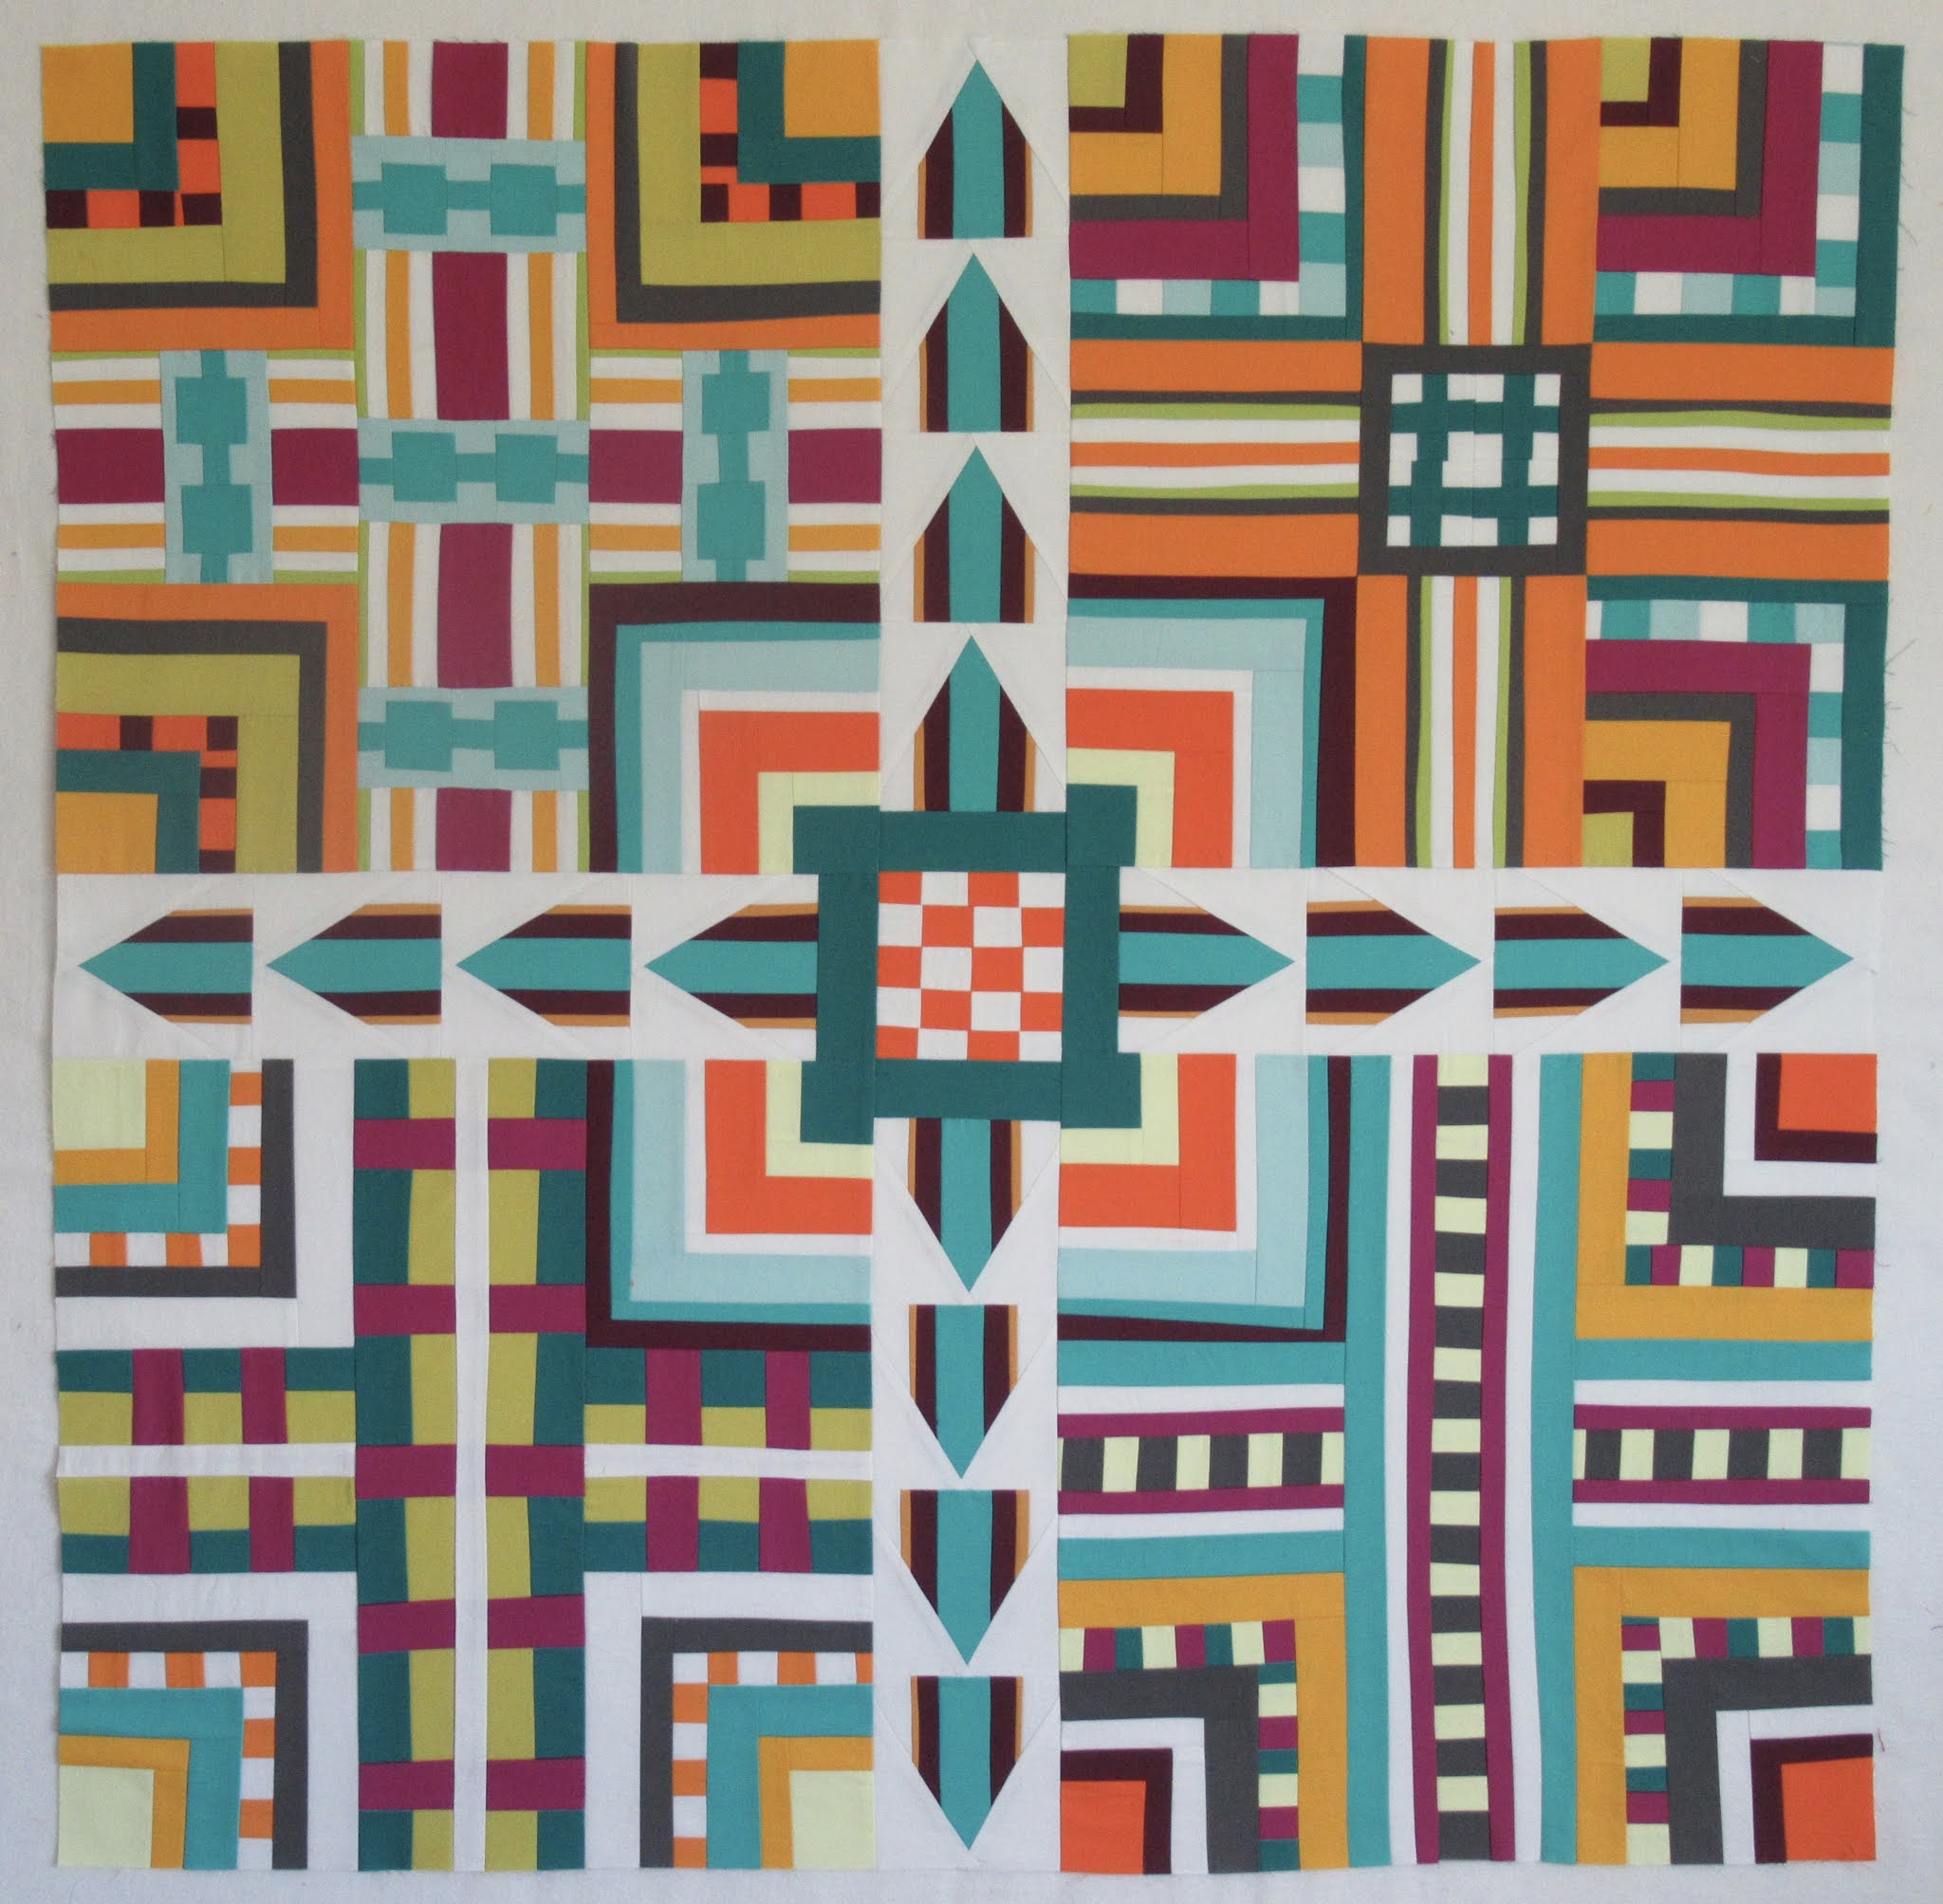
I didn't notice this piecing mistake for many hours, but I'm glad I took a photo because that's where I could "see" it! The upper-right section was turned 180-degrees the wrong way! Of course, I immediately took it apart, pressed it, and put it together again the right way. "When you see a mistake, fix it!"

I've begun to develop ideas for the next improv quilt I want to make, but won't allow myself to start until this one is finished. 

When making the quilt sandwich, for the first time I used black plastic clamps to hold the quilt along the edge of the table. I don't know why I waited to buy them because they were only $7 each from Lowe's. Batting is Quilter's Dream "Puff."

When I finished pin-basting the 45" square top, I machine-stitched ⅛" from the edge of quilt sandwich, a trick I learned from Amanda Murphy's book Ruler Work Quilting (see previous blog post). I think it helps keep the quilt flat during quilting. And with all the seams along the edges, the stitching helps hold the top together.

I started free motion quilting with concentric circles in the center. Then I did ruler work using a Sariditty brand Paradigm 60° triangle-shaped acrylic ruler. It's clear, like all quilting rulers, so it's difficult to see it in the picture. But I'm really liking the dimension that Puff batting gives! Those quilting lines really show up! Thread is 50-weight Aurifil on top, with 100-weight Wonderfil poly thread in the bobbin. 


It's been a long time since I've listened to a book that left me feeling flat, as Normal People by Sally Rooney did. It's about Connell and Marianne, (high-schoolers) who are in my opinion weird and over-sexed. They're both highly intelligent (he's a football player) live in Carrachlea, Ireland, and later attend Trinity College in Dublin. All of their relationship is based on a mutual desire for sex. Their mothers don't care; fathers aren't in the picture. The whole story goes from their failed relationship to another failed relationship, all built on sex, without ever completely resolving Connell and Marianne's inability to recognize affection for one another. Connell's most frequently-used words were, "I dunno." I plowed through the story because I expected something to happen - a resolution or explanation for their unusual behaviors. Call me a prude, but I dislike such a graphic, offensive story. I hope the characters' behaviors aren't what the author considers "normal!" Listening was a waste of my time. The only bit I enjoyed was that the narrator spoke with an Irish lilt! 

Linda's score: .01/5.0

Florida wildlife have been active lately, and these lovely creatures were walking through the neighborhood! This is a great white egret. 

This group dance of four sandhill cranes strolled up the street, not even pausing to nose a garbage bag awaiting pick-up. I determined that two cranes were adults (red skin on their crowns), very likely the parents, and two were juveniles (gray and rusty brown), their children.

Sandhill cranes are tall, and elegant-looking creatures, but wait until you hear them! There's nothing elegant about the way they call: loudly!

Our Coronavirus lives are gradually beginning to change. Big Cypress Quilters can now meet in the rec center, with 15 quilters permitted in our assigned room (we have 69 members). The first week nine were in attendance; on Tuesday 15 attended. Each quilter has her own table, six feet apart, and masks aren't required unless people are closer than six feet. Still, as usual I met up with Big Cypress Quilters on Zoom. One quilter who was at the rec center joined our Zoom call, so we chatted with several of them. Unfortunately we observed quilters who were less than six feet apart, not wearing masks. This is the behavior that concerns me.

Beginning October 4, our recreation centers are all re-opening with these guidelines. Personally, I'm still apprehensive about going into an enclosed space with a group, and will continue to sit out for a while. Linda

Sunday, September 20, 2020

Rulerwork Quilting Book: A Review

Mary at ZippyQuilts invited me to be a guest on her blog! Even though I’ve been blogging for 11 years, this is the first time I’ve been invited to write a post for someone else's site. What I've written here also appears on her blog. 


This post is to review a new book published by C&T: The Ultimate Guide to Rulerwork Quilting by Amanda Murphy.


Mary invited me to review the book knowing I'm an avid domestic machine quilter who began quilting in 2000, and started quilting with rulers in 2011. 


Here's one of my first rulerwork attempts - doing a no-no by using a regular free motion quilting foot against a Fine Line brand quilting ruler. 

Ruler work quilting with the WRONG machine foot!

For ruler work quilting, a quilter should use a ruler work quilting foot with a quarter-inch heel.

This is the Bernina #72 foot.


Two overall observations about the book:

  • Because Amanda quilts on a Bernina (both a domestic machine and a longarm machine) the book focuses on how to rulerwork quilt on a Bernina. One page is devoted to: "What if you don't own a Bernina?"
  • Pages 29 to 102 of the 127 pages have photos of rulers being used on a Bernina longarm
from the book

For me, currently using a Bernina 770QE for quilting, (I do not own a longarm), I was able to apply much of the information to my own Bernina experiences. She references using a stitch regulator, but those of us who quilt on a domestic machine with a stitch regulator, are unable to use the stitch regulator and a ruler work foot at the same time.


Interestingly, she mentions that rulerwork quilting is better for distributing quilting evenly across the surface because of being able to quilt in all directions. 

from the book

This made me smile because Jacqui Gering, a renown walking foot quilter with two quilting books under her belt, says precisely the opposite! According to Jacqui, there's no need to change directions when quilting. Is it any surprise that two quilters have differing views? And doesn't that make you feel better about how you quilt?


Amanda covers these important topics: 

  • thicknesses and shapes of rulers
  • ruler work quilting table set-up
  • sewing machine settings
  • needles

I concur with these points covered in the book:

  • Ruler thickness is important, and which thickness ruler to buy depends on whether your machine’s ruler foot is high shank or low shank

Each sewing machine brand needs its appropriate high shank or low shank ruler work foot.

  • Buy a ruler you will use most often
Though Amanda mentions that different ruler brands are available, she definitely focuses on and uses her own line of Good Measure rulers made by Bernina. 
from the book

Just as a quiltmaker invests in one or two most-used rotary cutting rulers, a rulerwork quilter need only invest in one or two rulers. Begin rulerwork quilting with a straight edge and/or gentle curve ruler and you’re good to go - like the Good Measure straight edge/curved edge ruler (above left), or Westalee straight edge/curved edge ruler (shown below).


These are some of the brands of rulers I've accumulated in the past nine years, with Fine Line rulers being the ones I use most often... probably because that's the brand I started with. I don't own any Good Measure brand rulers.


My ruler photo includes a picture of a roll of skateboard grip - a sort of sandpaper that's grittier than sandpaper with an adhesive back. It's the best product I've found for the bottom of the ruler, to make it "stick" to fabric while quilting. Amanda suggests putting blue painter's tape or Stable Tape (by Westalee) on the bottom of the ruler.


A bit about Fine Line rulers... They're different - made with two vertical posts to "hang onto" when quilting (see first blog picture). However, after buying a sewing machine with the dual feed feature, I quickly learned that these ruler posts bump into the dual feed! I can't use the ruler on the back of the ruler foot, so that's something to keep in mind when considering a Fine Line brand ruler.

Fine Line ruler posts bump into dual feed mechanism

Amanda mentions Bernina's echo clips, something I frequently use, though the brand I own is made by Westalee. Each slips on/off the ruler foot, and has different spacing, so you can choose how far away to quilt from the previous line of quilting. It's well worth $10 for the Westalee set!
  • Set-up is important: have a flat work surface with a means for easy quilt gliding 

Amanda recommends the Sew Steady table, and that’s exactly what I have. Top it with a Supreme Slider (or a Queen Supreme if you have a large machine harp), and you’re good.


Here's my quilting set-up contrived by placing two hollow-core doors across four IKEA adjustable-height Finnvard trestles.


Amanda mentions wearing quilting gloves for rulerwork quilting. Personally, I prefer rubbing Neutrogena original formula hand cream on my hands, and then donning a pair of Marcia Baraldi Quilting Grip Gloves. It's the perfect combo because my fingertips are is "grippy" and yet free to grab threads, tie knots, and even change a bobbin! (Neutrogena hand cream won't harm your quilt.)

Although I have my favorite methods for rulerwork quilting, I also learned a thing or two in the book. The tip that meant the most to me is this one... 

from the book

I've heard of taking a final "lap" around the outside of a quilt top, but I'd never heard of stitching around the perimeter of a basted quilt sandwich. I tried this on my latest quilt finish, my "Hole Punch Ribbon" quilt, and it worked to help keep my quilt "on the square!" I blogged about this quilt here. 

Amanda concludes the book with 31 pages of colorful quilt examples, showing different quilting designs on real quilts including quilt-as-you-go; followed by 14 pages about domestic machine quilting and troubleshooting; and 10 pages on longarm quilting and troubleshooting.

All in all, this book is a good resource for a thorough introduction to rulerwork quilting, and is especially worthwhile if the quilter quilts on a Bernina. Then, it's a must-buy! Linda

Friday, September 18, 2020

Linear Blocks Virtual Workshop, and Such

This busy week is nearly at an end with my Saturday afternoon (1 pm Eastern Time) No Tails Binding program to South Florida MQG, and Sunday's ruler work quilting book review finishing this weekend.

Days leading up to now have been full of good things, including positive health reports from my oncologist and cardio-vascular doctors, the former with whom I got to meet virtually.

I managed to finish piecing the Charming Postage Stamp quilt top before taking last weekend's virtual workshop. This is a heavy quilt top - those are 64-patch blocks - measuring about 64" X 72". It's on a hanger in the guest room closet, awaiting quilting 


Of course, the most fun I had was last Saturday and Sunday afternoon spent with Maria Shell @talesofastitcher in her "Linear Blocks: Line into Shape" workshop,

The workshop content was fantastic! Maria is a skilled instructor who does an excellent job of explaining her design concepts, and elements she uses to create them. Much of the workshop was based on information in her Improv Patchwork book (I ordered the book from her and it hasn't yet arrived), and she also gave us a total of six hand-outs with information not included in her book. 

Only the virtual format was a little challenging. Both days ran over the three-hour time allotment in large part due to 34 students being able to ask questions as Maria taught.

And in small part to this being Maria's first virtual teaching experience.  Still, the break-out groups of 7-8 students, with a chance to get acquainted (I met two other Floridians) was very nice, as was the after-class tour of Maria's studio.

She allowed us to take screen shots of her quilts, for personal use, but asked us not to publicly share those pictures. You'll have to believe me when I say that I was absolutely enthralled with Maria's wonderful improv designs. I'm completely smitten with her style!

Maria refers to her improv technique as "patterning" and said to keep creating patterns as we pieced elements. So, after choosing an all-solids color palette, I worked as she does - rotary cutting strips without using a ruler. This is the result of my first day of improv cutting and sewing to make tiny crosses, mirror ribbons, and bits. She shares other named patterns too. 

Maria explained that these improv designs are inspired by traditional blocks, and she uses Barbara Brackman's Encyclopedia of Pieced Blocks as her resource. (Yay, I bought this book at least 20 years ago!) She suggested we arrange our designs to make a Rail Fence, Log Cabin, or Crossed Square. 

Progress through the week meant trial and error arranging shapes. 

I chose to work with the Crossed Square block, and began to recognize a comfort level with the color combinations and patterns I made. 

When I discovered that I liked bits (two or three color rows of small pieces) in each block, and moved the "un-bit" blocks to the center, the arrangement took shape.

Once I was happy with the placement of improv units, I used a rotary ruler to square-up units to sizes - 7½" X  7½" and 6" X 20" - that would finish into a 20-inch square block. I also trialed different sashing colors between the blocks, but decided I wanted more pattern!

Note: Along the edges are the patterns I didn't use! This style of improv creates more scraps! 😟

By Thursday evening, this was my completed 45" X 45" quilt top. It's extremely graphic, and quite bright! It pretty much seems that whatever quilting design I quilt on top won't show a bit! 

In the past, I have taken improv workshops with Sherri Lynn Wood; Tara Faughnan; Carson Converse; Anne Sullivan; and Melanie Tuazon, and still struggled to create modern improv designs that I can do, and that I like. I've often just thrown in the towel. So it's been a happy surprised to find myself excited about Maria's improv style. It seems to suit me! But I still have a lot to learn... like how to pare down/limit my riotous color palette, and patterning. 

When the Improv Patchwork book arrives, I will start another quilt, but this time will choose my own traditional block to make modern. There's so much to explore with this patterned improv concept that I will be happily entertained for months!

A while back, when a bought more jumbo-sized Bernina bobbins for my 770QE, I saved the plastic screw-top containers they came in. This week I found the perfect use for them... to hold dozens of broken pins and needles that I've been collecting in a little drawer. I know other sewists use empty prescription bottles, but I donate those to a local church that fills them with fishing line and a hook for Operation Shoebox boxes. I'm pleased to have discovered this bobbin container use, and have a couple more empties to fill.


Three bags of Hy-Vee white popcorn were delivered this week! What a surprise! This is my favorite Iowa-grown popcorn, and the brand I always bring home from a visit to Kansas City. After mentioning to our daughter that we needed to visit them because I was out of Hy-Vee popcorn, she started looking for it. Hy-Vee popcorn has been out of stock (!), so when Tay crawled into a low store shelf and found three bags in the back, they snatched them up. Popcorn is their way of thanking me for the masks I've been making and mailing to them. 💕 

Last Sunday's sermon - What the World Needs Now - by Pastor Mike Housholder was presented entirely while he was on the move - walking through the Des Moines (Iowa) Sculpture Park, driving in his car, and walking to these crosses on Lutheran Church of Hope property in West Des Moines. His message about love resonated when he questioned "How does a person deal with someone who lies about you?" "Love your enemies," the Bible says, even though that's completely counter-intuitive to human nature. Pastor Mike shares how "Radical love is the pathway to the new normal."

On Tuesday I started the "Children of the Day" Beth Moore Bible study of Thessalonians I and II. It's a Spirit-filling study that's precisely what I need to get through these endless days. 

Let me attempt to leave you with a smile. 
Linda

Friday, September 11, 2020

Full Speed Ahead

I've put on my running shoes to keep up with the next eight days of activities! Every month it seems that obligations contrive to pile up in a window of time that has me triple-checking my schedule to see what I need to do each day. 

Last evening, I joined a two-hour+ "Sip and Sew" with 20 other quilters from South Florida MQG. I'm getting to know people better and make new friends. 

On Saturday I'll briefly pop into the Central Florida MQG Sew-In before logging into my two-afternoon (Saturday and Sunday) virtual workshop with Maria Shell @talesofastitcher. I've already expressed how excited I am to take "Linear Blocks: Line into Shape." 

After a Monday morning doc appointment, there's Show and Tell prep for the evening virtual Central Florida MQG meeting; followed Tuesday morning with the start of a 10-week virtual Bible study - "Children of the Day" with Beth Moore" (if you've taken a Beth Moore workshop, you know how much homework there is!); and an afternoon Zoom presentation to Big Cypress Quilters on the topic of "Quilt Photography."

Add another doc appointment; prep for another Saturday virtual presentation on the topic: "No Tails Binding: Mitered Corners by Machine" to South Florida MQG; and a Sunday, Sept. 20 blog post to share as a guest reviewer of a new book The Ultimate Guide to Rulerwork Quilting, by Amanda Murphy... and there you are. You've just watched me jog through the week!

Knowing that limited sewing time lies ahead, I set myself to making this past week. 

This was the Tuesday status of my postage stamp quilt with 68 of 72-needed blocks made. 
Photo taken with my iPhone 8 - a very inaccurate representation of colors 

Each block is a 64-patch that finishes at 8" X 8".

With the blocks complete, now the quilt top is almost pieced, which hasn't been a small task! That's because when joining a block to a block, I took great care to make sure all seven seams aligned. Now I'm doing the same with the rows. Lots of pinning!


And gosh, is it a heavy quilt, with all those seam allowances! Though I'd prefer not to add batting to the quilt sandwich, I think the seam allowances need to have something to "bury" into. I already have a plan to rulerwork quilt clamshells across the 64" X 72" top. 

Our Kansas City family returned to a hybrid form of school on Wednesday. Each of the boys, in fourth and fifth grades, needs to take two masks to school on the days they're present in person.
Aesa (4th grade) and Tay (5th grade)

So, I've been masking-making again (for their mom too), and switched to the free mask pattern by JapaneseSewingBooks. It has a nice 3D contour across the cheeks and nose, comes in six sizes, and has a channel for elastic. Rather than sew-in the ⅛"-wide elastic, I can knot it to be fit to the face, with the knot then slid into the fabric channel. 

I was asked to make KC Chiefs fabric masks, and though I checked at the usual online shops, and even called two from-Kansas City friends who live near me, no one has Chiefs fabric. So, I made solid red masks instead. The boys should at least like dinosaurs and alligators on the other masks. Now the masks are finished and in the mail.

The second embroidery project I finished is this flex case, from Aneela Hoey's book Stitch and Sew.
For the front, I selected green linen fabric, then chose a coordinating print fabric for the back. Finally I picked colors of size 8 pearl cotton for the hand embroidery. The finished case measures 4½" X 8½" - a good size for eyeglasses or rotary cutters. It came together easily, and another is prepped to stitch.

In the kitchen, I actually made something! Dan has always said my French bread is the best, so when he asks me to make a loaf, I oblige. We have a new, oversized baking sheet, so this is the first time I've been able to braid the dough to make a truly long French loaf - almost 24"! It tasted excellent, if I do say so myself. 

Book Recommendation
America's First Daughter by Stephanie Dray offers an insight into the history of one of our founding fathers: Thomas Jefferson. Though I am familiar with Monticello, and knew that Mr. Jefferson kept a slave as his concubine (Sally Hemings), I didn't appreciate the family emotions that must have played out behind closed doors. Nor did I know that Mr. Jefferson was an ambassador to France which is where his oldest daughter Patsy (Martha) was educated, grew up, and "came out," preparing her for the role she was later (1800-1801) to play upon returning to the US and her father's presidency in Washington City. Oddly enough, I found it fascinating to realize that the enmity and accusations being flung between the Republicans and Federalists are the same we're hearing from our candidates and officials today! Politics haven't changed!

This book is based on truths that make me respect Martha Jefferson Randolph, America's first daughter. As far as entertainment value, it doesn't score as high as others I've read. But for education,  understanding, and sparking a desire to visit some of these historic Virginia sites, I give it high marks. Audio book-o-philes will recognize an oft-heard narrator: Cassandra Campbell.

Linda's score: 4.0/5.0

As I was driving to a lab for morning bloodwork, I stopped to snap this sky view. Apparently the contrails of two jet planes created this ❌ in the sky. 

It's up to you to decide if the formation means that this has been a let's-cross-it-out sort of year, or that we've been given an over-sized, God-breathed kiss. I'm choosing the latter. Linda

LinkWithin

Related Posts Widget for Blogs by LinkWithin