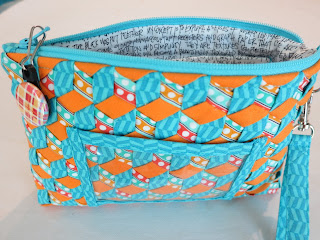
Then I decided what I wanted to make - my favorite wristlet: The Essential Wristlet.
First I cut lots of skinny strips on the cross-grain of my fabric. I ran them through my 1/2" bias tape maker to fold both raw edges to the center. After positioning a piece of fusible interfacing, fusible side up, to my ironing table, I pinned the strips, fold side down on top of the interfacing.
The next step was to make more strips with a second fabric - a small print - and use the small-sized Wefty needle to weave those strips through at a 30-degree angle. The pattern is Tumbling Blocks, and I followed this YouTube video.
The last diagonal weave was a solid orange fabric, woven at the opposite 30-degree angle.
Also, here's a nice tutorial of it by MisterDomestic who recently hosted a weave-along.
Anyway, I ended up sewing my newly created woven fabric into this. Admittedly, it was a little tricky putting that side zipper in the fabric, given that the weaving makes it extra thick. But, that thickness sure gives the wristlet a nice sturdiness.
Also on the outside I added to the opposite side of the wristlet a vinyl rectangle, edged with fabric strips. It's not included in the pattern, but is the ideal place to put my resident ID.
Happily, I had this cute zipper tab in my stash - from an Etsy order placed for an assortment of zipper tabs. Living as I do without a quilt shop nearby, it's most convenient to keep these kinds of supplies on hand.
Inside the wristlet I used one of my favorite texty-type prints, and added another inside zipper. The wristlet pattern does include the open pocket (seen at the bottom of this picture) for a cell phone, but the pattern doesn't include the zipper pocket. I find that pocket a necessity for valuables like a few dollars cash and driver's license.
This wristlet is the perfect size for my necessities: iPhone, ID, tissues, a pen, lip gloss, the garage remote and golf cart key, and a few dollars. Who needs more than that?
This is the fourth time I've made this wristlet, and I'm completely satisfied with every iteration of it. Linda
Edited to add: I'm linking this post to "Bag It 2016" being hosted by Elm Street Quilts.


Wow!
ReplyDeleteAdorable! Looks complicated but so cute!!!
ReplyDeleteYou never cease to amaze me:)
ReplyDeletewow. I was so surprised to see you doing modern meshwork! Your pouch turned out really nice!
ReplyDeleteWOW! It is gorgeous Linda! I have seen the weaving pop up on IG but haven't jumped on the bandwagon....yet!!!
ReplyDeleteThis is amazing! I've never seen anything like it before. You may want to link your bag up with my Bag It event - some really great sponsors have offered prizes and to enter you share a bag you made through a link up. I've got some tutorials available too.
ReplyDeleteThat is fantastic Linda!!
ReplyDeleteWhat a cute little bag but I can imagine that the construction of the actual bag wasn't that easy with all those layers. But you managed it very well and it turned out perfect!
ReplyDeleteWhat a great project. You go, girl!
ReplyDeleteYou are very patient to take the time to make such a perfectly gorgeous wristlet. It looks amazing and Is sure to be admired wherever you go!
ReplyDeleteOh my - be still my pounding heart! That is just TOO cool. You are so talented and patient. That looks like a lot of work, but the outcome is so unique that it's worth it. Beautiful
ReplyDeleteYou are amazing in your sewing and creations! I love this--so fabulous with that weaving. Another place you are a trend-setter--thanks for sharing!
ReplyDeleteWhy am I not surprised? It's incredible, just like you. XO
ReplyDeleteAmazing and so you with those colors. The aqua and orange remind me a lot of how I think of you and your color sense.
ReplyDelete