When we first moved into this house, I had very good lighting in my west-facing sewing room. Then, we paid to have UV film put on those bay windows. The lighting hasn't been the same since.
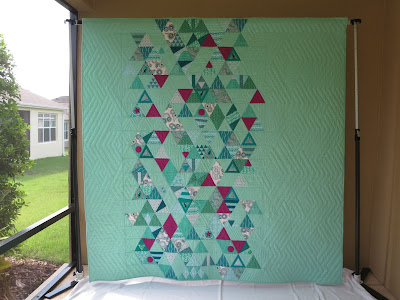
The following is what I went through to photograph my latest quilt finish - the Bernina Zen Chic QAL quilt that I'm calling "Diamonds in the Pond." (Thank you to those who offered name suggestions!)
So I brought it into my sewing room. This is the picture with the quilt facing the UV film-covered windows. The ceiling lights cast a glare.
Then I decided to hang the quilt on my design wall. I came up with the set-up below to position the camera on the quilt center. It's a mini-tripod on top of a step stool that's on top of IKEA "Alex" rolling drawers!
To avoid the keystone effect - a quilt photograph at an angle - the camera should be pointed directly at the center of the quilt.
I took advantage of the camera's timer and used those ten seconds to pick up my Slimline Daylight lamp to light the whole scene.
The quilt in the above picture is "Owl Always Love You," an improv design inspired by my grandson's artwork. I figured that as long as I was messing around with pictures, I might as well take photos of several quilts.
Anyway, I tried holding the lamp in different positions, at different angles. Then I repeatedly loaded a few pictures onto the computer to check what lighting position worked best.
Holding the Daylight lamp up too high made a glare.
Overheads on/off. Blinds open/closed. Lamp on/off. Gosh, what a rig-a-ma-roll!
Here's the best photo before cropping.
 |
| "Diamonds in the Pond" 78-1/2" X 78-1/2" |
And yes, I'm completely thrilled to have this quilt finished! I met today's quilt-along deadline, so this quilt picture appears on both the Bernina "We All Sew" blog, and on my Instagram feed with the hashtag #berninazenchicqal (Go to the hashtag to check out the gorgeous color combos quilters used to make this triangle quilt!)
If you have any thoughts to "shed light" (ha, ha) on my photo set-up, I'm open to hearing them! Linda


Well it's beautiful in any light! But yes, shadows and angles and distance (to say nothing of even the slightest of breezes) all make quilt photography a challenge. Your final pick does look good- quilt nice and square, lighting is good. But oh the shenanigans to get it. So much work to lug, hang, reposition, etc. And to assemble your ingenious tower deal. But you got it. And it's is a stupendous quilt.
ReplyDeleteBeautiful quilt! Oh the problems I go through to take photos of our quilts just to post it on my blog, it creates much angst for me especially during Winter. To me, you have lovely areas in your house to take photos and for me all of the photos look great. I depend on PicMonkey to edit my photos and I have invest in buying some backdrops and lighting but in the end, for me, I am only a small time blogger and I don't need professional looking photos. Plus I only use my iPhone for photos and don't want to mess with a SLR, too much tech for me.
ReplyDeleteI’m a bit like Rose. I’m a small time blogger who has no real use for professional photos so it’s my iPhone and a flat surface for me. I do like some outdoor shots if I can get an agreeable quilt holder as then the light, from the sun, is very even! As I said on IG, I admire your tenacity and perfectionism, in both quilting and photography!
ReplyDeleteWhat an interesting post! Documenting each way to try and take the picture(s) was great for your blog readers! Thanks...
ReplyDeleteI think we all have qualms about photographing our quilts! In this tiny house I can't even lay a large quilt on the floor and try to shoot from the ceiling down to capture the entire quilt, much less have ideal lighting. But as some of the previous commenters have indicated we're small blog quilters, and don't really need professional photos. I'd love to have something like your quilt stand though, that must make it all so much easier (no dog hair on the quilt!).
ReplyDeleteI don't have any photo set up and do the best I can, when I can.
ReplyDeleteI totally agree that taking good quilt pictures is so difficult. I have nowhere in my house that has the space and light for full quilt pics. I usually set my quilt stand up in my backyard and take pictures in either early morning or right before dusk (or during the day if we have an overcast sky).
ReplyDeleteI think you did a fine job. I was interesting in the link from the New York Beauties guy where he said he put a large white board to "bounce" his light back onto the quilt. I'll have to try that sometimes. Working in Affinity/Photoshop also helps correct photographs, too. (Affinity is waaaay cheaper and just as good.)
ReplyDeletePhotographing quilts can really be a challenge. I like the 'in the wild' shots just for fun but then usually also try for a flat shot with good lighting. My usual approach has been on my design wall with daylight bulbs and a tripod. Here's a link I used for getting started. Maybe it will help. https://www.hollyknott.com/stq/shooting.htm
ReplyDelete