Wednesday, September 29, 2010

First Birthday

On Tuesday, this little man turned one year old, already! He's such a happy, agreeable guy. Noisy-talkative too.

Tay's birthday sheet cake was stenciled with jungle animals and trimmed with green frosting.
It was his first ever taste of cake.
He drank quite a bit of water, so he must have thought it was pretty rich too.
Our small family and friends gathering was in Kansas, but we were happy to have our son and his family - almost five month-old Austin - join us from Florida via Skype.


For several weeks now, I've been at our daughter Jill's new home because her pregnancy is giving her problems. 
Jill and Maher
She is seeing a physical therapist for a painful, separated pelvis and isn't supposed to put undue strain on herself by moving, twisting, or bending the wrong way. If she doesn't take care, she could easily dislocate a hip. You might quickly realize that with a one year-old, Jill needs help, and I'm here to do just that.

What a blessing that Jill and her family moved in July from Sydney, Australia to Overland Park, Kansas, and that I am now only 3-1/2 hours away from them! Throughout each visit I've been cooking and cleaning a little, and spending lots of time unpacking boxes, and sorting, organizing and putting away their belongings, all around the schedule of a very active one year-old who still isn't walking. I'd forgotten how much physical effort it takes to keep up with a baby and a household!

Still, we managed to have a successful, three-day garage sale.
 

Until the baby's birth by C-section on Monday, November 8, I will be at Jill's house for several days every week. It's certain there won't be much, if any, productivity from me in the way of quilting, embroidery, or sewing, so I'll say it here and now, I won't be able to complete my own "Ten in '10 Challenge."

Life happens... and it's good.

Tuesday, September 28, 2010

Versatility and More

Pokey, AKA Gwen, of Pokeydotquilting recently gave me "The Versatile Blogger" badge. I guess that means (according to the dictionary) I'm "able to adapt to many different functions or activities." Perhaps the second definition of versatile is more apropos: "changeable" or "inconstant"! In either case, I'm honored. The badge comes with an invitation to list seven little known (forgotten!) facts about myself.
  1. I attended six elementary schools and had moved 12 times by the time I was 18 years old. (Dad was in sales, can you tell?)
  2. I was the only girl in my high school senior class who was nominated for homecoming queen and senior queen... and didn't make the "top five" either time!
  3. I was 17 years old, and Dan was 18, when we met for the first time in the parking lot of a Hy-Vee (midwest grocery store chain). Our wedding was 362 days later.
  4. The "Make It Yourself With Wool" contest is an annual competition that I entered for several years when I was in my mid-20s. Once, I was a district winner, but my age group didn't advance to state competition. Pah.
  5. When I was 41 years old, while working full time, I began attending college part-time. In 2000, at the age of 47, I graduated. That year I was the only non-traditional student to earn a public relations degree at Drake University.
  6. As a college graduation gift, my husband surprised me with a 2000, silver, stick-shift, turbo, Volkswagen New Beetle. This is a picture of the picture of me at my May, 2000 graduation party. I love that car and still drive it everywhere.
  7. I thrive on Beth Moore Bible studies. The more daily homework - and scripture memory work - the better! I'm currently in a Tuesday morning study of the book of Revelation.
  8. I know I'm not supposed to share eight things, but can you tell I like to write?
Now I'd like to pass along "The Versatile Blogger" badge to some other bloggers. In no particular order they are:
I can't wait to read seven unknown/little known things about each of these wonderful ladies.

Monday, September 27, 2010

Window Treatments for a Value

Not much quiltmaking has been happening since I offered to make window treatments for three windows at Jill's house in Kansas. Two of the windows are those half-circle, decorative windows you sometimes see on newer homes. I had wondered how those window coverings were made, and now I know. The old ones, which were in tatters from sun exposure on the south side of the house, were my pattern.
I'd always thought the curtain must be a half-circle shape, like a fan, so I was surprised to learn it's just one really long rectangle-shape! It took three 58" widths of fabric to make the length needed.
At the top of the window, a clear flexible tube is threaded through the rod pocket and shaped for the arch. The bottom of the rectangle is simply accordion-pleated and secured with a zip tie! Who knew!?

From the inside you can see the zip tie.
My greatest satisfaction in all this comes in the savings. I sewed them with Roc-lon drapery lining fabric which is made to block sunlight and provide "energy saver" insulation. I used two layers of fabric for each half-circle window and made both for only $21! And the decorator quoted Jill $70 for one window. It's stuff like this that makes me grateful that I can sew... and sorry for the young people who are not being exposed to that valuable skill.

From the outside of the house, they look pretty darned good, if I do say so myself.
(Below) This 40"-long window treatment, a tabbed valance, is on the single window in "my" room at their house. If you recall, from the same print I made posh pillowcases, for the bed.
I love how they turned out, and they weren't expensive to make either since I already had white fabric for lining. Aren't we glad we know how to sew and save pennies?


It's been a while since I've shared a good joke. This one is from Elizabeth, a sweet and talented - she bakes, cooks, sews, and takes beautiful photographs - young lady, who's 16 (Oops!) 14 years old. She has the loveliest blog too: JoyfulJewels4Jesus.

Why did the computer technician's cheese sandwich always disappear?
Because his *mouse* ate it!

Thursday, September 23, 2010

A Blogospheric Buddy!

Today I had the happy pleasure of meeting a fellow quilter-blogger, Carla, of Lollyquiltz. She has a colorful blog with beautiful photos of quilts - both personal and for missions - and her grandchildren. Let me tell you, Carla is just as lovely in person as the words and images she conveys through her blog.

We met at Homer's Coffee Shop in old Overland Park, Kansas. After more than an hour of chatting, that passed in about five minutes, we walked to nearby Harper's Fabric and Quilt Company where the owner, Elaine, took this picture of Carla and me. 

When we first met, Carla remarked that I didn't have curly hair like my blog picture. She's right! Guess I need to get a new picture of myself.

Just so you know how sweet Carla really is, she came bearing gifts! I received a Pink Flamingo cookbook published by her quilting small group of eight women who have been meeting at least monthly for the past eight years (How cool is that!?); and four fat quarters of Denyse Schmidt fabrics! I am touched by Carla's generosity,

It was very nice to browse through the quilt shop with her, looking at fabrics, patterns, and hearing about Kansas City's Modern Quilt Guild.

Our time together passed much too quickly, and Carla had to hustle off to an appointment. I stayed in the shop, and to no one's surprise, I managed to find several fabrics I liked. 
Because of Carla - it was her suggestion to go to Harper's! - in my sewing future there's fabric to make another Marie Madeline Studio Route 66 skirt, and a very neat "Trixie" bag by Renay of Pursestring Patterns. Renay works at Harper's, so it was nice to have her show me her purse/bag patterns and samples.

Carla made today a glorious day. And later, swapping emails, we realized we'd both thought of questions and subjects we wanted to ask each other about. Guess we'll just have to make sure to get around to those topics the next time we meet! 

Wednesday, September 22, 2010

Stitchery, Australian Style

I'm under the influence... of Australians! I've begun to take notice of how many projects - quilts and embroideries - I'm working on are based on what Australians are designing and making.

When the lovely Miss Di of Darling Point (Sydney) showed me the pretty, hand-embroidered quilt she'd made to remember a trip to Italy, interest in stitchery began to take hold of me.
Di herself designed each of the embroideries in this quilt! She's done a remarkable job of capturing the architectural features of the places she and her husband visited.

Thanks to Di, and two other stitchery designing friends - Jenny and Cheryl - I always have a stitchery or two in progress, though I haven't yet progressed to designing my own. That creative spark isn't sparking for me at this time.

For a couple weeks I've been working on "The Paris Collection" pattern by Natalie Lymer of Cinderberry Stitches. I bought my pattern in Sydney and, wouldn't you know, this summer found it for sale at a local quilt show.
Natalie certainly has a distinctive style.
I used Cosmo threads for the embroidery, and sewed the bag and coordinating needle case with Australian fabrics purchased from the Remnant Warehouse in Sydney. I have special memories of that day, fabric shopping with my dear friends, Di J. and Di B.

Fabrics are from the "Emperor's Garden" collection by "A Day in the Country" owner Sue Ross.
I know I'm going to enjoy using this as a stitchery tote. A girl can't have too many of those. (Lindi, I still love using the one you made for me.  Thank you! It's also very special.)

Sunday, September 19, 2010

Bow Ties

I like to make blocks with other quilters. It means you don't have to take responsibility for making a whole quilt, and you get to make a block that you might never have made otherwise. Just send me some background fabric, tell me the theme, point me to a pattern and I'm happy to play along. That's what my friend, the lovely Miss Di did. She even sweetened the deal by including in the parcel of background fabric, a pot mat and a pretty fat quarter. I certainly wouldn't call it bribery, would you?

Di asked me to make 18 Bow Tie blocks for a quilt she and another Di are making for a guy. I only had to cull my stash to come up with prints that matched his interests.

We're using this pattern. To make a 6" (finished) block you need four patches, two of which have a small diagonal piece sewn to a corner. The instructions say to draw a line - corner to corner - on the back of each small square, and to stitch on that line. Instead, I used "The Angler." Do you use one of these? It's taped to the sewing surface. Then, when you sew, you align the fabric corner with the line on the Angler, sewing a straight line without marking. 

These Bow Tie blocks went together in practically no time.

I don't know how Di plans to lay out 150 Bow Tie blocks, but it will definitely be an interesting quilt.
I thoroughly enjoyed helping with this quilt, and am looking forward to seeing the finish.
It's been a while since you've had a chuckle, so here's a cute joke shared by Elissa of Arizona.
Why did the blonde get fired from the M&M factory?
She was throwing out the Ws!

Tuesday, September 14, 2010

Feelin' Aussie

I follow Jenny's Elefantz blog. She often has charming pictures of her house located in her part of the world, Queensland, Australia. Her photos are beautiful and inspirational, and she's an exceptionally nice person too! Her blog, and those of several other dear Australian quilting friends perpetually keep me in mind of Australia and how I'd like to be one of them!

So one recent morning, seeking a kinship with Aussies, I ate breakfast outdoors on our back deck. The Aussie way is to have a cuppa (or tea) and mango (no fresh here, so frozen had to do) topped with yoghurt (have to spell it the Australian way). As I ate, I leafed through an issue of the Australian publication, Homespun, that I brought back from my May trip to Australia.

I even wore the slippers I made following an Aussie pattern found in the same issue of Homespun.

Turning to the magazine's page with the "Life is a Celebration" block designed by Kellie Wulfsohn, Don't Look Now, of Melbourne, Victoria, Australia. I admired it for the umpteenth time, re-reading how Kellie appliques and quilts in one step.
Since first reading the article, my interest has been piqued by this method of raw edge machine applique and quilting. Yes, I'd previously heard of raw edged applique. What I hadn't heard about was fusing the applique pieces to a background, making a quilt sandwich, and then applique-ing and free-motion quilting in the same step! Is this a new concept? Or have I just had my head in the sand? (No need to answer, please!)

That morning I determined to drop everything I should be doing and begin this project. To make a quilt larger than the 13" X 17" block indicated in the instructions, I started by enlarging the pattern templates by 25 percent and taping sections together.
I traced and numbered onto paper-backed fusible web all 41 leaves, and then selected five different green-ish prints on which to press them.
I selected a very pale green tone-on-tone fabric for the background, pressing to fuse the tree trunk, bird, and leaves onto it. Then, to make the finished piece even larger, and give it some oomph, I added a pieced border. I pin-basted a quilt sandwich - I used Dream Poly batting - and headed to my new-to-me, used Pfaff Grand Quilter to try simultaneous applique/quilting. Would that be appli-quilting?
Using thread to match, I straight stitched around each leaf edge two to three times. I also stitched around the bird. And last, using brown thread, I straight stitched the tree trunk, adding straight lines of stitching for limbs and branches. Oh, and to make the bird's legs too.

Switching to light green thread, I spent about six hours free-motion quilting.
I'm not unhappy with the results, but I'm not entirely pleased either.
If I could, I'd would take one of Kellie's classes to learn the proper way to make the perfectly round quilting spirals that look so beautiful on her creations. But, I have to settle for what I was able to do after looking at close-ups of the photos on Kellie's blog, and trying to figure it out for myself. There are a few hiccups.

It's a bit off the mark, but I'm satisfied with my first attempt. And I will try again.

I don't have a name for this 22" X 28" piece, and no particular place to hang it, but I enjoyed making it. And anyway, for a little bit there, couldn't you almost see my Aussie-ness?

Cheers!

Tuesday, September 7, 2010

Skirting Through the Week

It's timely that I've recently been sewing skirts because Marie Madeline Studio, who designed my favorite skirt pattern ever - Route 66 - is having a week-long 45 percent off fabric sale beginning next Monday.

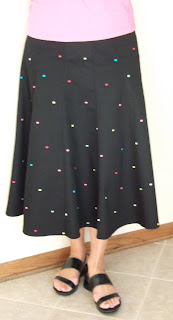
Here are two of my new Route 66 skirts. This one is black stretch denim with colorful embroidered dots. I should be able to wear it with lots of different colored tops.
I came up with this combination of autumn-looking fabrics from my local quilt shop. Gosh, do you know how difficult it is to take photos of yourself wearing a skirt!? I tried.For this Street Fair skirt pattern, I used a brushed fiber print fabric, something I think will be winter-appropriate.
Next... find leggings and knee-high boots, so I can keep wearing skirts through Iowa's long, cold, snowing winter. Did anyone else hear that the Farmers' Almanac is predicting another winter as bad as last years'?! Dreadful!

But let me leave you with a chuckle. My blogger-friend, Carla at Lollyquiltz, who I'm excited to meet in person later this month, shared a breakfast conversation she had with her granddaughter:
Four year-old Haven, watching her grandmother pour Cheerios into her breakfast bowl, spyed grandmother's box of Fiber One cereal.
Haven: "What's that?"
Grandmother: "Oh, that's my cereal and you probably wouldn't like it."
Haven: "Oh, is that what you feed mice?"
Get it? Haven heard "my cereal" as "mice cereal." Oh, wouldn't Art Linkletter have liked that one? (If you're too young - or too old! - to remember the TV show "Kids Say the Darndest Things" go here for a few laughs.)

Monday, September 6, 2010

Give Away a Project

This project has been given away.
It's going to Mary-anne in Victoria, Australia.
Believe it or not, back in the early '80s for several years I owned and operated a small retail shop in Altoona, Iowa, called The Stitchery Niche. Mostly I sold counted cross-stitch (CCS) supplies, and taught classes in counted cross-stitch, needlepoint, candlewicking and huckweaving.

During those years, I tried very hard to get Jill (our daughter) interested in CCS. She completed only two projects: the "Footprints in the Sand" poem, and a Precious Moments clown standing on a ball with the phrase "Keep Your Eye on the Ball." Last week, while helping Jill settle in her new house, we came across those two framed pieces and the unfinished CCS below.

It's the "Holliwell Bridge," one of the bridges of Madison County, Iowa. Jill stitched it on #14 Fiddler's cloth and the design area, thus far, covers 9-7/8" X 5-3/4".
Jill had pretty big ideas at the time, planning to stitch three other covered bridges - Imes Bridge, Hogback Bridge, and Roseman Bridge. These are four of the six covered bridges still in Madison County today. The patterns appeared as a series in 1995-96 issues of Cross Stitch magazine.Not wanting to just toss this, Jill suggested I offer these items free to the first person who comments, letting me know you want to finish this UFO. You'll get the partially finished Holliwell Bridge piece with the pattern, the three additional bridge patterns in three issues of Cross Stitch magazine, a magnetic line-minder with four magnets, and a package of Susan Bates brand tapestry needles. (Note: no DMC floss is included.) I'll pay the postage.
There are no strings attached. We just want to see this pretty piece finished and loved. If that person is you, thanks! This project has been given away. It's going to Mary-anne in Victoria, Australia. Thank you, Mary-anne!

Sunday, September 5, 2010

Posh Pillowcases

For the past six days I have been in Overland Park, Kansas, helping our daughter Jill - the one who returned to the US in July after living for more than three years in Sydney, Australia - get settled in their new home. Having sold their possessions in Australia, most of the week was spent accepting deliveries of newly purchased furnishings. Also, several contractors were in and out of the house, painting, and making flooring and countertop updates.

Celina is very happy with the colors in her new bedroom. I'd venture to say that her room won't look this sparse for very long.

After a few restless nights, 11 month-old Tay adjusted to his new sleeping quarters and was happy to be in a real crib again.
Anticipating that I will be visiting fairly frequently - it's a 3-1/2 hour drive from my house to theirs - one of the bedrooms, with an attached 3/4 bath, has been designated "Nana's Room." I was consulted about the color and furnishings. So before going, I decided to make decorative pillowcases for the bed.


Back in February, I saw Janet's crocheted-edge pillowcases on her Quiltsalott blog. She made hers following a tutorial by "You Go Girl." In four blog posts, "You Go Girl" provides instructions for making a pillowcase and edging it. The pillowcase is made with a pocket, using a different fabric that covers the end of the pillow. After sewing a pillowcase, yarn is used to hand sew a blanket stitch around the edge at half-inch intervals.

A row of single crochet through the blanket stitches gives a base for double crocheted scallops. That's all there is to it! Just three times around the edge and your posh pillowcase is finished.
After 30-plus years of not holding a crochet hook in my hand, I was happy to discover the rhythm of crocheting again. Now I'm excited to make more posh pillowcases! I'm waiting for my local yarn shop to get in an order of ecru-colored yarn so I can select fabric to match it. Then, I'd like to add a bit of embroidery to the next pair.

If you're interested in a few of the specifics about my pillowcases.... These are sewn with two fabrics. The floral focus print is from the "Lindsey" collection by Karen Montgomery for Timeless Treasures. The coordinating back and interior pocket print is from the "Breeze" collection by Wendy Slotboom for "In the Beginning." I crocheted with a K hook, using Sirdar Snuggly, Baby Bamboo in the color "Waterbaby."
"You Go Girl" instructions are here. I followed her excellent tutorial, except... for her admonition to eat chocolate during the process. Though I like chocolate, I was in the mood for animal crackers and spice drops, both of which are good with a cuppa!

Here's the finished product on the bed in "Nana's Room."

My posh pillows were so well-received by Jill that she asked me to make a window valance, and a square decorative pillow for the white bench on the other side of the room. Can you guess what I'll be sewing this week?!

During my June giveaway I asked for jokes as comment/entries. Amy give me this one:
What do hospital gowns and insurance have in common?

They both make you think you're covered when you're not.

LinkWithin

Related Posts Widget for Blogs by LinkWithin