Tuesday, September 14, 2010

Feelin' Aussie

I follow Jenny's Elefantz blog. She often has charming pictures of her house located in her part of the world, Queensland, Australia. Her photos are beautiful and inspirational, and she's an exceptionally nice person too! Her blog, and those of several other dear Australian quilting friends perpetually keep me in mind of Australia and how I'd like to be one of them!

So one recent morning, seeking a kinship with Aussies, I ate breakfast outdoors on our back deck. The Aussie way is to have a cuppa (or tea) and mango (no fresh here, so frozen had to do) topped with yoghurt (have to spell it the Australian way). As I ate, I leafed through an issue of the Australian publication, Homespun, that I brought back from my May trip to Australia.

I even wore the slippers I made following an Aussie pattern found in the same issue of Homespun.

Turning to the magazine's page with the "Life is a Celebration" block designed by Kellie Wulfsohn, Don't Look Now, of Melbourne, Victoria, Australia. I admired it for the umpteenth time, re-reading how Kellie appliques and quilts in one step.
Since first reading the article, my interest has been piqued by this method of raw edge machine applique and quilting. Yes, I'd previously heard of raw edged applique. What I hadn't heard about was fusing the applique pieces to a background, making a quilt sandwich, and then applique-ing and free-motion quilting in the same step! Is this a new concept? Or have I just had my head in the sand? (No need to answer, please!)

That morning I determined to drop everything I should be doing and begin this project. To make a quilt larger than the 13" X 17" block indicated in the instructions, I started by enlarging the pattern templates by 25 percent and taping sections together.
I traced and numbered onto paper-backed fusible web all 41 leaves, and then selected five different green-ish prints on which to press them.
I selected a very pale green tone-on-tone fabric for the background, pressing to fuse the tree trunk, bird, and leaves onto it. Then, to make the finished piece even larger, and give it some oomph, I added a pieced border. I pin-basted a quilt sandwich - I used Dream Poly batting - and headed to my new-to-me, used Pfaff Grand Quilter to try simultaneous applique/quilting. Would that be appli-quilting?
Using thread to match, I straight stitched around each leaf edge two to three times. I also stitched around the bird. And last, using brown thread, I straight stitched the tree trunk, adding straight lines of stitching for limbs and branches. Oh, and to make the bird's legs too.

Switching to light green thread, I spent about six hours free-motion quilting.
I'm not unhappy with the results, but I'm not entirely pleased either.
If I could, I'd would take one of Kellie's classes to learn the proper way to make the perfectly round quilting spirals that look so beautiful on her creations. But, I have to settle for what I was able to do after looking at close-ups of the photos on Kellie's blog, and trying to figure it out for myself. There are a few hiccups.

It's a bit off the mark, but I'm satisfied with my first attempt. And I will try again.

I don't have a name for this 22" X 28" piece, and no particular place to hang it, but I enjoyed making it. And anyway, for a little bit there, couldn't you almost see my Aussie-ness?

Cheers!

Tuesday, September 7, 2010

Skirting Through the Week

It's timely that I've recently been sewing skirts because Marie Madeline Studio, who designed my favorite skirt pattern ever - Route 66 - is having a week-long 45 percent off fabric sale beginning next Monday.

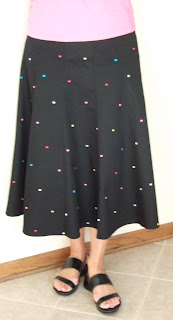
Here are two of my new Route 66 skirts. This one is black stretch denim with colorful embroidered dots. I should be able to wear it with lots of different colored tops.
I came up with this combination of autumn-looking fabrics from my local quilt shop. Gosh, do you know how difficult it is to take photos of yourself wearing a skirt!? I tried.For this Street Fair skirt pattern, I used a brushed fiber print fabric, something I think will be winter-appropriate.
Next... find leggings and knee-high boots, so I can keep wearing skirts through Iowa's long, cold, snowing winter. Did anyone else hear that the Farmers' Almanac is predicting another winter as bad as last years'?! Dreadful!

But let me leave you with a chuckle. My blogger-friend, Carla at Lollyquiltz, who I'm excited to meet in person later this month, shared a breakfast conversation she had with her granddaughter:
Four year-old Haven, watching her grandmother pour Cheerios into her breakfast bowl, spyed grandmother's box of Fiber One cereal.
Haven: "What's that?"
Grandmother: "Oh, that's my cereal and you probably wouldn't like it."
Haven: "Oh, is that what you feed mice?"
Get it? Haven heard "my cereal" as "mice cereal." Oh, wouldn't Art Linkletter have liked that one? (If you're too young - or too old! - to remember the TV show "Kids Say the Darndest Things" go here for a few laughs.)

Monday, September 6, 2010

Give Away a Project

This project has been given away.
It's going to Mary-anne in Victoria, Australia.
Believe it or not, back in the early '80s for several years I owned and operated a small retail shop in Altoona, Iowa, called The Stitchery Niche. Mostly I sold counted cross-stitch (CCS) supplies, and taught classes in counted cross-stitch, needlepoint, candlewicking and huckweaving.

During those years, I tried very hard to get Jill (our daughter) interested in CCS. She completed only two projects: the "Footprints in the Sand" poem, and a Precious Moments clown standing on a ball with the phrase "Keep Your Eye on the Ball." Last week, while helping Jill settle in her new house, we came across those two framed pieces and the unfinished CCS below.

It's the "Holliwell Bridge," one of the bridges of Madison County, Iowa. Jill stitched it on #14 Fiddler's cloth and the design area, thus far, covers 9-7/8" X 5-3/4".
Jill had pretty big ideas at the time, planning to stitch three other covered bridges - Imes Bridge, Hogback Bridge, and Roseman Bridge. These are four of the six covered bridges still in Madison County today. The patterns appeared as a series in 1995-96 issues of Cross Stitch magazine.Not wanting to just toss this, Jill suggested I offer these items free to the first person who comments, letting me know you want to finish this UFO. You'll get the partially finished Holliwell Bridge piece with the pattern, the three additional bridge patterns in three issues of Cross Stitch magazine, a magnetic line-minder with four magnets, and a package of Susan Bates brand tapestry needles. (Note: no DMC floss is included.) I'll pay the postage.
There are no strings attached. We just want to see this pretty piece finished and loved. If that person is you, thanks! This project has been given away. It's going to Mary-anne in Victoria, Australia. Thank you, Mary-anne!

Sunday, September 5, 2010

Posh Pillowcases

For the past six days I have been in Overland Park, Kansas, helping our daughter Jill - the one who returned to the US in July after living for more than three years in Sydney, Australia - get settled in their new home. Having sold their possessions in Australia, most of the week was spent accepting deliveries of newly purchased furnishings. Also, several contractors were in and out of the house, painting, and making flooring and countertop updates.

Celina is very happy with the colors in her new bedroom. I'd venture to say that her room won't look this sparse for very long.

After a few restless nights, 11 month-old Tay adjusted to his new sleeping quarters and was happy to be in a real crib again.
Anticipating that I will be visiting fairly frequently - it's a 3-1/2 hour drive from my house to theirs - one of the bedrooms, with an attached 3/4 bath, has been designated "Nana's Room." I was consulted about the color and furnishings. So before going, I decided to make decorative pillowcases for the bed.


Back in February, I saw Janet's crocheted-edge pillowcases on her Quiltsalott blog. She made hers following a tutorial by "You Go Girl." In four blog posts, "You Go Girl" provides instructions for making a pillowcase and edging it. The pillowcase is made with a pocket, using a different fabric that covers the end of the pillow. After sewing a pillowcase, yarn is used to hand sew a blanket stitch around the edge at half-inch intervals.

A row of single crochet through the blanket stitches gives a base for double crocheted scallops. That's all there is to it! Just three times around the edge and your posh pillowcase is finished.
After 30-plus years of not holding a crochet hook in my hand, I was happy to discover the rhythm of crocheting again. Now I'm excited to make more posh pillowcases! I'm waiting for my local yarn shop to get in an order of ecru-colored yarn so I can select fabric to match it. Then, I'd like to add a bit of embroidery to the next pair.

If you're interested in a few of the specifics about my pillowcases.... These are sewn with two fabrics. The floral focus print is from the "Lindsey" collection by Karen Montgomery for Timeless Treasures. The coordinating back and interior pocket print is from the "Breeze" collection by Wendy Slotboom for "In the Beginning." I crocheted with a K hook, using Sirdar Snuggly, Baby Bamboo in the color "Waterbaby."
"You Go Girl" instructions are here. I followed her excellent tutorial, except... for her admonition to eat chocolate during the process. Though I like chocolate, I was in the mood for animal crackers and spice drops, both of which are good with a cuppa!

Here's the finished product on the bed in "Nana's Room."

My posh pillows were so well-received by Jill that she asked me to make a window valance, and a square decorative pillow for the white bench on the other side of the room. Can you guess what I'll be sewing this week?!

During my June giveaway I asked for jokes as comment/entries. Amy give me this one:
What do hospital gowns and insurance have in common?

They both make you think you're covered when you're not.

Friday, September 3, 2010

Road Trip

Whoops! Not that road trip. I took that one last April. But Sydney, Australia is just about my most favorite place in the world!

The road trip I want to share with you is right here in Iowa. Mr. FP (Dan) and I left Des Moines on a cool (for a change!) morning and drove northwest. Out the car windows were endless fields of corn and soybeans. Through Humbolt, Fort Dodge, and all the way to West Bend and back... corn and soybeans. And beautiful, clear blue skies.

Along the way we also saw these huge grain elevators. That small, lid-looking thing on the left is a gigantic cover for a pile of grain.
And another elevator with, of course, good 'ole John Deere equipment in the foreground. John Deere is the company that Mr. FP retired from three years ago.

This pretty grass was profuse along the edges of a pond, and many other wet places that received excessive amounts of rain this summer.

So much rain fell this summer that we learned the park we'd planned to hike - Dolliver Memorial State Park, south of Fort Dodge - was heavily damaged by flood waters from the Des Moines River. We had to alter our plans. Our next stop was the Grotto of the Redemption in West Bend.

Father Dobberstein is the priest who started this project back in 1912. He and subsequent priests spent years gathering rocks, stones, crystals, shells, glass, and petrified wood that was painstakingly chipped and set into concrete to assemble this unique place.

There's no place in the world like it.
Mr. FP is standing in one of the cave-like chapel rooms.
Directly above where he's standing is this intricate ceiling.

Some of the colorful stones and crystals.

I've always been fascinated by geodes.

In the museum I read that some of the geodes came from Illinois, and others from Keokuk, Iowa.

Polished stones were used to make detailed arrangements.


In several places, mosaiac designs were inserted in pillars.
On departing, we couldn't help but giggle to see this. When was the last time you've seen a phone booth? Maybe that's how it is in a little town with 750 residents.
It was a very pleasant day and a nice diversion from the usual activities. I hope you enjoyed coming along.

Wednesday, September 1, 2010

Stitchin' Mission Wins!


Thank you!

Voting for Stitchin' Mission to win the $1,000 Dream Big, Grow Here grant, concluded at midnight, August 31. Thanks to all of you, Stitchin' Mission won, receiving 2, 519 votes over a 16-day period. Your support has been overwhelming beyond words. My simple "thank you" does not begin to adequately express the depths of my appreciation for everyone who voted, and my thoughts about this experience. God is faithful, and I praise Him for what He has done.

All follow-up information about the Stitchin' Mission grant will be posted to the Stitchin' Mission blog. Thank you all, from the bottom of my heart!

LinkWithin

Related Posts Widget for Blogs by LinkWithin