Tuesday, June 30, 2009

It's Tuesday and I Can't Wait

...to finish machine quilting this quilt. I'm free-motion quilting this for a friend. Didn't she choose some great colors?

To stabilize the layers, I used cream-colored thread to quilt "in the ditch" (also known as "in the valley") along the on-point squares. 
Then, with gold-colored thread I quilted arcs along the inside of the small and large squares.
A zig-zag design runs vertically through the quilt, in four columns. Each one will have this quilt feather vine with spirals that pop out at intervals and land in a square. 

Since I'll be quilting with black thread on black fabric, I've pounced the design with a white iron-off powder. The first quilting pass will be to stitch the double vein. 
I can't wait to show you more, when it's finished!

Visit Buttons by Lou Lou for the list of bloggers who are playing "It's Tuesday and I can't wait..." Join us!

Thursday, June 25, 2009

All Things Patchwork

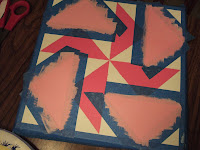
So what can you do with an 11" X 11" square piece of wood? One with perfectly beveled edges I might add. (Thank you, Gary.)

You can spend hours painting several base coats of exterior paint. Then draw, measure, mark and tape.
 

Paint patches. Give them a second coat, and a third coat. Re-tape. Paint, re-paint, and paint again. Then, do it all again. Repeat six times!

Make these garden decorations. 
I saw them for sale at a quilt shop, and smugly thought, "I can do better than that, and for a lot less money." Hmmm. Not so much. Per board, my investment was inexpensive, but the time... makes them about a Benjamin Franklin ($100) each! 
Still, I like them. But can you believe it? They need another coat...
of sealant since they'll be outdoors, poked in the ground, exposed to Iowa UV rays and rain.

Lastly, each patchwork board will need a rod affixed to the back so they can stand in my front flower(less) bed. 
But gosh, won't they look nice?
I learned several lessons through the process. The most important one was to accept advice. "Buy that new green tape that keeps paint from bleeding." I didn't; I wish I had. 

Please admire from a distance. 
Hey, I bet the next time you're in my neighborhood you'll be able to guess which house I live in!

Tuesday, June 23, 2009

It's Tuesday and I Can't Wait

...to start piecing this quilt! These are some of the fabrics collected for a quilt for our first grandson. He's due October 3, so if he cooperates, I have time to get it made.
The pattern for the quilt is similar to one in the new book Quilting for Baby, the "Peek-a-Boo Monkey" quilt. But instead of appliqueing monkeys, how about several Aussie animals like a kangaroo, koala, a tree snake...whatever I can design. I'm open to suggestions!

Sunday, June 21, 2009

Big Sister Quilt

Remember, I said piecing should be a snap? It was! What fun to put these funky colors together, all in one day!

To make the quilt 56" X 74", I added a couple more prints from my stash. Thank goodness I could find two more - and only two more! Really though, this is pretty much a no-fail design. Perfect for a mostly mindless day of cutting and sewing.

Blogless Mary shared with me the name for this lime green color: "Kiwi." It's not quite an Aussie name, but New Zealand is close enough. Does anyone know a clever name for turquoise or aqua?  

After sandwiching, the real work begins: quilting. Quilting will probably never be my favorite thing to do, mostly because it's time-consuming even on a domestic sewing machine.

Turquoise thread, I think, and a variety of free-motion designs...a different design for each pair of matching print logs. Your quilting pattern suggestions will be gratefully accepted.

Friday, June 19, 2009

Fabric Shopping

There's nothing like quilt shop shopping to cure whatever malaise a quilter might feel. Even a case of the blahs improve when you can bring home new fabs. Hoping to feel uplifted, and looking for inspiration to make two quilts, I visited two local quilt shops.

Our first grandbaby - a boy - is due in October, in Sydney, Australia, and making his quilt will come later this summer. For now, my attention is on a quilt for ten year-old big sister. Selecting the lime and turquoise colors made for fun shopping, and will no doubt be fun to piece too.
The quilt design is a simple one-patch log cabin. The large medallion print, a fab from Free Spirit, will be the 14" X 14" cabin center. The large dot print at the top is the backing. For extra interest and a feminine touch, the top and bottom edges of the quilt are scalloped. In any case, piecing should be a snap.

The pieces in the photo have already been washed, as I do with all new fabrics as soon as they come home with me. I like knowing I'm working with clean fabric, and that it has already been treated like it will be as a finished quilt - machine washable.

How about you... What's your personal policy about washing, and why?  

Thursday, June 18, 2009

A Season of Grace Christmas BOM #5

My Tuesday "I can't wait" happened. Summer arrived. And with a vengeance! The temperature reached 90 F (32 C) and today the forecast is 91 F (33 C). Now that may not sound too awful, but add to the temperature humidity at 91 percent and you have the makin's for misery, as soon as you step outside. This wavy head of hair has turned to complete frizz.

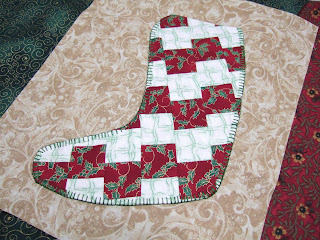
To avoid turning on the air-conditioner for as long as possible, I hunkered down in my cool basement sewing room. Though not quite ready to think Christmas, the Emilie Richards/Pat Sloan June BOM of the "A Season of Grace" needed making.
As usual, I made two identical blocks: one for (Blogless) Mary and one for me. Will this do, Mary?

Tuesday, June 16, 2009

It's Tuesday and I Can't Wait

A number of bloggers are playing "It's Tuesday and I can't wait." Visit ButtonsbyLouLou to see the list of bloggers, and join in on your opportunity to share what you're anticipating.

For me: It's Tuesday and I can't wait... for summer to really arrive! Cool, overcast days and even cooler nights have been the norm for a couple weeks. I know I'm going to get what I want because Wednesday's predicated high temperature is 89 (32C). Yay!

See how easy I am to please?
P.S. In today's Des Moines Register, the Stitchin' Mission #17 group photo appears in the communities section. 

Monday, June 15, 2009

No Tails Binding Tutorial

I'm often asked, "How do you like to apply binding?" Below is a tutorial I'm glad to offer. This binding method is one with no joining, and machine-sewn mitered corners. If you haven't tried it, I encourage you to do so.

No Tails Binding Tutorial
Begin by preparing double-fold binding (AKA French binding) in one long continuous strip. My favorite width is cut 2-1/4".

Note: Do not trim backing and batting at this time. First sew binding to the quilt; then trim.

Lay the untrimmed quilt, face up, on a flat surface, smoothing out wrinkles.
This is also an opportunity to make sure your quilt layers are square.
Use a long ruler to draw straight lines along each side - around the entire perimeter - of the quilt. You will use this straight edge as a guideline for sewing binding to the quilt.
Following a straight line will ensure you end up with a squared quilt and straight binding.

Cut and Sew Binding Across Quilt Width
Lay the binding across the width of the quilt, approximately in the center. Leave a 2" to 3" tail extending beyond both edges of the quilt top. Gently smooth and pat the binding flat.
Cut the binding 2" to 3" from the edge of the quilt top.
Repeat, to make a second piece of binding for the width of the quilt.

Do not move the binding.
Insert a pin, or make a mark at the point where the binding meets the edge of the quilt top. See blue pin.
Insert another pin, or make a mark at a point 1/4" to the inside of the first pin.
See pink pin.
The pink pin marks the sewing stop-start point. Remove the blue pin.

Now, focusing on the corner of the quilt top,
measure 1/4" from each side of the quilt top. Use a pin or make a mark at the spot.

Repeat at the opposite end of the binding, marking the binding and marking the quilt top.
Position the binding along the edge of the squared quilt top. Pin.


Begin sewing at the pinned or marked spot on the binding. Backstitch.
Continue sewing binding to the quilt, stopping at the pin or mark at the opposite end. Backstitch.


Repeat the above steps to sew the second binding to the width of the quilt.

Cut and Sew Binding for Quilt Length
When you have sewn binding strips to the top and bottom of the quilt (across the width), again lay the quilt on a flat surface.

As when cutting the binding width, lay down binding along the length of the quilt, placing it approximately through the center of the quilt. Smooth and pat binding.

Insert a pin, or make a mark at the point where the binding meets the edge of the quilt top. Repeat for the second piece of binding.


At both ends of the two binding strips, insert another pin, or make a mark at a point 1/4" to the inside of the first pin.

Working at the corner, fold back the previously sewn binding to get it out of the way.

Match the unsewn binding start-stop point to the stopping point of the previously sewn binding.

Lay binding along along the straight edge of the quilt, pin across the binding length and matching the unsewn binding start-stop point to the stopping point of the previously sewn binding.
Sew binding to the quilt, beginning and ending with backstitches.
Repeat to apply the last binding strip.

Mark and Sew Binding Corners
At one corner, fold the quilt onto itself, back-to-back, to form a 45-degree angle. Position binding strips to form a straight horizontal line, meeting the binding's folded edge to the folded edge, and the raw edge to the raw edge.


Pin to hold into place. Use a small ruler perpendicular to the binding to make a small indication mark on the binding fold at a point parallel and directly above where the stitching ends.

Tip a small ruler so the ruler corner is positioned in the middle of the binding strip. Position the ruler point an equal distance from both the mark along the binding fold, and the end point of the stitching. Between each point the distance is 1/2" to 5/8".

Draw along the corner of the ruler to make a visible line that forms an arrow.

Sew on the drawn line: backstitch at the fold, sew, pivot at the point, sew, backstitch.

Trim 1/4" from the sewn line to remove binding tails. Snip the tip to reduce bulk.

Repeat steps, marking, sewing, and trimming on three more corners to sew a total of four mitered corners.

Finish Binding
From around the perimeter of the quilt, trim excess batting and backing 3/8" from stitching line. Be sure not to rotary cut the binding corner!
Turn the binding to the quilt back. Use a stiletto or point turner to pull out the points at each mitered corner. Admire these sturdy, machine-sewn mitered corners - you won't have to hand-sew them closed!

Using thread that matches the color of the binding, blind stitch to hand sew binding to the quilt back.

Friday, June 12, 2009

Flourishing Around the House

For the past few days, the work of my hands has been applied to things around the house. Company's coming! Time to wash the winter grim from the windows, wipe dust and pollen from the furniture tops, toss into the dryer quilts from the guest room beds, and catch-up on vacuuming and laundry. Exciting stuff, hey?

I absolutely adore hanging out the laundry, but I'm an oddity here in West Des Moines, Iowa (...in more ways than one, I'm sure my friends would say.) Very few people hang laundry outdoors around here. In fact, I don't know another person who does! 

I thought you would enjoy seeing how Hogan helps me when I'm outside. When I took this picture, I was standing in the back yard; he was laying on the deck. 
You can see by looking at Hogan that it's tough keeping up with me all day long.

LinkWithin

Related Posts Widget for Blogs by LinkWithin