Monday, July 29, 2013

Hexies

Last week I continued to quilt "Bloom," and managed some cutting and piecing, in spite of being under the weather.

A visit to the doctor last Friday confirmed that I was feeling punk due to a sinus infection and an ear infection. Antibiotics are making me better, but have the side effect of sleepiness. Still, I'm forging on. I have things to do and quilts to make!

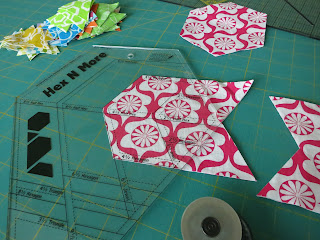
Since purchasing a Hex 'n More ruler in May, I've wanted to use it, knowing I'm giving a November program on hexagons at our Central Florida MQG meeting! I also need a baby quilt to gift in August, and a quilt on which to demonstrate how to sew binding, so this project fulfills all my needs.

From my favorite modern prints, including numerous pieces of Technicolor by Emily Herrick, I cut 4-1/2" hexagons.


I also cut 222 - 2-1/2" triangles (no picture) from a pink Kona solid, but later scrapped those to cut white Kona triangles. After sewing triangles to the top and bottom of each hexagon, I joined units, and sewed columns together on the diagonal.

I pinned at every intersection to ensure that those challenging diagonal points met, but I still didn't achieve 100 percent perfection.

I'm happy with the bright cheeriness of this quilt. This photo was taken before I trimmed the right and left sides to make them straight. The quilt top is 36" X 52", a nice baby size for a new grand-niece. 
36" X 52"
It's now layered - the backing is V&Co. Simply Color (far left) - pin-basted, with binding at the ready, and awaiting quilting. If all goes as planned, free motion quilting will happen over the next three days and the quilt will be ready for Thursday morning's First Time Quiltmaking binding class. 

This week marks lesson four (of five), and thus far there's been perfect attendance! That's never happened before. I was surprised to learn last week that of 18 students, only four of them are tying their quilts. The rest are giving free motion quilting a try! Everyone seems enthused about learning to make a quilt, and that just makes it even more fun to share my love of it with them. Linda

Tuesday, July 16, 2013

Reflecting

The bedraggled thing in the picture below is a beloved stuffed dog that my hubby cherished when he was little. Dog (he didn't have a name) endured many hugs, with one particularly vivid memory being when hubby was hospitalized for having his tonsils removed, and his parents brought Dog to him in the hospital. I'm sharing this because wee doggy was accidentally left behind when we moved in May, 2012! The poor fellow was tucked away on the top shelf of the master bedroom closet where he wasn't seen until the new homeowners recently found him. We're grateful for their thoughtfulness in contacting us, and then going to the effort to mail him. Some lovely people are still to be found, aren't they?

Another lovely person, Cindy in our Mid-Century Modern Bee, sent me these two gifts, a scarf and trivet, along with the blocks she made during my June Queen Bee month. Cindy shared that breast cancer awareness is a very dear cause to her and her husband Keith who made the 12" ceramic trivet.

Since a few of you have inquired about the status of my health, I share that am doing extremely well, tolerating without side effects a daily dose of the keep-cancer-away drug (Arimidex) I've been on since April 18. Two weeks ago I returned to the imaging doc for a recheck and was given an "all clear" until another check in December. Before then, I'll keep regular appointments with my general practitioner, oncologist, surgeon, and radiation oncologist, so if anything untoward pops up, I'm in good hands.

If you can't remember when you had your last mammogram, it's time to have one! The ONLY way my breast cancer could have been found was through a routine, annual mammogram, and I thank God it was! I had NO - zero, zip, nada - risk factors for breast cancer, and got it anyway. Your check-ups aren't anything to pooh-pooh, ladies!

Last Thursday morning I started teaching again - First Time Quiltmaking - and boy-o, was it a nice class! Eighteen women signed up, and 18 women showed up! I think that's a first - to have every registrant attend the first class. Guess that's the different between free lessons and paid-for lessons! 

It was somewhat daunting to face this roomful of empty chairs, but shortly afterward, many smiling faces put me at ease. Students were attentive and, based on their thoughtful questions, very engaged about learning how to make a quilt. I'm looking forward to lesson two this Thursday morning.

I'll have to add that though I am thrilled to be teaching again, these different circumstances are making me miss the thoughtful and supportive Iowa women who always helped me teach. They quite spoiled me by helping unload/load my car; set up/take down my sewing machine; unpack/pack-up quilts and bins of supplies, and answering questions and generally help students. Among my most supportive friends were Norma, Michelle, Bug...

Kim 

Susan

Lola (me on the left)

Mary, Deb, Suzanne... and many others who helped with six years of Stitchin' Mission lessons... You're the best! I miss you!

At home, between activities, I'm steadily FMQing Bloom. It's coming along as I'm now filling in open spaces with feathers.

I especially like to quilt feathers. A glass of wine alongside - in the evenings only - help take the edge off, so quilted feathers are smoother. That's my story, anyway.
Linda

Sunday, July 14, 2013

My First FAL

Leanne who blogs at SheCanQuilt is hosting a 2013 Finish-A-Long (FAL).

I've never participated where I've been invited to commit to finishing particular quilts, but when a few randomly-chosen prizes are up for grabs, and I've got way more than a few projects for which I'm grateful for motivation to finish, I thought, "Why not?" I'm getting a late start for 2013, since they're on the third quarter already. Q3 starts July 15 and ends October 7.

So. I'm supposed to blog about the projects I plan to finish - I picked four - and then link to SheCanQuilt. Here we go:

1. Roll, Roll, Cotton Boll was a Bonnie Hunter (Quiltville.com) mystery pattern from 2010-2011. (It's no longer available for free.) Several months ago I began FMQing this 86" X 101" monstrosity but need to add more quilting around blocks, and to borders.

2. My Bloggers' BOM was begun in 2011. The 60" X 60" quilt center is put together, and as of the end of June, quilters in my Mid-Century Modern Bee have mailed me all the rectangles I need to add for a border. At 78" X 78" it will take lots of FMQing to finish.

3. Bloom, a pattern by a favorite designer, Emma Jansen (she designed Snowflake Medallion) is a must-finish by the end of August. It's in-progress, with lots of FMQing going on at the moment. In this picture you can see exactly where undulating feathers will go next - between the blooms and diamonds. The quilt's 78" X 78", so I think I'll need a couple more weeks for the quilting, and then there's washing, blocking and binding.

4. What you haven't seen has been on my design wall for a week. Wishful thinking that I'd squeeze in time to start piecing this baby girl quilt! It's 4" hexagons - cut using the Hex 'n More ruler from Jaybird Quilts. That solid pink in the upper left-hand corner is what I'd planned for background triangles, but I'm thinking to switch to white. Or do you have another suggestion?

So, except for machine piecing hexies, it looks like this entire third quarter is pretty much all about FMQing. Now "let's finish quilts!" Linda

Wednesday, July 10, 2013

Bloomin' Quiltin'

Like every quilter - or so I keep telling myself - I stew and fret about choosing just the right FMQing designs. Wanting to put thoughtful, quality quilting into Bloom, I'm going through the typical, challenging process of deciding what to quilt where.
It was easy to start quilting because every bloom needs to be appli-quilted along its outside edges. I'm appli-quilting with 50-weight Aurifil in the same color as the bloom. In the bobbin is white, 60-weight Bottomline.

I've known exactly what I wanted to quilt around each bloom - these concentric rings. I'm matching the quilting thread color to the bloom color. Now, I'm almost done appli-quilting and quilting around each bloom, using about eight different thread colors for the 15 blooms. 

By the way, for those who wanted to know... the wool batt, layered using 505 Spray and Fix aerosol adhesive, is working wonderfully! Nothing is shifting, even though I've been moving this quilt around a whole lot. 

When the blooms are appliquéd and quilted... well, to be honest, I'm stumped as to what to quilt next. The past three days have been about trying to figure that out - looking through several favorite FMQ blogs, and Flickr pages. A couple days ago I remembered something blog friend Lyn (WhataHootQuilts) shared about creating quilting designs, and I hurried out Home Depot and Sam's Club to buy supplies.

A FMQ Design Tool
From Home Depot I bought this 18" X 24", .093"-thick sheet of clear lucite. It cost $10.49. At Sam's Club I bought a set of 12 Expo dry erase markers, an eraser, and white board cleaner for $12. I edged the lucite with silver duct tape.

Then, I put the lucite sheet on top of the quilt, and drew quilting designs.


Though my drawings are rough, the process has been helping me at least decide what I don't want to quilt! Nope, I haven't yet landed on the just-right design. But this new tool is sure giving me a better perspective on quilting possibilities. I expect to use this tool a lot.

A Little More Info
1) Lucite sheets come in several sizes, so you can choose the one that suits your needs. Lyn has a really big sheet that she uses to create designs for an entire baby-sized quilt top!
2) If you shop at Home Depot, look for this product in the back center of the store, where you find doors. The entire selection of lucite sheets was at the end of the aisle.
3) Don't neglect to put duct tape around the outside of the lucite sheet. It not only protects your hands from sharp edges, but the tape is a visual indicator of where the lucite ends - a must-know so you don't get dry erase marker on your quilt!

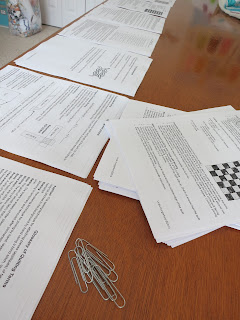
This afternoon sees me prepping for teaching. Five weeks of "First Time Quiltmaking" lessons begin tomorrow (Thursday) morning. Eighteen women are enrolled! Hand-outs are ready, and I'll be loading the car next. I'm excited about teaching again since it's been since November 2011, in Clive, Iowa, that I last taught. I'm expecting Floridians to be as amenable and excited to learning quiltmaking as Iowans were. Linda

Tuesday, July 9, 2013

A Saturday in Florida

Last Saturday we left "the bubble" and went to Tampa for the day. Our three year-old grandson was invited to a birthday party at Lettuce Lake Park, so we tagged along. While the kids and parents partied, we took a lovely walk on the boardwalk along the Hillsborough River. Tranquil-looking. Yes.
Hillsborough River
But as with all bodies of Florida waters, danger lurks within. This baby 'gator was in shallow water, but he'd just before been on the dock where we were standing. 

The cypress trees and their unusual knees are so interesting up-close. 


A couple other, less harmful creatures were seen sunning themselves.
Common Musk Turtle
Brown Water Snake - not venomous
After our nature walk we went to the party playground to see our grandson enjoying himself. What a thrill, just sliding!

All three year-olds love blue-frosted cupcakes.


Back to quilting. Pictures soon.
Linda

Wednesday, July 3, 2013

Life's Bloom-in!

I need a new project like - not!  But I just couldn't resist another of Emma Jansen's designs after seeing her Bloom quilt posted on Instagram. (Oh, am I ever hooked on that technology... a reason blog posts have become less frequent.)

Emma and me at Spring quilt market 2012

Emma's talent just oozes out of her... one beautiful quilt pattern after another. I wish I had a thimbleful of her giftedness. And isn't she a doll?

Anyway, I ordered Bloom from her Ballarat Patchwork on-line store. The purchase was too easy, even converting Australian dollars to US dollars.

When the pattern arrived, I pulled fabrics. I've wanted to make a rainbow-colored quilt for a long time now.

From these yummy-colored prints, and using Steam-a-Seam 2, I drew, cut, fused and cut 345 appliqué pieces.

An unused (perhaps that should read "never-used") muffin tin helped me separate each bloom fabric combo.

After more than a week of cutting, fusing and sewing, I ended up with this 78" X 78" quilt top. I've decided to "appli-quilt" it. It's a term I made up to describe the method whereby you fuse shapes to a quilt top, make the quilt sandwich, and then appliqué and quilt at the same time. If you know Kellie Wulfsohn (also an Australian) and her work (Don't Look Now), that's how she makes many of her quilts. 

The back is made using "Twirling Blossoms" Lush, a Michael Miller fabric from Fabrics.com.

Of course, I always save selvages.

After waiting a few days for batting to arrive - Hobbs' Tuscany Wool, from Patsy Thompson - I headed to the garage for spray basting. I moved out the car and golf cart so I could lay a couple of old sheets on the concrete. Then, I laid out the batt. I actually sprayed one side and then turned it over to spray the other side. It was a little difficult to handle, but it worked. I'd heard it's best to take spray basting outdoors, but it always manages to be too breezy on the days I want to baste!

I went back to my sewing room with that sticky batting, and put it onto the backing that was already taped-down on my big table. On advice from a quilter in our MQG, I pressed the entire quilt top. Supposedly, it helps bond the adhesive and batting... bonding being a concern I had since the 505 Spray and Fix can instructions state it's for use with cotton batting. Until I start quilting, I really don't know how well this is going to work!

You may also wonder why I chose wool batt, living as I do in sunny-hot Florida. Well. Bloom isn't so much about being a quilt for warmth, as for an opportunity for free motion quilting. Wool is a favorite of Diane Gaudynski, a domestic machine quilter whose work I respect and admire. She likes wool for its resiliency and trapunto-ish-ness after quilting. I've also found that wool doesn't leave fold marks like some cotton battings do. I know this because I used a wool batt in Snowflake Medallion, another Emma Jansen design.

The step I'm working on now is marking for quilting. It's a step I really struggle with. I manage to do a much better job of suggesting quilting designs for others' quilts than my own! However, taking some time to think through possibilities, and with the help of freezer paper, Frixion pens, and several rulers - including my beloved, oft-used 12" set of nested acrylic circles - I'm slowly working through marking quilting designs. Some shapes will be "organic" - a term that I think really means "quilt on the fly as best as you can."

Now you know what I'm doing. That is unless this little man happens to come for a visit. Of course, then all quilting activities cease.
Linda

LinkWithin

Related Posts Widget for Blogs by LinkWithin