Thursday, September 29, 2011

Embroidered Birth Wallhanging

On our 4,538-mile drive to and from California earlier this month, I had plenty of passenger-side handwork time. I'm glad I don't get carsick when doing close work. I get so much done when we travel by car! This time I completed all the embroidery on "Jungle Safari," a design I purchased here. I stitched all of the pieces with Cosmo embroidery floss.
 

When we returned home, I started coloring. I've watch Helen Stubbing's video about how to Colorque (her technique for pencil coloring), and have previously colored several embroidered quilt projects. Ironically, today Helen offers a free pattern and tutorial for her method, in case you like to try it. 

Helen says to color first, then brush textile medium over the color to protect it.  Then embroider. I chose to embroider first and then color. I'm not using any textile medium because this is a wall quilt that will likely never be washed.

When I think about embroidering first, it's like what I did as a kid when I had a coloring book. I liked to outline a shape and then color in the space. Plus, I have a limited pencil palette of only 24 colors, so I like to layer and blend colors that look good with the floss colors. 

 I use Derwent brand Coloursoft pencils.

Of course I especially had fun coloring the palm tree. Still love those palm trees!

It took a couple days to work out this arrangement (no layout instructions are provided with the embroidery pattern), and I'm very happy with it. I think it all works because of the jungle fabric that was gifted to me. Thank you, Mary!
20" X 33"
I had fun with free motion quilting too, adding palm fronds to parts of the embroidery...

...and using cream-colored thread to add sand along the bottom of several designs.


On the back I added a hanging sleeve. Instead of a dowel or wood lathe through the sleeve, I inserted a two-inch wide plastic slat from an old set of horizontal blinds. It was easy to cut it to the right length with wire cutters.

We hung the wall hanging over his changing table.

 Aesa likes it. That makes me happy, and so does the fact that it's finished before his first birthday!
Aesa - 10-1/2 months
Linda

Sunday, September 25, 2011

Hop on Board!

Strawberry Fizz and Lime Pop

That's what I'm going to call this quilt when it's finished in 2012.

Today it started... the Blogger's Block of the Month is being hosted by Jackie at Canton Village Quilt Works. Each month, on the 25th, a different designer will offer her block.

The 8-1/2" X 8-1/2" (unfinished) September block comes from Sherri McConnell at A Quilting Life. It was easy to sew. I probably spent more time choosing fabrics (pick one background fabric to use in all blocks) than cutting and sewing it!

Hop on board! Go here to get signed up. Then go here to get your September block. Linda

Wednesday, September 21, 2011

West and Back Again


  • 2  people, celebrating 39 years of marriage
  • 3 quilt shops in: Lincoln, Nebraska (Cosmic Cow); Durango, Colorado; and Napa, California
  • 5 different US National Parks
  • 10 different motels including the Wine Country Inn, St. Helena, California
  • 13 whole days away from home
  • 17 can't-buy-these-anywhere-else bottles of Napa Valley wines from six wineries
  • 4,538 miles on our Nissan Rogue, from Iowa to California and back
That's what I've been doing!

Between September 6 and 19, my husband and I traveled. We drove and drove on a long anticipated visit to Napa Valley, California. We spent more than a week sight-seeing our way through Colorado, Utah, and Nevada, with incredible views of breath-taking scenery, and sometimes cliff-hanging, hair-raising mountaintop roads!
Cliff House, Mesa Verde National Park, Colorado
While at the Visitor's Center at Canyonlands National Park, we met a couple from Wentworth Falls, New South Wales, Australia. Of course we had a nice chat about family, and places we had in common.
Canyonlands National Park, Utah
Arches National Park, Utah
Capitol Reef National Park, Utah
Bryce Canyon National Park, Utah
Bryce Canyon, Inspiration Point - 8,100 feet
If HE looks like he's sitting on the edge of his seat, he is!
He didn't like having his back to the open cliff!
In between dazzling views in five National Parks - Isn't God a masterful landscape artist? - we passed through Durango, Colorado. Though we'd never been to Durango and didn't have time for a good visit, I managed to convince my husband I needed to visit the Durango Sewing Center. The shop had a ad in a tourism brochure that advertised 10 percent off a purchase with just a mention of the brochure. It's another reason to always stop at the visitor's center in each state.

We stopped, though 15 minutes wasn't nearly adequate to take it all in, let alone decide what fabrics to buy!

Durango Sewing Center carries lots of modern fabrics that include Art Gallery Fabrics. I wasn't familiar with that brand, but I am now! I learned they're designed by the Art Gallery Fabrics owner, Patricia Bravo, and that all the 100 percent cotton fabrics are 200-count. I wanted every one of these Nature Elements prints, but settled on just one... the gray one.
"Nature Elements" collection by Art Gallery Fabrics
A clerk brought out a quilt made entirely of Art Gallery Fabrics and insisted I feel it. The hand is extremely nice.

I especially liked perusing this rack of one-yard pieces of various prints. That's "Wrenly" at the bottom right. I'd seen it on blogs and on-line quilt shops, but hadn't seen it in person. It's odd that I knew it was Wrenly before I checked the selvage to see if I was correct! See how much you learn when you read blogs?
Display of one-yard pieces
The next quilt shop I visited happened several days later, just after we'd ridden the Wine Train - in the Vista Dome car - a three hour-long trip from Napa to Calistoga and back. We started the lunch trip with champagne, and it kept getting better and better, including just about the best food we've ever eaten.

Check out these teeny, unbelievably in-credi-lious hand-made Grand Marnier dark chocolate truffles.

Ahhh, but I digress...

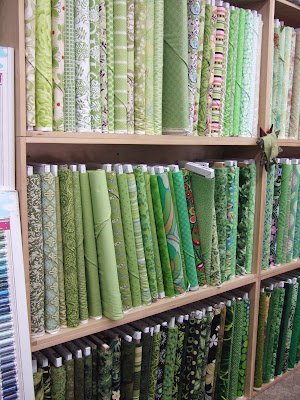
Quiltmaker in Napa, California. I don't know how I lucked out, but all three of the shops I visited on this trip had modern fabrics. I was in my element, gushing over all the bright, retro, fun prints, and wishing I could take home every single bolt in the Quiltmaker shop!  
I'm very much into lime these days. It's the new neutral according to American Quilter magazine.
 This is what I love to see!

A selection of "Sherbet Pips"

I have to thank the shop owner (above), and two customers, who did their best to keep my husband engaged and entertained while I looked around. When I returned to the cutting table with another bolt of fabric to add to a small, growing pile, he would groan and say, "Aren't you done yet?" Before I could reply, the shop owner had my back: "She's only getting 1/3 yard. That's not very much." 

One of the customers saw my selections and said, "I don't know how you can choose so quickly!" Believe me. It's a talent I've had to develop.

I spent only $25 on fabric which I was quick to justify as being much less costly than some of the bottles of wine we bought.
Wines from Reverie - Yes, that's "Ass-kicken" wine. The vintner's last name is Kiken!
It was wonderful to get out and see the natural beauty that the US has to offer. I hadn't been to some of those national parks since I was a kid - like 44 years ago - so it was especially nice to appreciate them more the second time around than I did the first.


And the ambience of Napa Valley is magical.


The ambience of home is comfortable. The dog, who was ably cared for by a close friend, was thrilled to see us again. Who knew that an eight year-old beagle- chow mix can leap three feet, vertically!?

And other happinesses...
  1. I won a giveaway from World of Charity Stitching and have a $50 gift certificate to Fat Quarter Shop that I must spend.
  2. I learned that Snowflake Medallion quilt and Life is a Celebration: Nature (the red bird in the tree wall hanging) have been juried into the Pacific International Quilt Festival. Though I can't attend the show, if you're in Santa Clara, California, Oct. 13-16... well, lucky you!
  3. I'll be teaching beginner quiltmaking lessons for another Stitchin' Mission - #25! - at a Lutheran church just down the street from me. It will be a large class (no class size limit), so that means many baby quilts for pregnant moms at House of Mercy here in Des Moines. If you're in the area, please join us! We start Thursday, Oct. 6.
  4. We're going to see these three little men and young lady very soon. I can't wait!
Austin (16 months)
Aesa (10 months); Tay (two, Sept. 28)
Celina
What happinesses are happening with you? Linda

Monday, September 19, 2011

Friendship Medallion

Continuing to sew strictly from my stash bins, I cut 72 print rectangles and 288 little squares to make part 3 of my Friendship Medallion quilt.  

I watched (umm, mostly listened to) four different movies on the Lifetime channel while doing lots of chain piecing.

To make my stash bin search and cutting easier, I've decided to make each part - each round - a different theme color. Though I'd like the next round to be blue, I don't have many blue prints. It might be purple instead.

Friendship Medallion, ready for part 4
Linda

Friday, September 16, 2011

Habitat Challenge

At the July meeting of the Des Moines Modern Quilt Guild (DSMMQG), 13 of us accepted the "Habitat Challenge" being sponsored by Free Spirit Fabrics. We received six fat-eights of Jay McCarroll's fabric, in earthtones, and had until our September meeting to make our quilted items.

Our challenge rules basically stated:
  1. Only print fabrics from the Habitat Collection could be in the piece.
  2. Fabric could be added, but only solids.
  3. All six prints had to be used someplace (front or back) on the piece.
  4. Our piece had to be between 60 and 120 linear inches.
  5. Anyone who didn't complete the challenge would have to pay $8 (the cost of six fat eights) into the DSMMQG treasury.
I'll be the first one to openly say that this was an extremely difficult challenge. I'm not accustomed to working with such busy prints and the color pink as an earthtone (?!) completely threw me. Initially, I had no intention of using the two pink prints on the quilt front. After three different design attempts, I worked out this one, unsewing previously made blocks, basically eeking out every bit of Habitat fabric I could for my quilt.

When quilting, for the first time I used a Pilot brand Frixion pen. I think most kids are familiar with this pen, as it's feature is that the ink is erasable. But what quilters like about a Frixion pen is that all the marks, no matter what color ink, easily steam away! You can see I tried red on this one. I've got pink, purple, and orange at the ready to try next time. Supposedly, after steaming the marks away, the chemical remains in the quilt until the quilt is washed. If the quilt isn't washed, and is exposed to a cold temperature, the marks reappear. Since I usually wash my quilts after binding them anyway, this isn't an issue for me.

My finished "Habitat Wash" quilt is 24" X 24". I quilted with gold-colored Aurifil thread in the top and bottom. Binding is a solid teal color.
Front of Habitat Wash, 24" X 24"
Now you get to see the back of the quilt! This is my first rejected design which I had to put on the back because I can't stand to waste fabric - and work!
Back of Habitat Wash, 24" X 24"
That pinwheel is foundation paper pieced, and I couldn't believe how bulky the center became with all those converging seams. I still liked that part though, but the Flying Geese... they can fly away. The design is too traditional for the style of these prints.

I always label my quilts. Always. I figure that someday my kids will inherit them. Whether they decide to pass them on or not, I've documented myself for posterity's sake.
Linda

Friday, September 9, 2011

Pressing Concern

I don't know about you, but I think it's difficult to know which iron to buy.

A dozen or so years ago I had a negative iron experience, so there's one brand I refuse to purchase. And not wanting to have to live with yet another disappointing choice, as with my last iron, this time I did my homework. First I did some online research. Then I referred to a late 2009 report listing the top three iron brands. Numbers one and two were (at that time) economically-priced Black and Decker models. Number three was a higher-priced T-Fal.

Then, I proceeded to stop at five different stores looking for the latter, and not finding it! I finally made a phone call to one more place, the JC Penney Home Store, and there it was. Even better, what is usually a $65 iron was on sale for $35!

The one I've been using until recently is this black one. I just popped over to our 24-hour Wal-Mart early one morning and picked one that looked good. It proved to be a very poor choice, an iron with a design flaw. The cord continually got caught in a space between the sole plate and the base. Every time I tugged the cord back out, the cord's rubber coating shredded. The inevitable happened. A week ago there was exposed copper wire where a piece of rubber was gone. Though I wrapped black electrical tape around it, I knew it wasn't safe. Besides, the iron never removed wrinkles. Whether used with steam or dry, or even with a spritz of my homemade starch, I couldn't get fabric to lay smooth. The old iron was 1200 watts.

My new T-Fal iron is 1400 watts. I don't know exactly what about the high number makes it better, but I can tell this iron has more "umph" on wrinkles. I can use steam on three different settings, or press without steam. Best of all - in my opinion - after eight minutes the iron automatically shuts off. This is good because when I leave my basement sewing room I have seven plugs and switches to unplug and shut off. If I happen to miss unplugging the iron, I have a little piece of mind.


I dislike ironing clothes and put it off as along as possible, But eventually I get to it, touching up after tumbling in the dryer, or  ironing particularly those clothes that have dried on the outdoor line. Maybe this little "cord-away system" feature will help.


As for pressing fabric?  I'll do that any day!
Fabric: "Wild Garden" by Dan Bennett
By the way, did you know there's a difference between pressing and ironing? If not, here's an enlightening blog post by Lee of FreshlyPieced with some helpful information. Linda

Thursday, September 1, 2011

My "One Block Over" Block Tutorial

Since September is "my month," today is the day that 11 of my fellow One Block Over block-makers receive a parcel from me. They're getting fabric and instructions for making a strip-scrappy block adapted from here.

Here's the tutorial for making these blocks. I'm happy to share it with you too!

Paisley Panache, High Society Collection by Anthology
The only thing you won't get in this tutorial is the fat quarter of fabric I mailed with their instructions! They'll use this Paisley Panache print to choose color-coordinating scrappy strips.

I recommend choosing:

  1. a favorite multi-colored print
  2. strips to coordinate with it
  3. background fabric
When you're finished making the blocks, you can decide how to use the multi-colored print as: additional blocks, sashing or borders.

To make three blocks approximately 8" X 12-1/2" (unfinished), cut:
  • 3 - 8" X 14-1/2" rectangles for background
  • 3 - 1-1/2" to 3" wide strips, at least 16" long
Align a ruler along the length of one background piece, allowing at least 1" of fabric on each edge. Cut.

Sew to insert your selected stash strip between the two background pieces. 

Press seam allowances toward the print strip. Trim to remove strip ends.

In random widths from 1½” to 3”, cut straight across the width of the fabric to make 5 to 6 short strips.

Repeat the previous steps with your two remaining background rectangles and two different print strips. For greater interest, change the angle of the first rotary cut of each background piece.

In a pleasing side-by-side arrangement, mix the short strips to make three blocks. Note that I've aligned the strips along the bottom edge. When laid side-by-side, and before sewing, my blocks ranged from 14" to 16" across.


Variety is good! Two rectangles have six strips; one rectangle has seven.


Sew along the short sides to join the strips. Press seams open as shown.
back view
front view
Trim only to straighten the uneven strips. Don't do any squaring-up... yet. 

To be completely honest, I haven't made any more than these three blocks. But I do know I'll make more sets. It will be fun to see the variety of scrappy prints in the blocks I receive from my One Block Over buddies. At that point, I'll decide how I'm going to put them all together. I've got several ideas in mind and I'll be sure to let you know. Linda

LinkWithin

Related Posts Widget for Blogs by LinkWithin