I just spent a full week in Kansas City, visiting family. I stayed with our daughter, hubs, and two teenage grandsons, while also getting to visit with our son and two 11 year-old and teen grandsons, my Dad, sister/BIL, and two great-nieces - pretty much a sweep of family! I had a great time with everyone, enjoying every moment of being with them. We don't do this often.
Also while in KC, I wanted to be
sure to visit
KC Maker Studio and Fabrics, a shop I follow
on Instagram and from where I get Painter's Palette solids. I met KC Maker Studio owner Pat at QuiltCon in Atlanta, and have jumped on her unexpected one-day sales of PP solids (watch for them on IG). I spoke with Pat at the shop and learned she has signed a contract to be a vendor at the next three QuiltCons, in Raleigh (2026), Atlanta (2027), and who-know-where in 2028. Even
she doesn't know where that show will be.
Let me just say that KC Maker Studio is pretty much the largest quilt shop I've ever been in. And though I've been to Hancock's of Paducah, by comparison KC Maker Studio has the most extensive variety of fabrics (not just quilting cottons), and notions I've ever seen in one place.
This was my first impression walking in the store. I had to stop for five minutes to take it in.
I tried to capture it all in a panorama photo, but even that doesn't do the shop justice. It's simply BIG!
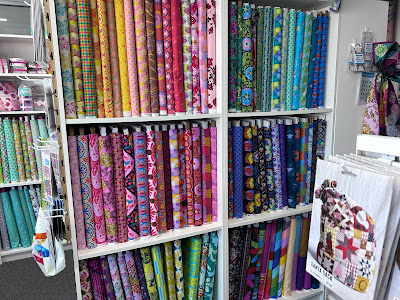
I was blown away by the fabric collections, beginning with Kaffe Fasset at the front.
Both sides of the tall aisles were full of Kaffe. Though I'm not a Kaffe lover myself, I could sure appreciate the beautiful view!
So much Kaffe color!
Then there were the Tula Pinks. Again, I'm not a fan, but was impressed by color.
Here are Anna Maria Parry fabrics.
Marcia Derse fabrics.
Alison Glass fabrics.
And then I looked up. Fabric as far as I could see to the back wall! To give you an even better understand of the store size... the women's bathroom has
three stalls! 😀
The opposite (left) side of the store repeats the size and structure of this right side (!) with the left side stocking wide backs, canvas, knits, and garment patterns. Seeing it all was overwhelming.
Being a linen-loved, I was delighted to see how much Fableism she stocks. If I'd known what I wanted to make with it, I would have bought some.
In the end, though I meant to visit the shop only to browse (Who was I kidding?) these are my purchases:
- 8 ½" X 11 Ultimate Appliqué Freezer Paper - for foundation freezer paper piecing
- brown .005 micron pigma pen - for marking seam lines when using my Inner City template
- 4 spools of thread - 1 Aurifil and 3 Scanfil (Scanfil is my new favorite thread)
- a skein of #2 cotton yarn - for making a crocheted amigurumi teddy bear
- and, fabric:
- 2 yards of a wideback for the Posh Penelope quilt I'm working on
- blue lollypop print - Ruby Star, Eye Candy, to make a Cielo Top
- ½ yard pink - Benartex Sunny Day by Christa Watson
- ½ yard pink/aqua stripe - Michael Miller Fly By Butterfly
The pink and striped pieces are mean to go with the Pick-a-Decade Challenge Quilt I've just started.
I recently finished this atomic-looking 20" block. I had thought to surround the teal and pink circles with bias tape, but that was a big fail. I ended up making circles, pillowcase-style, so all the circles have a turned under edge. No raw edge appliqué.
I made the pink circles first, with white fusible on the back (sew right sides together; clip raw edges of the circle; slit the interfacing; turn right side out) press to fuse onto black fabric; machine appliqué, then make a pillowcase circle with black fusible on the back. Fuse and machine appliqué the double-circle to a background of Oyster Painter's Palette. Whew. It worked. I achieved the 1950s vibe I was going for.
Anyway, the pink print and stripe will work into this project nicely. I don't know where at this point, but having these prints gives me options, even if it's to use the stripe as binding.
About the threads I bought... At QuiltCon, I bought a three-pack of Scanfil thread - 50-weight/2-ply - that's made in the Netherlands. I love it! It's fine, practically lintless, and machine pieced beautifully in my recently finished Diagonal Scrap Quilts. It's also organic, if you're into that sort of thing. The spool itself is wood. So, seeing all the colors on a store shelf made me happy.
Thread Trivia
KC Maker Studio charges $9.29 for a spool of Scanfil; and $15.95 for a spool of Aurifil. I thought to do a price per yard comparison.
- Scanfil - 500 yards is .0186 per yard
- Aurifl - 1422 yards is .0012 per yard
- Scanfil is .0074 per yard more expensive than Aurifil.
- Scanfil is 66% more expensive than Aurifil.
- If Aurifil was priced the same as Scanfil, you'd pay $26.45 for a spool of Aurifl.
I will continue to use Scanfil - it's that nice - and I'll keep using Aurifil too.
After an hour or so at KC Maker Studio - I could have spent much longer! - I met up with my friend, Carla. She and I met 16 years ago through our blogs, and in September 2010 (when I lived in Iowa) we met for the first time in person in KC! I blogged about her
HERE. She blogged about me
HERE. Maybe you remember Carla when she blogged at Lollyquiltz.blogspot.com?
I treasure our special friendship. Even though we haven't seen one another for about six years, when we're together we pick up right where we left off and could talk for hours and hours.
As wonderful as it is to get away, it's also good to return home. I feel reenergized and invigorated about getting to work on projects, though
which project is the biggest dilemma. I want to keep going on the Pick-a-Decade Challenge;
and make eight Posh Penelope blocks to meet my July self-imposed quota;
and make that Cielo Top;
and begin crocheting an amigurumi "Cuddle Me Bear;"
and do some diamond painting.
There's nothing like jumping in with both feet, right? I can do it all! Linda


