 Since receiving Christina Cameli's (afewscraps) new book "Wedge Quilt Workshop," I've been itching to play with wedges. My interest in sewing wedges was piqued after watching Christina's MQG Webinar (Wedge Quilts Go Modern, July 2012 - accessible only to MQG members) about using 9-degree and 10-degree wedge rulers. So when her book came out, I was the first in line to get it!
Cutting out and sewing was easy. I used my Marilyn Doheny 9-degree wedge ruler, purchased in 1989! Christina's book has lots more ideas and options than the two-color, 12 inch-long wedges I made.
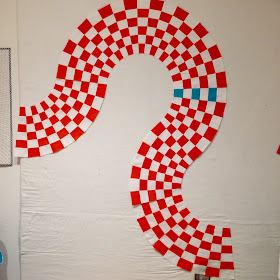
It was figuring out what to do with those wedges that challenged me. Many different iterations appeared on my design wall. I first made wedges using a combination of white and Painter's Palette Carrot. Then I made some wedges with white and Kona Punch. As the design progressed, I began alternating those colors which may be difficult to see in my pictures.
Besides playing with the design, I auditioned other colors with the wedges. Besides this poppy red, green and gold made appearances. No good.
Then I tried in Kona Breakers. It seemed right.
I switched the design again to make circles, and cut a piece of bias using Kona Breakers. I liked the bias accent.
This is how I applied the bias to the inside of all the wedge circles, while simultaneously appliquéing to the circle center fabric which is Kona Silver.
The design evolved. I really liked the idea of the Breakers color "pouring" through the whole design. However, Breakers as the center color seemed a little heavy.
So I moved it to the bottom. It's as heavy there, but I'm considering adding another small partial circle on the middle or upper right. And of course, my quilting will impact the overall design. I'm thinking to use turquoise-colored thread to quilt some accent circles.
In case you're interested to know how I applied the outside edge of the circle wedges to the background, here are a couple pictures. I cut 1-1/2"-wide bias strip of white fabric, and used a quarter-inch seam to sew it to the outside wedge circle.
I folded and pressed the bias to the back.
Then, using an appliqué foot and straight stitch, I sewed the wedge to the background. On the back of the quilt, I trimmed away the excess backing, and any parts of wedges that were covered.
Because I don't have any big hunks of yardage from which to make a quilt back for this 54" X 70" wedge quilt top, I'm piecing a back using this free quilt pattern called "Bookmarks". Nothing uses up stash fabric more than making two quilts as one!
Also, with all that wedge-piecing, I sewed more leaders and enders from my basket of 1-1/2" (unfinished) squares. Though the pile number says 83, I actually have 88 16-patch blocks. I have a quilt design plan for those too!
Linda


Oh, my goodness, I am so impressed! I can feel the electricity from here!
ReplyDeleteThis is all so fun! I think you're a natural with the wedges!
ReplyDeleteWhat an eye catcher! Can't wait to see how you quilt it.
ReplyDeleteBeautiful. Love the touches or teal with the red and orange
ReplyDeleteThis was fun to watch you do..... Thanks for showing us.
ReplyDeleteLooks to be excited about here Linda! The wedged circles look amazing and I'm certain your quilting will take it to another level! And I also want to see what you have planned for your scrappy 16-patch blocks!
ReplyDeleteThis looks like so much fun! And of course the colors are totally you.
ReplyDeleteI loved reading all the process of this quilt--watching the "waterfalls" of the wedge/checkerboards move across the background. You make it all sound so easy, you know, even though I know you probably did way more scooching around that you show us here. I've got to stop traveling, so I get to playing--you make me itch to come home and get going on sewing! (I'm in San Antonio TX right now.)
ReplyDeleteThank you so much for the really helpful hint for the edge of your wedge Linda. I made a wedge about 3 years ago, and its languishing in the cupboard waiting to be basted to a background. Your way is so much better then what I was going to do, so thank you!
ReplyDeleteThis is such an amazing design, I love the bold graphic structure to it!
ReplyDelete